Newbie and The Rocking Engine

Home Model Engine Machinist Forum

Help Support Home Model Engine Machinist Forum:

This site may earn a commission from merchant affiliate links, including eBay, Amazon, and others.

Foozer

Well-Known Member
HMEM Supporting Member
Joined
Nov 26, 2008
Messages
1,181
Reaction score
83
Location
Camano Island, WA
I say newbie for every thing i do on a lathe is new to me,

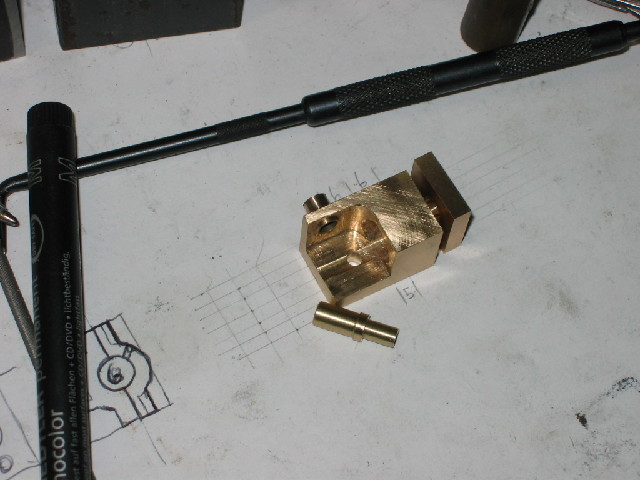
So always liked that little thimble/rocking engine, and now that the plans showed up on this board I'll give it a shot and build one to plan.

Figured I start with the hardest part, the Axle? That is tiny (to me) for sure. Got it cut down and just ran the tap in the end, another "tiny" adventure. managed not to break the tap so with that semi complete its just a matter of figuring out how to do the rest of the pieces. A weekend project? someone said. Gonna be one long weekend.

Zee try this one, it'll challenge you :)


rocker-a1.jpg
 
Two whole pieces complete, weekend project?

The axle and crankdisk, small tiny, need new glasses

First shot drilling the holes in the disk with my fancy dancy cross slide
thing-a-ma-bob, works

Second cutting off the excess to which I droped the other piece and spent 20 minutes looking for it. Of course it found that little space between to lathe stand legs and floor bolt done bracket. All nice and cozy it was too just sitting there watching me hunt

Third shot facing the disk down to finish size, Yes there is a part down in there

Final 2 little pieces. Photos dont do it justice. that is a small little engine.

Robert


rocker-a2.jpg


rocker-a3.jpg


rocker-a3.jpg


rocker-a4.jpg


rocker-a5.jpg
 
zeeprogrammer said:
I guess I'd better get an order for metal ready.

Order metal? It looks like you could machine this engine from crumbs and floor sweepings. Now I wanna build one, too.
Nice work Foozer!
 
Making really tiny parts for tiny engines requires a different mindset and some specialized tools, many of which are self-made or appropriated from other endeavors.

Foozer's dropped part is a case in point. Before I got smart (well, smarter anyway) I managed to lose a bunch of parts while parting off in the lathe. In fact, there are probably enough tiny parts in the swarf behind my lathe to make several engines.

If the part you're parting off on the lathe has a central hole, it's easy to stick a piece of soft iron florist wire in the tailstock chuck and insert it in the hole. Then, when the part pops free from the parent stock it's trapped and held on the wire. I use the florist wire because it will break easily should it somehow be grabbed by the spinning part - although I've never had that happen. I suppose that (soft) copper wire would work as well.

But what if the part doesn't have a central hole? I took a clear plastic pill container and fitted it with a shaft that can be grasped in the TS chuck. In use, the open end of the container fits over the spinning parent stock and part. A narrow cutout in the side of the container allows the (miniature) cutoff blade to reach the stock. Now, when the part separates it's trapped in the pill container.

Tweezers are essential when handling minute parts. However, it's easy for a part to pop loose from the tweezers (with a heart-stopping "sproing") and disappear on the other side of the shop.

Coating the tips of the tweezers with liquid electrical insulation can help. It's spongy and slightly compressible when dry and helps to get a good grip. However, the real solution is a jeweler's tool - pearl tweezers. These have spatulate, slightly hemispheric tips coated with a plastic. They're meant for getting a good grip on spherical pearls and the plastic prevents scratching the gems. They just happen to be perfect for gripping small parts securely - no more "sproings". Oh, and they're just the thing for manipulating ball bearings and the tiny decorative spheres that figure into some miniature projects.
 
Vernon said:
Order metal? It looks like you could machine this engine from crumbs and floor sweepings.

The flywheel is 1.25" I only have aluminum that big. Also nothing in a rectangular shape large enough to turn down. (Besides...sometimes I say these things as a way to justify getting more goodies.)

Marv...I think you also mentioned the tip/trick of using some cloth or thin pillow to catch a dropped part so it doesn't bounce away. Not that you want that near a spinning chuck.

Keep the wire short and don't wrap it around a finger.
 
Aluminum is fine for the flywheel. That's what mine uses.

Do you have 1/2" square aluminum from the clamp exercise? You could make the cylinder from that and use a steel or brass piston/conrod.

The bearing needs to be soldered in place. (There's not enough surface area to use Loctite effectively.) Ordinary soft (plumber's) solder is perfectly adequate. If the bearing isn't a good press fit in its hole, I recommend an alignment pin of aluminum (solder won't stick to it) to get it square to the frame/cylinder.
 
zeeprogrammer said:
Is that what I need eh?
I guess I'd better get an order for metal ready.

Here's a link to Stew's thread where the plans are...

http://www.homemodelenginemachinist.com/index.php?topic=5461.0

Its tiny pieces, even sitting on the silver dollar doesnt really express the size.

Plus your gonna have to grind down a piece of HSS to do some turning. Used a piece of 1/4 tool stock and just ground the tip down thin and pointy. I drilled and tapped the bolt hole first while the stock still had some meat to it. Used the thin and pointy bit and brought it down to size a few thousands at a time. Too much of a cut and the part would probably just get all twisted up and snap. Really kept an eye on the DI's so as to not over run the cuts. Just so small these old eyes loose focus. One of the times trust in the gauges plays its part.

Go for it, you'll do better than I at it, Advice? SWEEP the floor first. :)
 
mklotz said:
The bearing needs to be soldered in place. (There's not enough surface area to use Loctite effectively.) Ordinary soft (plumber's) solder is perfectly adequate. If the bearing isn't a good press fit in its hole, I recommend an alignment pin of aluminum (solder won't stick to it) to get it square to the frame/cylinder.

Good advice, will save me from the OOPS when that time comes

Robert
 
Flywheel time.

Plan calls for a 1.250 inch dia piece. Hmm dont have a piece that fits the requirement. Do have a piece of bronze bearing that has an OD tad greater, do have some AL that an OD a tad smaller. A two piece adventure.

Made the rim, OD 1.250 inch ID 1.050 inch
Made the web OD 1.055 inch (heat rim, chill web press together?)

Drilled holes in web, changed number and size to account for smaller dia web.

Brides cooking a chicken sitting on a beer in the oven, seems like a good time to pop the bronze rim in :)

Robert


rocker-a6.jpg
 
Mmmm... Beer Chicken and Bearing Bronze...interesting combo. ;D

Post pictures when you're done! (The flywheel, not the chicken. ;D )
 
I think that little bugger is contagious. I started one this morning well two why not. I/we have two of everything done except the cylinders. The blocks are cut need to get the 4 jaw set up Yes took a few pics need to get them into the computer and onto photo bucket.
Even thought mini mill is still mid build on the cnc the x-y is functional so wrote a quickie g code program for the fly wheel hole pattern. then did the drilling manually After Marvs comment I changed the plain bushing to a hat bushing see how that works.
My son helped quite a bit this afternoon so he will likely get the second engine. will probably start a new thread as not to hijack this one.
Tin
 
By the way the sound of this thread you've all caught a dose of

_________________________________________________PROJECTITUS

Its more contageous than swine flue.

Have fun

Great tips on handling small bits Marv thanks for sharing

Stew


Yep - PROJECTITUS is the correct word... I caught it as well!

After a late start yesterday (we had a long power outage & I had to do a run-around to get some suitable small drills) I finished the block, bush & shaft.

I did deviate from some of the original measurements a bit to suit my metric tools though :) - and made a separate cylinder head.

Here is where I left off last night:
smaller-IMG_1134.JPG


That little bush now officially became the smallest part I have ever made ;D
Will post build pics in another thread - for now I have to go and finish it.

Regards, Arnold
 
Tin Falcon said:
I think that little bugger is contagious.

My son helped quite a bit this afternoon so he will likely get the second engine. will probably start a new thread as not to hijack this one.
Tin

Good father son activity,

Can post em into this thread, then I wont have to hunt down what its supposed to look like. Keep the contagion in quarantine as it were.
 
arnoldb said:
Yep - PROJECTITUS is the correct word... I caught it as well!


That little bush now officially became the smallest part I have ever made ;D

Photos don't really do it justice do they, that is a small piece when its in hand. gets even smaller should you drop it
 
Photos don't really do it justice do they, that is a small piece when its in hand. gets even smaller should you drop it
I spent a fair bit digging around on the floor... If the little buggers would just stay put, but NOOO - they have to fall!! :big: :big:
Lesson learned though - next time I try something this small, I'll have a parts bin presticked to a work surface!

Regards, Arnold

 
Tin Falcon said:

Take two shots of Tequila and . . .

Hopefully the contagion spread wont develop into fatalities as will be seen here,

I thought all was center, really I did, OH you mean subtract half the edge finder dia from the . . .

This time around used the indicator, at least I think I am. Rotate the part and get a max run out in the 1-2 thou range. Could fiddly forever but that's within my comfort range for now.

Drilled the holes, 6 this time, they fit. Set it in the soft jaw and as I hate turning that handle I used the old "Dont you wish you had one" Cross slide power handle turner. 6 minutes later she be all nice and even.

Shot showing the failure on the right, could'a sworn everything was centered. The better flywheel on the left. My lunch underneath :)

rocker-a7.jpg


rocker-a8.jpg


rocker-a9.jpg
 
The flywheel looks good. I've always liked flywheels that use different metals or are put together rather than being a one-piece.

My poor eyes can't tell what's wrong with the one on the right. Are the holes shifted left a bit?

That's at least the 2nd time I've seen that brand of sardines. (I trust it's a different can.) I wonder if they're available around here?
 
Back
Top