Making an internal threading tool

Home Model Engine Machinist Forum

Help Support Home Model Engine Machinist Forum:

This site may earn a commission from merchant affiliate links, including eBay, Amazon, and others.

Wannabe2

Member
Joined
Oct 23, 2007
Messages
22
Reaction score
0
Does anyone have any ideas on making an internal threading tool for threads over say 1/2" that will cut up to a shoulder.
I've looked at the insert types but they are not cheap and the inserts not easy to come by. Have tried an elcheapo carbide one but it flexes and the carbide chips if you look at it the wrong way.
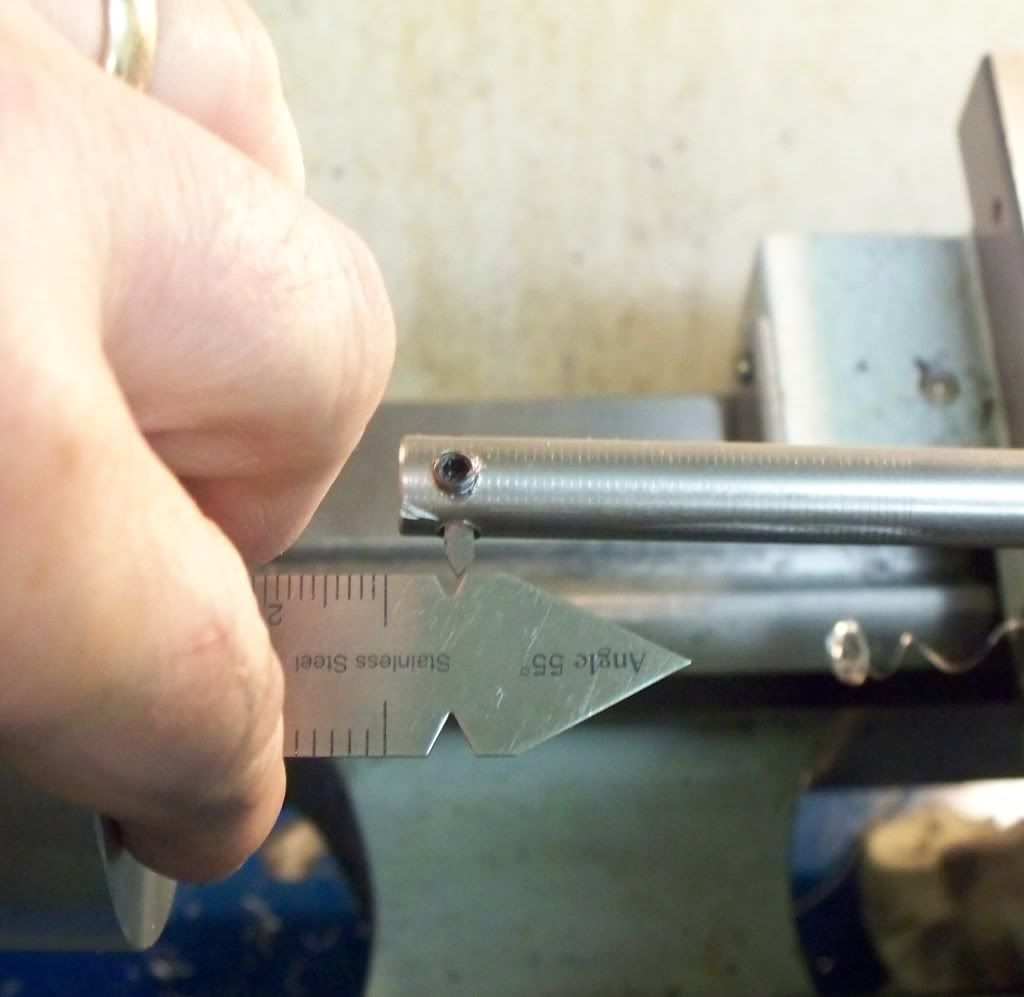
I would like to make one that uses a round HSS insert that is removable for sharpening and length adjustment. Trouble is I'm having troubles figuring out a way to hold the insert reliably and not weakining the bar too much. I did make one up by silver soldering the insert in but this makes it difficult to sharpen and doesn't allow for length adjustment so I'll be in troubles after a few sharpenings.
 
I always use a hand sharpened HSS tool bit to cut threads. When cutting blind internal threads I start from the inside & bore out of the hole. You need to run your lathe backwards & have the tool bit upside down to get right hand threads. ??? This will eliminate the chance of crashing at the bottom. :)

Good Luck!
 
I would use a say 3/8 boring bar made for HSS square bits and grind the bit to a 60 degree angle use the fish tail as a guide.
To cut to a shoulder use the end of the BB that is cut at a 45 degree angle.
Also it is not really best practice to go all the way to a shoulder you should curt a relief groove a couple of threads wide.
Tin
 
Brazed Carbide Boring Bar sets are very inexpensive.
I paid $20 for this set. Compare that to the cost of an internal threading
bar and you can buy a lot of boring bar sets!
toolin2.375%20%20Boring%20Bar%20Set.jpg

The shanks are 3/8" If I need an internal threading tool I find the shortest bar that will
reach the depth and grind the carbide to a 60 degree point.

Rick
 
For any boring, always use the largest bar that will work in the hole. As Tim says, use the 45° end. The bit is ground to 60° by grinding all the material of one side and the V shaped point is just barely longer than the depth of thread. If you are doing this on different thread pitches, you have to grind a tool for each pitch.

You have to use an indicator to show the position of the carriage as you approach the bottom of the hole. If you are feeding in with the compound, you have to do the math to calculate the carriage position relative to the compound. If you feed straight in the carriage will always stop at the same point.

Use the slowest possible speed or even turn the lathe by hand and you can have the last thread touching the bottom when you reach full depth. My lathe has DC drive so my minimum speed is zero.

This is not something that you want to do as a routine operation. The only place I have had need for it is when the hole is too shallow to get more than two or three threads.
 
as a beginner I splurged on a carbide inserts holder for internal threads because its convenient; its not just challenging it s a pita to grind as so much material must be removed (when grinding from solid). While i can blame it on beginners folly, i do continue to enjoy the convenience :D. Being more knowledgeable now, if i had to do it over I'd grind a hss bit and place in the end of a bar; either existing or made if it had to get into some tight spots........this is all for larger threads, the smaller ones are done by hand ground hss tools. The other idea is to take an older larger tap and grind everything away except on cutting tooth toward the end.

blind holes are done as Mike describes, headstock to tailstock.
 
Mike N: I've heard of that method of turning the bar upside down and running in reverse but haven't tried it. My chuck is the threaded type so I might run into some problems with that but I'll give it a try.

Rake60: I never thought of doing that. I'm looking at more like AU$50 over here for a set but as you said it's still way cheaper than the AU$100 I've seen these internal threading bars selling for. Originally I toyed with the idea of getting a bit of carbide out of an old masonary drill and silver sildering that to a bar and grinding it up. The trouble I've found with carbide though is that one wrong move and it chips.

Tin Falcon - Stan: Sorry I didn't explain that too well. I do cut a relief groove slightly larger than the major dia at the bottom of the bore. Learnt that one the hard way after I crashed the cutter into the end. I then setup a carriage stop so the cutter is slightly short of the bottom and use that as a guide as when to stop.

I had a go at making version No.2 today and I think it's going to be ok. I have a good supply of broken No 2 centre drills so they were used for the cutter. I took a 16mm (5/8") square piece of mild steel 120mm (4 3/4") long and drilled a 30 deg hole for the cutter on one end. An M5 grub screw was then used in a hole at 90 deg to the cutter hole far enough down the holder shank so the grub screw didn't protrude. I ground a small flat on one side of the cutter for the grub screw to mate with. I then trimmed the end of the holder about 1/3 into the cutter hole so the cutter would be overhanging the end of the bar then turned the bar down to 12mm (1/2") for about 35mm (1 1/2"). Finally I ground the appropriate angles on the cutter. Hope that makes sense.

This design should be good because I only have to have one holder and can grind up cutters for 55, 60 deg or whatever purpose I need. Since I seem to have a continual supply of broken No. 2 centre drills (another story) I can put them to some use.
I gave it a test run and it seemed to work well, no flex. It's far better than anything I've used to date anyway.


I make my own threading tools from silver steel (believe this is drill rod in USA?) and whilst the one in the picture won't go up to the shoulder, I have one that does, just can't find a picture at the moment but the basic difference is It was made as the the one in the picture, then ground off the overhang end. Hope that makes sense?

This way I can do 55deg as well as 60deg depending on the thread type. Works for me......

fowlerandmills21082008047.jpg


Hope this helps Mike.
 
Just had a look on your website Mike. Lots of good stuff. Pic No. 5 on the "Home Made Tools" section shows a boring bar that will cut up to a shoulder. That's basically what I've done. Only differences are that I've used a round cutter where you have used square. The other difference is you have your grub screw at the top. I've put mine at the bottom. I didn't think of putting it at the top.
 
Hello Wannabe2

Its a poor job when someone finds one of my pictures quicker than I can! Thanks for the comments re the website. Its nearly a year old (a couple of weeks time..). It covers my first proper year as a model engineer. Sometimes it doesn't feel like you are getting anywhere..then you look back and realise you haven't!!

Its good fun though and keeps me sane. Good luck with your projects and don't forget to share.....its the main way I am learning....to see others work.

 
Metal Mickey said:
Sometimes it doesn't feel like you are getting anywhere..then you look back and realise you haven't!!

It's not just me then Mike
sad5.gif


Wanabe2, having recently taken my first tentative steps into the world of single point threading I have to agree that the carbide tipped tools I've tried break if you cast them an offhand glance, must try some hss methinks.

CC
 
We should all remember, every day, that we are doing this for enjoyment. Most of us don't have the gages to determine if we have a H1 or H3 thread and it doesn't matter. If your threads fit together nicely, it is correct. If it is sloppy fit, learn from you mistake and try to do better next time. When your fun time is no longer fun, it is time for a break.

If you ask a question and get six different answers they may all be correct or they may all be wrong. As long as your safety isn't at risk, you can try them all. If you ruin some material, so what. You don't have to get the job out the door by quitting time. That is why we call it a hobby.
 
I get on well with grinding my own tools and I gained so much confidence and knowledge with Jose F. Rodriguez DVD on how to grind tools. If you want a link http://mikes-models.com/reference.html half way down to Chronos who stock his videos. If the grinding one is not listed they do stock them, but don't list all his titles all the time.

His DVDs are not 'polished' but its the content and visual confirmation that I find of greatest value. I admit to running them at a higher speed..............
 
You're not wrong about keeping the sanity although some people would disagree with that statement with me ;D
Call me deranged but I get a sense of achievement from making my own tooling plus I learn a lot while doing it. Grinding up HSS phases some people but as long as you have a think about what you want before you start, be patient, plenty of dunking in water to keep it cool and prevent burning and a light hand as you get near the required shape it's fairly easy to achieve a good result. The added bonus is if you have a moment of indescretion all you have to do is regrind it. Carbide and indexable tooling is an ongoing cost whereas HSS is a one off cost. Broken tooling can always be reground or reused.
Ever since I started machining I've had trouble with internal boring and threading mainly because of the incorrect tooling. I know it's "a poor tradesman that blames his tools" but I don't claim to be a tradesman machinist ;D. One thing I learnt is that the elcheapo carbide tooling is a waste of money.
The last straw was recently I was trying to cut an internal 5/8 -14 BSP thread. The elcheapo threading tool was flexing, the carbide chipped and I was having all sorts of problems. I got the threading done but decided it was time to get all this sorted out. I don't have enough hair as it is without losing any more.
Also had a go as Mcgyver mentioned about grinding a tap up. I had a broken 8mm tap so ground it up to use in smaller diameter holes. It still needs a bit of tidying up yet but it's very rigid. Excellent idea.
 
If you see the little stainless steel thread cutting gauge in my photo for Whitworth threads all you need to do is grind your HSS to the shape in the form tool! Its easy really just make sure you clearance angles are there (I set my grinding rest, so it automatically sets clearance etc.)

One thing Jose states is that people spend too long grinding. If its just a case of sharpening then if your spending more than a minute or so, your wasting time and tooling. Doesn't count obviously when you have a HSS blank and want a particular shape, but even then its not a long time.

Mike


Latest posts

Back
Top