Lobo Pup Twin 1.6 cc diesel

Home Model Engine Machinist Forum

Help Support Home Model Engine Machinist Forum:

This site may earn a commission from merchant affiliate links, including eBay, Amazon, and others.
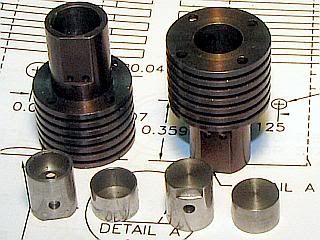
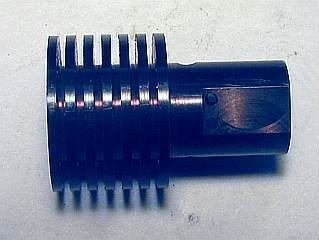
The cylinders were turned up same as the Mk1 and the porting cut into them. Then they were rough lapped to about 0.0005 under size. By careful planning I was going to cook a brisket in a slow oven for about 5 to 6 hours today to ward off starvation for a few days. So the oven was set to 550 deg F and I went about cleaning all traces of oil off the cylinders. Oven was up to temperature so the cylinders went in the oven for 20 minutes to produce a blue/black oxide coating. In the intervening time I prepared the brisket for the oven. Remove the cylinders and replace with brisket and turn down the oven temperature.

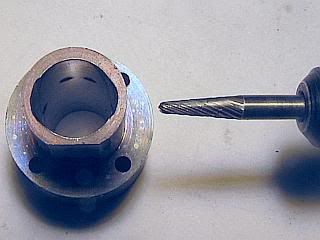
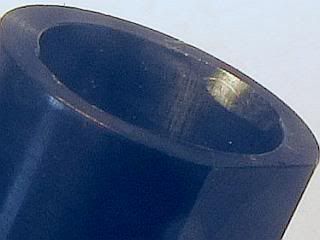
I turned up a dummy piston to an easy slip fit in the cylinders and made up the wrist pins. I knew that the connecting rod was going to hit the bottom of the cylinder skirt. There are three options. One is to countersink the bottom of the skirt with a 60 degree included angle countersink for about 0.050 inches. Second would be to just reduce the length of the cylinder by 0.050 inches. Both of these options leave the bottom of the piston skirt unsupported as it passes bottom dead center. This would not be a problem as there are only very small side loads near BDC, but it just never seemed very neat to leave it that way. The third option, which is what is on the drawing, is to relieve the bottom of the cylinder with a burr with a notch about 0.150 wide by 0.050 deep at about 30 degrees. That is what I did. Carbide burr in the rotary hand tool and 10 minutes later they were finished. The reason for the dummy piston was so I could check that the rods were not touching. Just hold the cylinder in place on the crankcase and turn the engine over. When the rod quits touching, take off an extra 0.005 or so for safety and it's done.

One other thing that could be done is to round the edges of the rectangular cross section of the rod. This almost gives enough clearance. I did not do this.

All that remains on the cylinders is the final lapping and polishing.
Gail in NM


Cyl1.jpg
Cyl2.jpg


Cyl3.jpg
Cyl4.jpg


Nice Job Gail!

Thanks for another very nice build.

And thanks for the detailed explanations.
 
thanks for sharing, nice and useful as always!
 
Thanks Kevin and Ariz.

Dean, the brisket is good. I did not get to do more than sample it yesterday as I got a better offer for dinner. Went to dinner with my son and his family. Got to see two of the granddaughters that I don't get to see very often. But the brisket made for a fine lunch today.

Gail in NM
 
You sound like you have a similar situation to my own, George. Just me and the dog here, so cooking for a few days ahead makes sense. Works for a middle-aged-pushing-ol'-codger kind of guy, like me.

Sunday is pizza day. The dog likes that, too.

Dean
 
Gail,

Good Brisket, Good Family and a Good Engine as well - not to mention your good dog. :bow: :bow: :bow: :bow: Thm:

Best Regards
Bob
 
Dean,
Your are correct. Just me and the puppy dog named Coot. He is the Young Coot and I am the Old Coot. I enjoy cooking and enjoy eating my own cooking so he and I eat quite well. At least I don't hear any complaints from Coot.

Thanks Bob. You are right about everything except not sure about the Good Engine yet.

Busy for the last few days, so did not get too much done on the Lobo. Just the cylinder heads. But all that leaves is final lapping the cylinders, then making and mating the pistons and contra pistons. I need them to make the compression adjustment screws and compression limiter. And,of course the carb, Then wait for a warm day for test runs.

So the cylinder heads is the only progress report. They are unchanged from the Mk1 version.
Gail in NM


Head1.jpg
 
The final lapping of the cylinders is done and the pistons and contra pistons are made and mated to the cylinders. The wrist pins are also done but not photographed.
Gail in NM

CylsPistons.jpg

 
It doesn't look like there could be to much to go on this one, Gail.
A great effort. How many engines did you actually end up making to get to this point?

Dean
 
Getting down to the wire, Dean.

Only the fuel system and compression limiters to go. Thanks for following along to keep me honest.

The limiters will wait until I loosen the engine up a little bit so I can feel the contra piston touch the piston easier.

I could cheat on the fuel system and steal the carb from the Mk1, but the weather forecast is for it to be to cold to try a test run until next week so I will build a new one.

With it partially assembled I ran it for a few minutes in the lathe for a few minutes at about 1500 RPM. Lots of suction and sucking sounds from the intake where the carb will go. Big improvement over the Mk1.

Gail in NM

Assy9.jpg
 
Dean,

I forgot to answer your how many Lobo's I built to get to this point. This is the second Lobo that is completed. I suppose that if you put all the spare parts in a paper bag and shook long enough another one would fall out. It would probably look a little strange with the changes that have crept in on the two versions.

I finished up the fuel system, so the Lobo Pup is ready to take it's first steps at howling next week. Test stand was covered in snow until about a hour ago. Warm enough for the snow to melt, but not warm enough for an old man to play engine games outside. It will probably be late in the week for the test run. Tuesday is the first day forcast to be warm enough and I have to spend the day humoring the MD's that keep me building toys.

Here is the engine with the fuel system installed and ready to go.
Gail in NM

Assy10.jpg

 
it is very very nice Gail and sure it will run smooth

you have completed another great build, many compliments :bow: :bow: :bow:

 
Gail,

Great engine. :bow:

Send it here, we have a week of over 30C days. :D

Best Regards
Bob
 
We'll be watching, listening, for a good bark out of it soon, Gail!

I thought you had built quite a few versions of a few of the parts for this. We all "get" to do some do-overs in this game.

I'll have to try the paper bag trick with some of the stuff in my rejects box. Ought to get a couple of "engines" out of that, at least. ; )

Dean
 
The Lobo Pup is alive and running. woohoo1

The weather man is still not cooperating with me. It is still about 5 degrees below my threshold of pain for playing with toys but I could not stand it any longer. Besides the long range forecast shows it being colder for the next week.

So off to the test stand. Full fuel tank and a almost charged battery for the starter and away we go. Open the needle valve about 1-1/2 turns and back off the compression on both cylinders. Hit it with the starter and the fuel jumps right up to the needle valve. Much better than the Mk1 which had weak fuel draw. Bring up the compression on the #1 Jug and it starts to show signs of life. Play with the compression and needle valve setting and it starts to unload the starter and make better noise. Still won't run with out the starter of course as there is nothing but drag coming from the #2 cylinder. Bring up #2 cylinder compression and it starts to run for 5 seconds or so without the starter. Everything is still stiff, but it is loosening up a little bit. I am still running it rich until things wear in a little bit.

The whole 10 seconds of run routine is repeated until the fuel tank is empty. It's a small fuel tank, less than a fluid ounce. Refill the tank and start over again. This time I lean it out a little bit and it runs on it's own. And the first problem shows up. The compression adjustment works loose. To keep it running smooth I have to hold the compression adjust lever in position by hand. This is probably means the contra piston is a little bit too loose and a new one will have to be made. I wont know until I pull the #2 jug off and inspect it but I am pretty sure. It takes less pressure to move the contra piston down with the adjusting screw than it should, and less than #1 cylinder takes.

Second problem is the needle valve spring makes the needle jump during adjustment. Close it a 1/4 turn and it jumps back an 1/8 turn when I let go. I probably need a stronger spring and a smoother grind to flatten the ends.

Third tank of fuel. I start it and let it run the whole tank out. My left hand is frozen holding the #2 compression adjustment in place in the slipstream. I smell of ether my fingers taste of castor oil and the starter battery is low so it's time to call it a day. Remove engine from test stand, clean it up and retire to the shop. Wash hands. They no longer smell of ether, but left hand still has little feeling other than cold. Wash hands again, this time with hotter water. Much better.

Time to remove the #2 jug and check the contra piston, and probably make a new one. And nake a new spring for the needle valve and maybe put a washer on each end of it to smooth it out.

It will be about another week before the weather warms up enough for another run. I will try to get video then. Could not do so today while holding the compression adjustment in place.

Gail in NM

 
Gail,

Congratulations :bow: :bow: Looking forward to the warmer weather and the, (by now), obligatory video.

Best Regards
Bob
 
Congrats Gail,
Can't you use a little blue Loctite on the contra to tighten it up a bit?

Tony
 
Alright Gail! I just knew you would have a good report for us when I saw the "Lobo" subject line.

It's hard to be patient, but I don't live close enough to come over and prod you. We'll just have to wait for the video. ; )

Dean
 

Latest posts

Back
Top