Lagging steam pipes

Home Model Engine Machinist Forum

Help Support Home Model Engine Machinist Forum:

This site may earn a commission from merchant affiliate links, including eBay, Amazon, and others.

tmuir

Well-Known Member
Joined
Oct 30, 2007
Messages
888
Reaction score
9
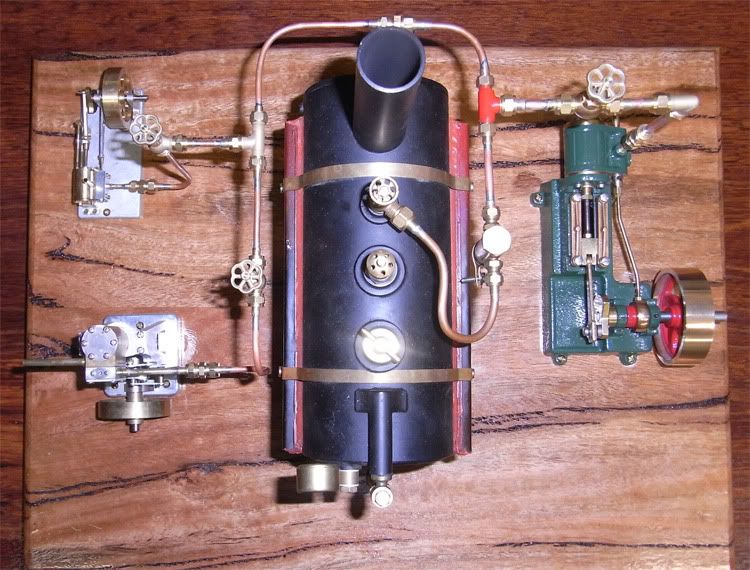
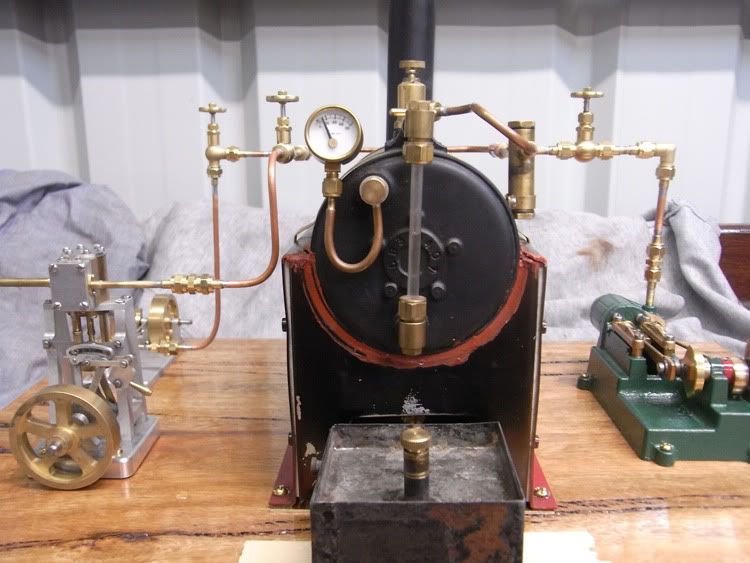
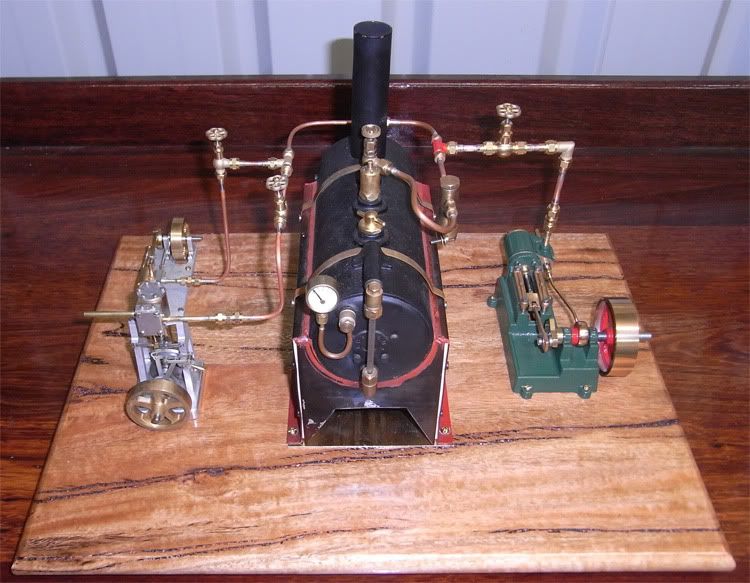
I've had gathering dust on my shelf for a while a few model steam engines and recently picked up a good quality second hand boiler.
I've spent the last few days plumbing them all up and after a couple of test firings I'm happy I have no steam leaks so want to lag the pipes, but I'm not sure what is the best way to do it.
What does everyone else use to lag their steam lines?


I did cheat, I didn't build these engine. The two engines on the left I got second hand for in trades and the PM research engine on the right I got cheap second hand as a machined unassembled kit.

steam_plant1.jpg


steam_plant2.jpg


steam_plant3.jpg
 
That's a great looking setup TM. I have seen several modelers use what appears to be white cording to lag steam lines. The cord looks to be about 1/16" diameter and is white in color, I suspect it can be purchased at a well stocked hardware store. Just one idea to muddy the waters. :big:

BC1
Jim
 
Yes I've been thinking along that lines, natural cotton or wool white string, just wasn't sure if there was something better.
 
The cord looks to be about 1/16" diameter and is white in color,
What is used is sometimes called butcher twine it is a small dia 3/21 strand twine made from cotton. 3 strands of 21 threads. it does comes from about 1/16" or in mm sizes even in the states. It is sold as a macrame string/thread. Most of the better stocked craft stores would have something like it. They are larger dia. so you can change the size to fit the pipes.

It is the same rope work that they do on ships railings, so and good fancy note book should have some ideas. They do some fancy monkey fists at the elbows and valve bodies.

The simplest form is ½ hitches around the pipe, with the hitch or knot part in a line along the bottom side of the pipe. When it is done they they paint them with a special sealer coating. to keep the dust out. As getting the dust and debris out of the rope is a pain. So painting is a must with the miniature lagging. More so with the rope/string style.

The other kind is a layer fiber glass insulation batting. In the states here a good source is frost king pipe wrap sold at all the big box home stores. the batting is about 2" wide and 20 feet long or so and 1/4" thick. You wrap the batting around the piping and secure with thread. Then you will need a thin light weight muslin or linen material . Seam tape or basting tape wide enough to wrap around the pipe and over lap the edges. it can be glued on or sewn as the old time pipecovers did. Again the seem on the bottom.

This is also sealed or painted to keep the dust and dirt out. The seams are all ways placed on the underside of the piping to keep the cleaning/repainting problem to a minimum.

The colors chosen generally reflect the in house color code or what the contractors has the most paint for ;)

I have also seen somebody that used the fiberglass batting and then electrical heat shrink tubing. Two important things with this method, is he said it took sometime to get the hang of it,as you had to have a lot of extra tubing to cover joins etc. And it took some practice to get it right as he started in the center and worked out to the ends of the pipe runs.

And it works better with threaded pipe rather than soldered piping of any type. I'm sorry I didn't get any pictures of it as he was gone from the show when I got my camera and had gone back to take some.

Edited to add missing sections:

*Asbestos/magnesia mud was used at the elbows, and valve bodies. The pipe sections were covered in formed blocks of the same material. Wrapped in what was called wild weave muslin (or in the old days a canvas like fabric.) so it doesn't unravel when torn.It was then dipped in wall paper paste to hold it in position. Then it was sown together. Can't remember what the type of stitch it was called but they had a special one they used.

When fiberglass became popular they used sections and the mud. Then formed pressed fiberglass elbows and bodies for valves. This also was covered with the fabric which was dipped in wall paper paste to hold the fabric in place on the pipe runs and elbows and valves, and then sown.

When they perfected the aluminized backed heavy craft paper covering with a peel and stick tape strip. It speeded up the application. Before the formed plastic skins the plastic came on a roll about 3 foot wide and 150' long.*

The above are the ways they do full size equipment other than the plastic skins over some magnesia formed insulation, and the stainless steel skin sections. They probably have come up with some new stuff in the last couple of years.
glen
 
Tmuir,
Nice model! I have always wondered what people where using too. I thought it looked like pipe cleaners. Fuzzy on the outside soft wire on the inside to stay in place.
But what the heck do I know. Waiting for the steamer guys answer.
Tony

Addendum Sorry PT I was posting as you where. Good ideas
 
PTsideshow said:
What is used is sometimes called butcher twine it is a small dia 3/21 strand twine made from cotton. 3 strands of 21 threads. it does comes from about 1/16" or in mm sizes even in the states. It is sold as a macrame string/thread. Most of the better stocked craft stores would have something like it. They are larger dia. so you can change the size to fit the pipes.

It is the same rope work that they do on ships railings, so and good fancy note book should have some ideas. They do some fancy monkey fists at the elbows and valve bodies.

The simplest form is ½ hitches around the pipe, with the hitch or knot part in a line along the bottom side of the pipe. When it is done they they paint them with a special sealer coating. to keep the dust out. As getting the dust and debris out of the rope is a pain. So painting is a must with the miniature lagging. More so with the rope/string style.

I like this idea.
When I did my apprenticeship in the 80s with our Telecoms company I was taught how to lace up cables using waxed twine, obviously the spacing on the cables were greater but the same idea.
Time to visit a craft shop I think.

Thanks
 
cobra428 said:
Addendum Sorry PT I was posting as you where. Good ideas
not a problem unless your crystal ball wasn't broken :big:
glen
 
Steam piping was not wrapped in a cord or rope, although a lot of modelers and small steam launch guys do that. In full size practice the pipe was covered in a plaster like mix of asbestos then wrapped in a fabric covering. It was then usually painted white.

You might find some decorative rope wrapping in a short pipe near an engine control, or on handrails, but not on a steam line.

The wrapping wound up about 1-2" or so thick around the pipe.

Id try strips of white frabic, like an old bedsheet torn into about 1" wide strips. Id wrap it at a bit of an angle, in a spiral fashion, so the overlaps help build thickness. Maybe try a first wrap with some fiberglass torn into strips. Id hold the warp on with some short wire ties, then paint it all with a thin acrylic paint. If you made the wire ties short, neat wraps of copper wire they might look neat. real steam pipes had metal bands about 1" wide wrapped around at intervals of 2-3 feet.
 
RonGinger said:
Steam piping was not wrapped in a cord or rope, although a lot of modelers and small steam launch guys do that. In full size practice the pipe was covered in a plaster like mix of asbestos then wrapped in a fabric covering. It was then usually painted white.

You might find some decorative rope wrapping in a short pipe near an engine control, or on handrails, but not on a steam line.

Sorry for the confusion and loosing a couple of paragraphs when I posted earlier trying to copy and paste and talk on the phone! Getting to old for multi tasking ;D I have added the missing paragraphs.

glen
 
Back
Top