How to true the column of a Mill-Drill?

Home Model Engine Machinist Forum

Help Support Home Model Engine Machinist Forum:

This site may earn a commission from merchant affiliate links, including eBay, Amazon, and others.

Philipintexas

Well-Known Member
Joined
Apr 13, 2012
Messages
227
Reaction score
52
I've been using an Enco mill-drill for many years, however I found the column was not exactly perpendicular to the table. It's fairly easy to shim it into plumb but how should I secure it once shimmed? Shim stock works but that leaves everything basically bolted to a stack of thin material making contact in only a small fraction of the total contact area. I'd feel better if the entire base of the column was in total contact with the base area but short of machining those areas it doesn't seem to be as solid as I'd like. It's a catch-22 since I'd have to machine the base using the machine itself.
 
you could scrape it to fit or file to fit.

how much is it deviating? how much material would you have to remove to make it square?

that's some fairly involved work and not much people would care enough to do it i think.
 
Shortly after I purchased my X3 mill 6 years ago I checked the head of the mill and found it to be off a few thousandths. I used a piece of 0.005" copper sheet as a shim to get the head perpendicular left - right and front - back. That copper shim is still sitting there and the head hasn't moved after all this time.

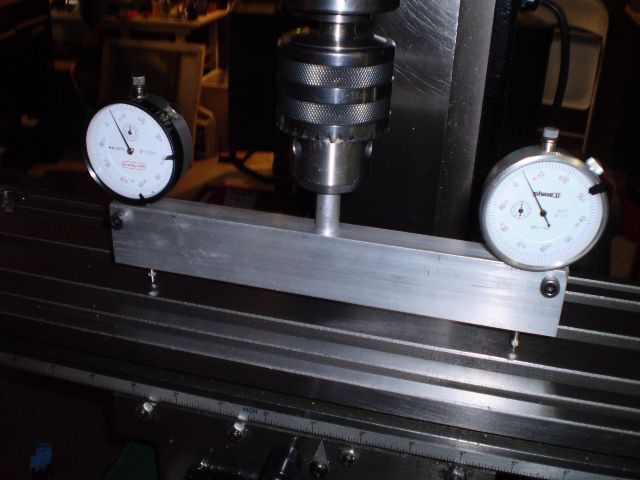
I made a tramming tool some years ago and check the mill a few times a year and it's always good.


This is a fixed head mill so I expect this stability. I also have a smaller mill with a tilting head. That mill will often go out when I've taken too big a cut. With the tramming tool it's easy to get it back to true.

I hope this helps

Cheers,
Phil
 
When shimmed into plumb I have about .017" gap at the rear,and about half that on the left side. Scraping is out of the question and so is machining. Do you just shim an a couple places and tighten the bolts?
 
That's it, push the shims in (not so far you can't pull them out, tighten the bolts, check the true, adjust if necessary with a different size shim.

Cheers,
Phil
 
OK, I gotta know! I've asked this question before but no answer yet. Why use the "tramming fixture" when a simple extension And one quality indicator will do the job, and as I see it, probably more accurately? Been doin this full time for 30 yrs and have never seen a setup like this anywhere.
 
A single indicator will do the job too. Tramming tools are common. You can make your own (I did) or buy one

http://tool.wttool.com/tools/Mill Tramming

The results you get with either method are operator dependent unless you have really bad DI's

Phil
 
OK, I gotta know! I've asked this question before but no answer yet. Why use the "tramming fixture" when a simple extension And one quality indicator will do the job, and as I see it, probably more accurately? Been doin this full time for 30 yrs and have never seen a setup like this anywhere.

Agreed, I think it's just a bit quicker using the twin DTI setup.
 
I use just the one but it has it's back to you for half the operation, 2 clocks will more convenient for viewing.
 
I have always used the one indicator to tram a mill, however I wish that I had found out about the twin indicator long ago. On Bridgeport mills and their clones, which I have, it was easy to tram the X axis, but the Y axis was always a pain. The X axis pivot point is central to the spindle, but the Y axis pivot point is set back from the spindle making it a bit more work to tram. Still, with only one indicator, it's only a few minutes work to tram both.

Paul.
 
I made a tramming tool some years ago and check the mill a few times a year and it's always good.

Cheers,
Phil

An indicator point like this helps to minimize the effects of the sideways stresses when passing over the T-slots.

Gene

IndPoint.jpg
 
Back
Top