Help with Accuracy Problem Please

Home Model Engine Machinist Forum

Help Support Home Model Engine Machinist Forum:

This site may earn a commission from merchant affiliate links, including eBay, Amazon, and others.

jmshep

Well-Known Member
Joined
Aug 15, 2008
Messages
83
Reaction score
1
Can someone help me to understand what is going on here:-

I have an X2 mill with DROs and when I tried to drill using either of the following methods the hole was consistently to the right of the mark each time by about 0.2mm

1. A centre finder (wobbler) to locate a scribed mark
2. Edge finder to locate the edges and then locate the drill using the DROs

(I have previously used these methods on the same set up with acceptable accuracy)

I am satisfied that both my X and Y DROs are accurate and I have checked the table travel against the graduated hand wheels, the DRO readings and a separate DTI. I am also satisfied that the edge finder and centre finder are accurate (both Starrett). The head and the table are adjusted properly and everything is as rigid as you can expect from an X2. The table is locked for drilling and the DRO readings checked.

I know that the chuck used is not perfect and has some run out but if that was the cause I would expect the result to be random and not consistent. Besides the chuck measures no worse now than when I was getting acceptable results.

I think I have narrowed it down to two centre drills I was using but I am at a loss to work out what is going on. If the problem was due to run out of the spindle, chuck and/or off centre drills then surely the inaccuracy would be random (X and Y) about the desired setting and not consistently just to the right?

Any explanation to get my confidence back into co ordinate drilling would be welcome.

John
 
Hi John,

Read your post several times and the only thing I can think of is you may have a small burr on the edge you are using with the edge finder
confused5.gif


Hope this helps ???

Regards
Bob
 
The other thing I am wondering is if the table is moving on you when you start drilling the hole. Surely you would see such movement on the DRO.

The only other thing that I can think of is the scales of the DRO... Is everything tight? Not a likely factor in this case, but just to be sure...

Let us know what you discover!!
 
Possibly this might be what is happening.

Saw something about this on another thread somewhere, might have even been on here, it turned out the X2 column was NOT dead straight up and down, when you lowered the head, the head/gibs were traveling down at a very slight angle causing the drilled hole to wander of at an angle when doing the drilling. This is similar to what your getting.

From memory, it was checked by getting a long straight rod and mounting it in a collet, when it was lowered an inch to the work-piece, the centre was marked, then that rod was taken out, then he put in a short rod, when that was lowered to the work-piece, there was this discrepancy in the center marks. A bit of mucking around brought it all back in line.

Maybe that's what you might have to check.

regards greenie
 
You might try putting the center drill in a collet rather than the chuck. You might also try elevating the workpiece so that the spindle travel is minimized; this would tell you if the column is not straight.

Also, you don't say if the error is in the small center hole or the final drilled hole.

If you are positioning to a scribed line, you ought to be able to see if the tip of the center drill is on the line or not before drilling;
 
John,
I was the one having the problems Greenie mentioned.
You can read my sad tail of woe HERE

My issue was with the spindle not being parallel with the dovetails. Tramming caused the spindle to be perpendicular to the table, but the vertical column was at a very slight angle. This causes the head to move sideways as it is raised higher along the column.

I've had my X2 for about 4 years and until this time all my holes had been drilled with shorter drills. It wasn't until I used a longer one that this error showed up, so I don't know if it was a factory defect or something that happened over time.

My immediate solution, detailed in the thread, was just pure dumb luck.

My permanent solution was to buy a much larger knee mill ;D
I still use the X2 as the knee mill is not fully commissioned yet. Once the new mill is "on line" I'll use it to finally fix the X2. For the near term I plan to keep the X2, I still think it's a pretty nice little machine. I agree with others that think of these small Chinese machines as partially finished kits that need a bit of work before they can reach their full potential.

Good luck and keep us posted on what you find out.
 
I had the same problem with my x2 and I found that when they bolted the two halves of the head together they didn't get the spindle axis paralel to the dovetail. Because of this, when you tram the head to get the spinle square to the table you end up with the column slightly off of 90 degrees to the table and the head drifts along the x axis as it moves up and down.

If you take the head off of the column and look into the the dovetail end you will see that this is a simple box casting with four bolts that hold it to the spindle casting. When you remove those bolts and take the two apart you will be very suprised to find that there are no dowels or pins or anything to align the two pieces. I don't know how they ever get any of them right!

Aligning them is a pita. First put an indicater in the spindle and run it along a square refence that is sitting on the table. Bump the column around untill it is square to the table. Now, leaving the column where it is, tram the head by re-aligning the two head castings. Sounds easy enough but there's a lot of taking apart and putting back together. I wound up clamping a couple of pieces of scrap to the dovetail part so that they overhung the the spindle casting, and drilled and tapped holes in them for pusher bolts. (Think of the adjustment on the tailstock of your lathe.)


Good luck,

Rick
 
Thanks to all for your replies.
Ksoues and Airhead - I am convinced I have the same problem as you describe. I had trammed the head using a DTI but after reading your replies I put a piece of straight round bar in the chuck and moved the head up and down the column and the head was not perpendicular.
I will try the adjustments and let you know how I get on.


see my post in:
Adding a "home position" locator to vertical mill with tiltable head.
I think it is the last post
Hilmar
 
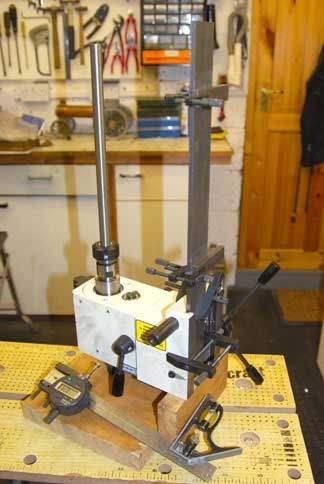
Ok I established that the two parts of the head were not aligned and subsequently the dovetail and spindle was not parallel.
This is how I tackled it:

1. After removing the motor and head, I clamped a piece of flat bar so that it was tight up to the edge of the dovetail.
2. I put a substantial piece of silver steel in the chuck
3. Two short lengths of bar were clamped to the flat bar at right angles to serve as repeatable reference points for the square and DTI.
4. I clamped a DTI to a square so that I could measure the gap between the edge of the bar (and dovetail) and the test bar in the chuck. (when I say measure, I was just checking that the gap at the two pints was as near the same reading on the DTI as I could get).
Now the purists may question the accuracy of my “standards” (the two pieces of bar) and I could have done with a more rigid square but with care and repeated measurements I have a result that is at least better than trial and error and tied directly to the two parts that need to be aligned.
In fact I got the two readings to within 0.2mm over a distance of 22cm with the head over as far as it would go in one direction and I did not consider it worthwhile to make any further adjustments.
Will try and post a picture but having trouble with that at the moment
 
The photo of my set up is in the download section - I kept getting an error message when I tried to send it with the last reply.

John
 
Good job!

When I did mine I messed around with a surface plate, an indicator, and some drill rod, but the only thing I got out of it was a good appreciation of just how crooked drill rod can be. That's why I wound up with the indicator in the spindle instead of a 'test bar'.

Anyway, glad you got it straightened out.


Rick
 
Good job, John.

They sure don't make it easy, do they?
 

Latest posts

Back
Top