Glass wobbler

Home Model Engine Machinist Forum

Help Support Home Model Engine Machinist Forum:

This site may earn a commission from merchant affiliate links, including eBay, Amazon, and others.

Penguingeoff

Well-Known Member
Joined
May 19, 2009
Messages
52
Reaction score
2
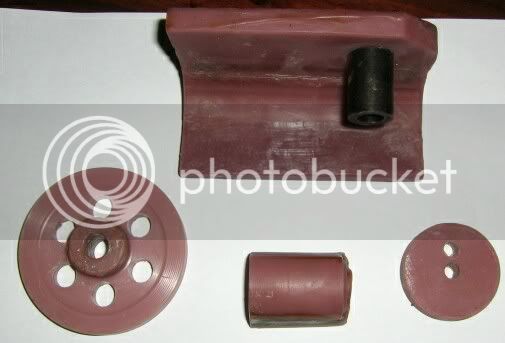
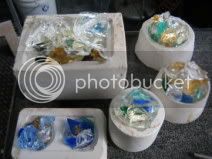
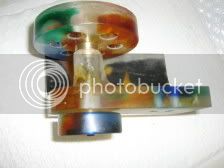
Ok, you have me interested. As the philosopher "Clarksonius" was fond of saying, "How hard can it be". It will be a simple wobbler, roughly 16mm bore, 20 mm stroke. Lead Crystal except for the piston and rod and the mains shaft. Piston will most likely be Teflon (It will be running in a glass bore) Main shaft and rod probably Brass/ Bronze. (The main shaft WILL wear and will be easy to replace.)
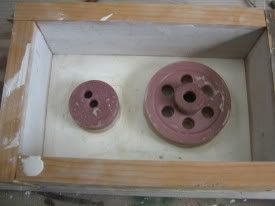
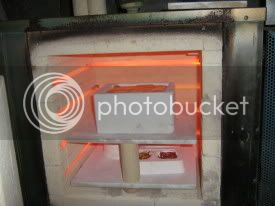
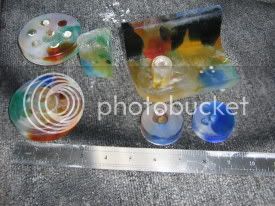
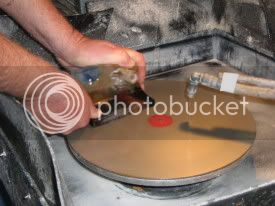
First step will be to make WAX masters of the glass components. I will probably start them Monday.
Metal parts will be bonded to finished glass components with Silicon adhesive. Cheers from Tassie, Geoff
 
really great idea. I cant wait too see ya get started.

kel
 
You've got me interested.
I'll look forward to your updates
 
Interested here as well - not that I'll ever try it.
 
Here are the WAX masters for the engine. Flywheel, Crank Disc, Cylinder and Base/Standard. Method of production - Cylinder, Standard and Flywheel are all fabricated from Sculpture wax. "Welded" with a soldering iron and a Model aircraft covering iron (now dedicated to wax work). Roughly cut with the iron then drilled/machined to what I want. Machining wax is easy, but between operations the bits go into a fridge to stiffen. Sometimes into the freezer.
Next step is to encapsulate with the mould material - mixture of Plaster and Silica. 1 part Plaster, 1 part Silica and 1 part water.

IMG_1105.jpg


I will post pics of the next step soon. Cheers from Tassie -Geoff
 
Thanks, keep the pictures coming I'm really interested in how you are going to do this.
 
Wax models in a mould box ready for Plaster/Silca mix.
700g Plaster, 70
IMG_1115.jpg
0g Silica (300 mesh), 700g water.
 
Steaming the wax out of the mould using the trusty Steam Duck. I use this for small moulds, for larger ones I have converted a Pressure cooker for steam delivery. Somtimes I use a Heat gun, but this can cause cracking of the mould. To get the last vestiges of wax out I will rinse the mould with boiling water a few times. I recycle the wax, melt the wax and pour into a milk carton filtered through some panty hose (No, I dont' give them back to my wife even though they would be water proof by the end.)
IMG_1118.jpg


Next step is to mix some RTV Silicon and pour into the mould so I can duplicate the castings if I want to. I usually work this way in case I have a failure.

Casting with glass has a few idiosyncrasies that MUST be followed.
1. You MUST use COMPATIBLE glass (NOT recycled bottles etc). Art glass manufactures all have FUSIBLE compatilble glasses. I use Bullseye, Spectrum System 96 (both US made), Blackwood Lead Crystal (Made in OZ) and Kokomo. However you cannot mix Bullseye with Blackwood and/or the others as they are not compatible with each other. What will happen? Stress cracking WILL occur after firing, not necessarily straight after, but it WILL happen.
2. You MUST follow the firing tables for each type of glass, particularly the annealing or firing down stage.

Then after the castings are CAREFULLY broken free from the mould, you start grinding and polishing. I have a small fortune in Diamond abrasives and the grinders to use them.
Cheers from Geoff
 
Cool. What's the anneal time on a chunk that thick?
 
It took roughly 12 hours to get to 840c. The main problem is to dry the moulds out. Heat to fast and they WILL crack. For the larger moulds I re-inforce them with fibreglass tape. Water boils off at 100c, But chemically combined water doesn't come out until roughly 600. Annealing took roughly 40 hours. The kiln can be crash cooled down until 600c, then slowly to 40c with 3 annealing stages according to the thickness. There is also a 200 min stage at 440c. Just take a push of the button on the controller (after it has been programmed) and go off and let the kiln do its own thing. The bits are out now, will post pics tomorrow, then the fun of grinding etc. Geoff
 
Pictures of castings roughly ground.
Castingsoutofmoulds.jpg


I use a Flatbed grinder that I built to grind and polish glass.All the grinding and polishing is done wet. I usually end up drenched after a days grinding. Diamond discs 80mesh down to 1200mesh, then 600 mesh resin bond diamond smoothing disc for a PRE polish. Then onto a felt disc loaded with Cerium Oxide.
Grindingcasting.jpg


If all goes well that piece will be finished. If I notice a scratch (Very easy to do on Lead Crystal), I go back to 400 disc and start again.
This process can take a while to do.

Tried to put this one up yesterday. Glass in Moulds prior to firing.

GlassinMould.jpg


To get the amount of glass for each mould, I weigh the mould, fill the cavity with water, then multiply the difference in weights by 3 for Lead crystal.

Cherrs, Geoff
 
I'm still working on this. The first trial assembly. Brass bearings in baseplate. Brass bushings in the flywheel and crank disc, 1/4 inch stainless main shaft. Bearings and bushings will be epoxied into the baseplate, flywheel and crank disc. There will be a grub screw to lock the flywheel to the main shaft. Main shaft will be Loctited to the crank disc.
FIRSTASSEMBLY.jpg


Next step, make the piston (Teflon) and rod (brass), put brass sleeves in the port hole, mount the cylinder. Once all this is done I can finish polish/sandblast the bits I want to. Cheers, Geoff
 
Very nice Geoff...that is going to be one colorful and unique engine once you are done. Definitely looking forward to the finished model.

Bill
 

Latest posts

Back
Top