


Hi all;
A few of the fellows who are looking in on my build project in the Work in Progress section
said they would like to know a little more about filing. So, I'll start a thread here in the
hope that other guys with some experience with a file will join in. It's not like it's a lost art,
or something, but it's one of those things that takes a little learning.
First a little bit on files themselves, and other stuff.
Right after that first old metal worker invented the chisel, he probably came up with the
file too. Once he had a file and chisel, along with a hammer, he probably became the first
machinist. That's the story, anyway.
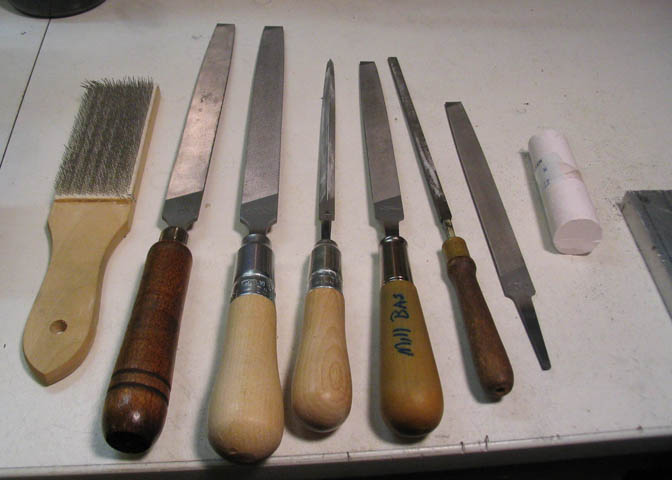
Above is a shot of a few different kinds of files and a couple other things.
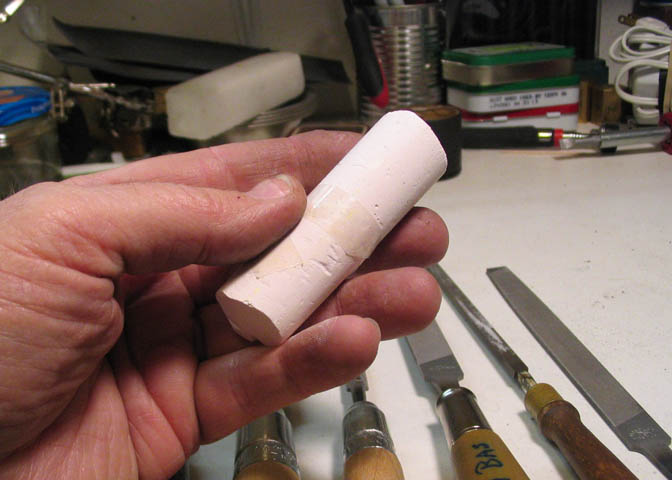
Something that is handy when filing is a piece of chalk. Some people like a certain type.
The type that is kind of soft seems to work best for me. The hard chalkboard kind seems
to make a lot more dust and falls out of the file faster.
The chalk is used to "chalk" the file. By filling all the grooves of the file with chalk,
it helps prevent pinning. Pinning is the result of the file taking a cut, and is just part
of the process with some kinds of metal. The problem starts when the little pins
get stuck in the teeth of the file. Then you start having problems with finish, and
the file won't cut as well. The chalk helps to keep those pins from sticking in the file.
The best way to deal with pinning is to prevent it. To chalk the file, run the chalk
over the file teeth and let it fill them. If you don't mind a mess, you can keep oil on
the file, and it will also help stop pinning. I've tried this, and it works, but the file has
to be fairly dripping with oil. I like chalk better.
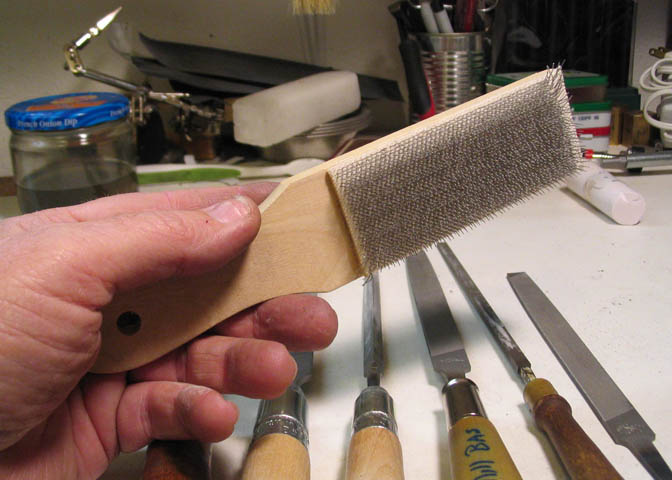
This is a file card, or file brush. It's used to clean stubborn bits from the file teeth. (If
you chalk, you won't have to use this so often...) Some materials are simply gummy,
and will stick in the file teeth, even with chalk. The file card will help get it out.
Some folks don't like these. A few guys have told me that they dull the file. I don't
know how you dull something that is dead hard without something else that is dead
hard, and I don't think the bristles on the brush are.
I use one of these when I think it is necessary. Some guys are with me on that, some
are again' me. You just have to decide for yourself on that. Often, if you chalk the file
regularly, the pins will just fall out of the teeth when you tap the file on the work bench.
Each time you tap the file, or clean it with the brush, you need to chalk it again.
Part of success with files, is using the right one for the job.
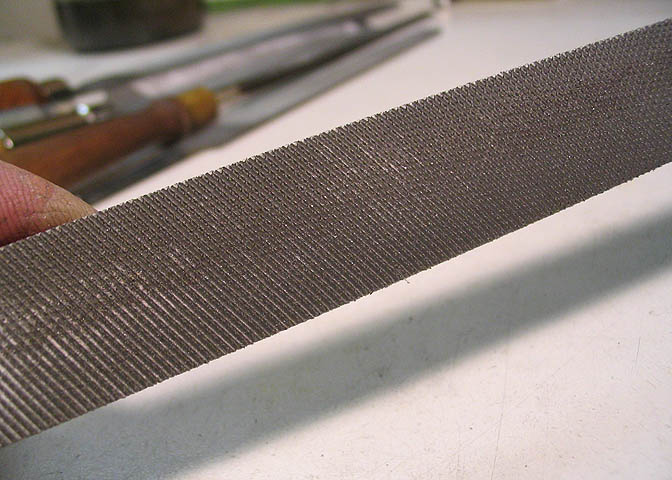
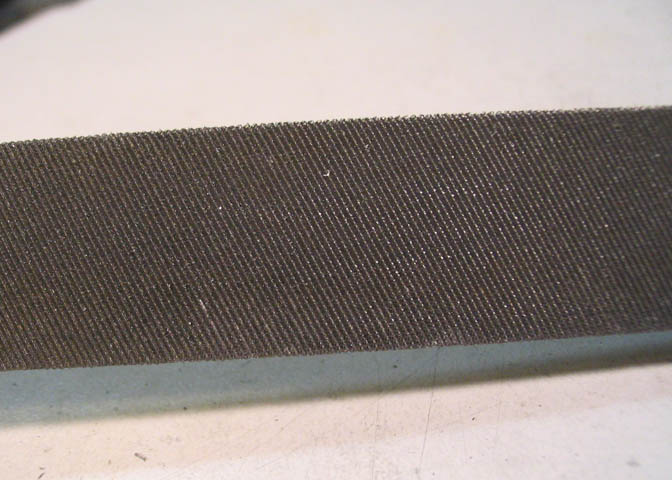
The file above is a double cut mill bastard, and it's made for heavy material removal, but
it won't make a real smooth finish as easily. If this is the only kind of file you have, you need
more files. You can see, if you look close, that it looks like it has a bunch of diamond
points on it. That's from the double cuts crossing.
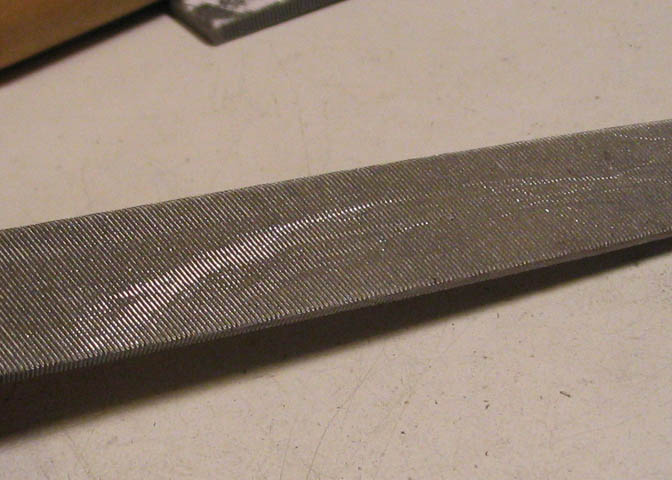
This is a single cut smooth flat, the same length as the file in the previous picture. It makes
a much smoother cut, but doesn't remove material as fast.
These two files are both 8" long. The cut on a file is dependant on the length of the file.
All of the cuts for a given length of file will match from the finest to the coarsest cut, only
for the given length of the file. So, if you desire a full range of cuts in a set of files, get them
all in the same length.

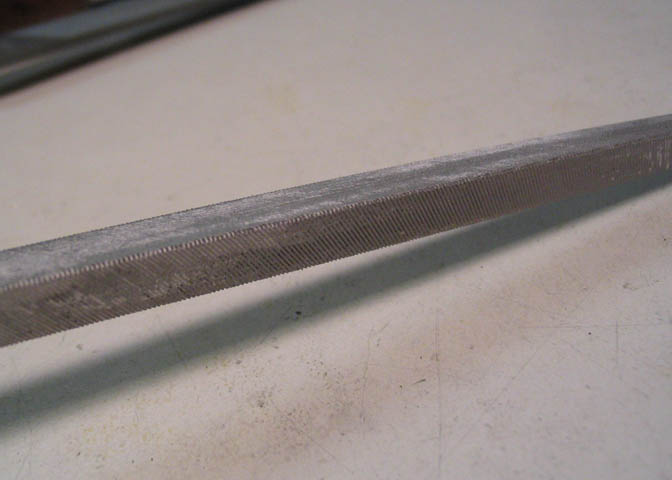
This is a single cut mill bastard, which looks much like the previous picture, except
smoother. It's only 6" long, but if it were 8", it would be a faster cutting file than the
8" smooth cut in the previous pic. That's what I mean about all sizes being relative
only to each other. The 6" file of a coarser cut can be smoother than an 8" file of a
finer cut.
This is a taper file, and it's triangular shape is good for cleaning up corners, (in the smaller
sizes of files), but it is also easy to screw things up because of the 120 degree angle.
This is a ruined file, and I'm putting it here so you will know what to look for. If you're
not into filing, then you may not realize that the reason you have a hard time getting
a good finish is because your file is ruined.
This damage was done, by me, in a "dumb mistake" moment. Cutting a piece of hard
steel on the lathe, the bit suddenly dulled because I'd work hardened a spot on the
work piece in the previous pass. Sometimes you can get a file under a hard spot and
pull out the work hardened spot, but I didn't go at it with enough conviction and the file
skipped over the hard spot. In a second, a good file was relegated to the scrap "hard"
bin.
Save your ruined files. They can be used for other tooling. There's not much in your
shop that is harder than a file, and you can heat them and make cutters from them.
So, everyone is probably thinking, "when is he going to get done blabbering about files
and do something"..
Okay, when you set up something to file, first, get it in a position that will lead to a
good result. That means start with your piece held firmly, and start with it "on the level".
Starting with the piece level will help to keep the cut level. Put it in a position that is
comfortable to work on. You want to position yourself in a way that you will not lean
to one side. If you are leaning, your cut will likely be leaning too.
Filing is not sawing. Probably one of the biggest mistakes made, and often seen, is someone
sawing away at a piece with a file. The file is made to cut in one direction, (for regular filing).
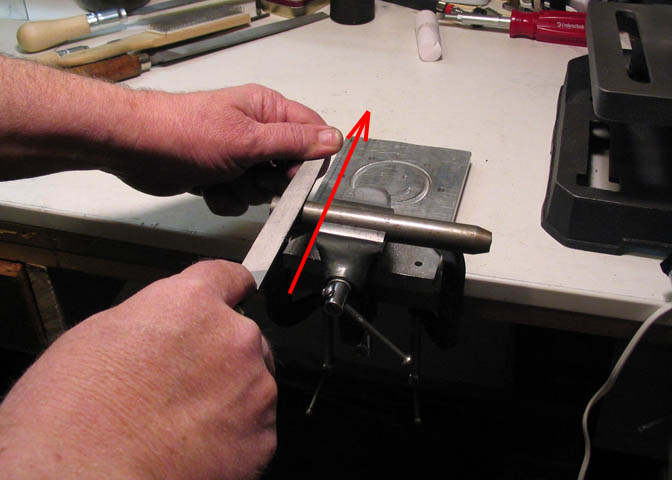
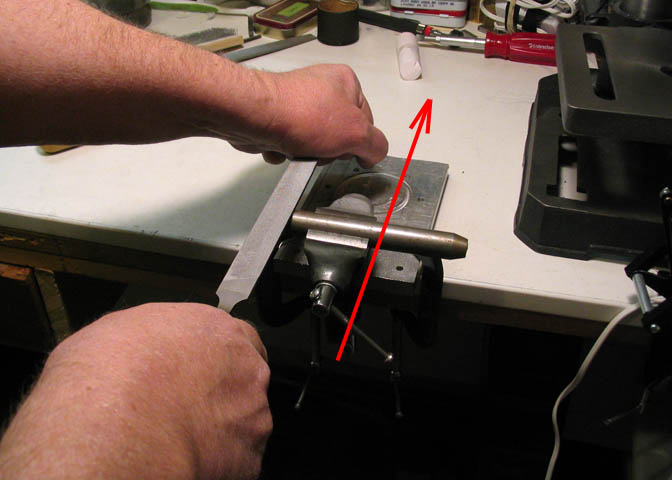
Push the file away from you.
Chalk your file. Get in postion behind the work piece and lay the file flat on it. Rock it side
to side to make sure you are not putting more down pressure on one side. Hold the file with
both hands. One hand grips the flat end of the file, either by lightly pinching it between your
fingers, or, if it is a great big ol'file, put the ball of your palm on the flat end of the file, and wrap
your fingers around the end. The other hand goes on the HANDLE. You need handles on all
your files. That goes double if you are using the file on the lathe! The handle not only gives you something to hold onto. It keeps the file tang from piercing your tender body if you should
happen to run the file into a spinning lathe chuck. It also greatly increases your control of the
file, helping you make better cuts.
Start off with a couple of light cuts, pushing away from you as in the picture above. Push
with an even stroke, going the same speed at the end as as the beginning of the stroke.
As you reach the end of the stroke, lift the file slightly so it just comes off the work. Then
go back to the starting position and make another stroke, making sure to get the file flat
on the work piece again.
After a couple of strokes, look at the work piece. By examining the cut, you can determine
if you are holding the file flat. Is the cut the same width on both sides? If not, now is the
time to correct the problem, before you get half way into the work and have a big mess to
straighten out. This takes practice. There's no way of getting around that. It's a technique
that takes a bit to figure out. If you continually get a cut that is deeper on one side than the
other, reposition your body and try again. Just moving yourself an inch or two to the right or
left can make the difference.
If you sit while you are filing, like you would when working on a very small piece
and need to get your face close to see, keep your elbows off the work bench. If
you put one elbow down, you will probably cut a slant, as you tend to slide the
file toward the planted elbow. Keep the elbows up.
Here's a shot of how you would grip a larger file. Instead of pinching the end between
the fingers, make a fist around it. The file in the picture is not big enough for this grip, (for me),
but it's the largest one I had handy. Usually you will use a fist grip on the end if you are using
a 12-14" or longer file that has a coarse cut, like a big double cut or a rasp.
How much down pressure you use depends on the file, and how smooth you want the
finish. If you are roughing a piece down with a double cut file, you can push down pretty hard,
but the stroke still needs to be steady throughout.
For finishing cuts with a fine file, less pressure is needed. As you come to your final strokes
on a finish cut, you only need enough down pressure to keep the file from skipping over the
cut. You want it to cut every time, no matter how light you press on it. If it doesn't cut a
little, you can get chatter, just like with a lathe or mill. A good, (or new) file will cut with very
little down pressure.
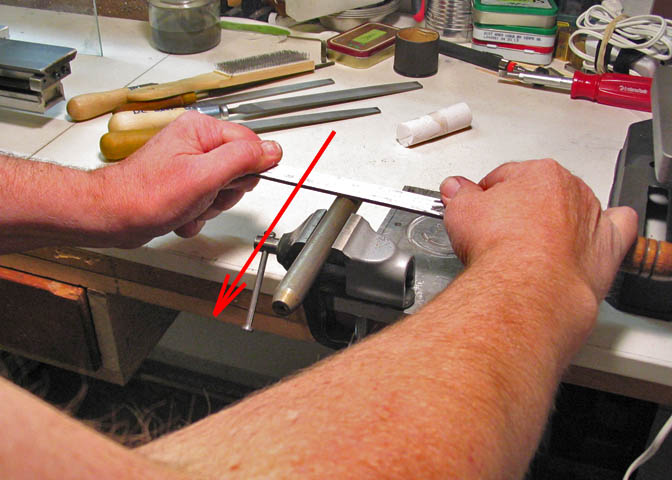
This shot, and the next, demonstrate draw filing. Draw filing is a method of getting very fine
finishes with certain file cuts, and for doing work on thin edge sections, like the spokes on a
wheel, (clock gear). If you want to file the edge of a piece of 1/16" thick metal, this is about
the best way to do it. Filing across such an edge will sometimes make so much vibration that
it's impossible to get a good finish, but draw filing along the edge makes it easy. To start a
draw file stroke, put the file on the work piece sideways, at the point on the piece that is farthest
away from you, and "draw" it toward you, as in the picture above.
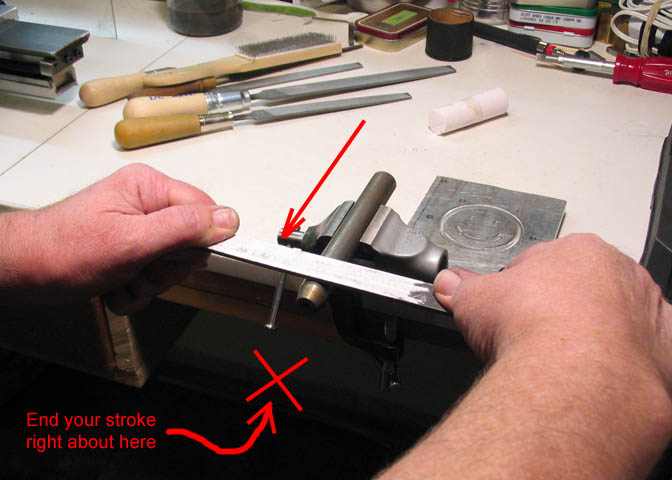
Pull the file toward you, and end your stroke at an imaginary point somewhere past the point
where the file comes off the work. All the things about regular filing apply, with regards to a
steady stroke, even pressure, and keeping the file flat on the work piece.
Because of the need to use both hands for the demo shot, and to get my hands in the picture
while keeping out of the way of the camera, my grip is not optimum for demonstrating this.
Normally, I would grip the file the same with both hands, and usually more like the grip on the
left. The main thing is to do it in a position that will let you keep the file flat, and pull it toward
you with an even stroke. Take care not to increase the down pressure on the file as you bring
it toward you. It's what you are normally going to want to do, so concentrate on that aspect.
The following two shots are just examples from my current engine build.
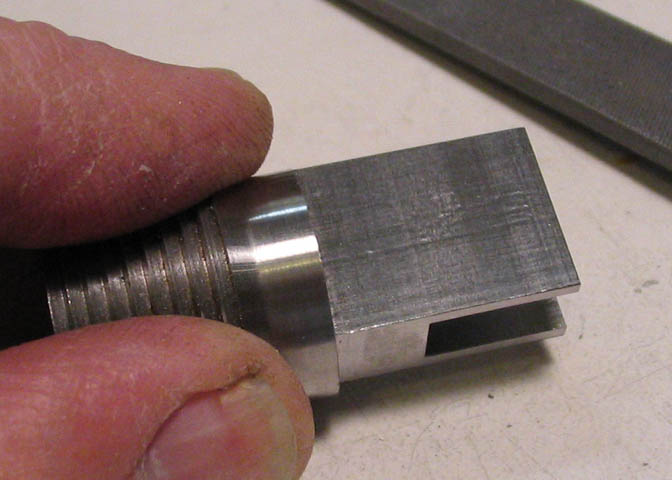
This first shot is before filing.
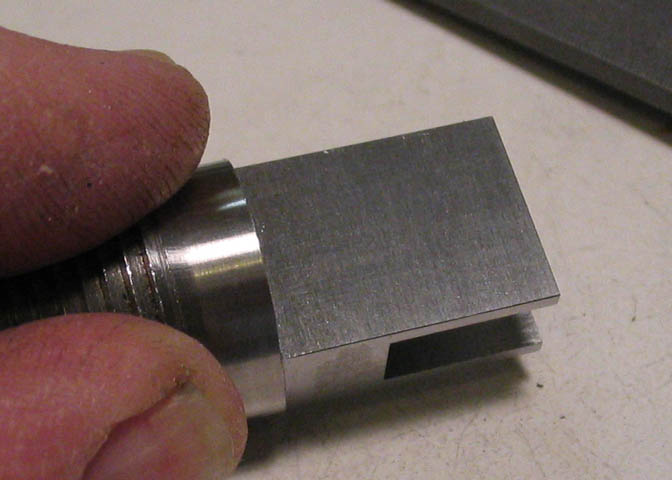
And this is after a few minutes with a 6" single cut mill bastard. This is about as smooth as
I want this piece, because I want it to maintain more of a sheen than a shine. With finer files,
you can make things almost bright looking, and from there about all that can be done is light
sanding.
I hope this wasn't over long for a single post. It's mainly basic information. I know by looking
at some of the work on this forum that there are some pretty good file hands here. If you're
one of those guys, please join in with your comments, or corrections to my explanations.
Dean
A few of the fellows who are looking in on my build project in the Work in Progress section
said they would like to know a little more about filing. So, I'll start a thread here in the
hope that other guys with some experience with a file will join in. It's not like it's a lost art,
or something, but it's one of those things that takes a little learning.
First a little bit on files themselves, and other stuff.
Right after that first old metal worker invented the chisel, he probably came up with the
file too. Once he had a file and chisel, along with a hammer, he probably became the first
machinist. That's the story, anyway.
Above is a shot of a few different kinds of files and a couple other things.
Something that is handy when filing is a piece of chalk. Some people like a certain type.
The type that is kind of soft seems to work best for me. The hard chalkboard kind seems
to make a lot more dust and falls out of the file faster.
The chalk is used to "chalk" the file. By filling all the grooves of the file with chalk,
it helps prevent pinning. Pinning is the result of the file taking a cut, and is just part
of the process with some kinds of metal. The problem starts when the little pins
get stuck in the teeth of the file. Then you start having problems with finish, and
the file won't cut as well. The chalk helps to keep those pins from sticking in the file.
The best way to deal with pinning is to prevent it. To chalk the file, run the chalk
over the file teeth and let it fill them. If you don't mind a mess, you can keep oil on
the file, and it will also help stop pinning. I've tried this, and it works, but the file has
to be fairly dripping with oil. I like chalk better.
This is a file card, or file brush. It's used to clean stubborn bits from the file teeth. (If
you chalk, you won't have to use this so often...) Some materials are simply gummy,
and will stick in the file teeth, even with chalk. The file card will help get it out.
Some folks don't like these. A few guys have told me that they dull the file. I don't
know how you dull something that is dead hard without something else that is dead
hard, and I don't think the bristles on the brush are.
I use one of these when I think it is necessary. Some guys are with me on that, some
are again' me. You just have to decide for yourself on that. Often, if you chalk the file
regularly, the pins will just fall out of the teeth when you tap the file on the work bench.
Each time you tap the file, or clean it with the brush, you need to chalk it again.
Part of success with files, is using the right one for the job.
The file above is a double cut mill bastard, and it's made for heavy material removal, but
it won't make a real smooth finish as easily. If this is the only kind of file you have, you need
more files. You can see, if you look close, that it looks like it has a bunch of diamond
points on it. That's from the double cuts crossing.
This is a single cut smooth flat, the same length as the file in the previous picture. It makes
a much smoother cut, but doesn't remove material as fast.
These two files are both 8" long. The cut on a file is dependant on the length of the file.
All of the cuts for a given length of file will match from the finest to the coarsest cut, only
for the given length of the file. So, if you desire a full range of cuts in a set of files, get them
all in the same length.
This is a single cut mill bastard, which looks much like the previous picture, except
smoother. It's only 6" long, but if it were 8", it would be a faster cutting file than the
8" smooth cut in the previous pic. That's what I mean about all sizes being relative
only to each other. The 6" file of a coarser cut can be smoother than an 8" file of a
finer cut.
This is a taper file, and it's triangular shape is good for cleaning up corners, (in the smaller
sizes of files), but it is also easy to screw things up because of the 120 degree angle.
This is a ruined file, and I'm putting it here so you will know what to look for. If you're
not into filing, then you may not realize that the reason you have a hard time getting
a good finish is because your file is ruined.
This damage was done, by me, in a "dumb mistake" moment. Cutting a piece of hard
steel on the lathe, the bit suddenly dulled because I'd work hardened a spot on the
work piece in the previous pass. Sometimes you can get a file under a hard spot and
pull out the work hardened spot, but I didn't go at it with enough conviction and the file
skipped over the hard spot. In a second, a good file was relegated to the scrap "hard"
bin.
Save your ruined files. They can be used for other tooling. There's not much in your
shop that is harder than a file, and you can heat them and make cutters from them.
So, everyone is probably thinking, "when is he going to get done blabbering about files
and do something"..
Okay, when you set up something to file, first, get it in a position that will lead to a
good result. That means start with your piece held firmly, and start with it "on the level".
Starting with the piece level will help to keep the cut level. Put it in a position that is
comfortable to work on. You want to position yourself in a way that you will not lean
to one side. If you are leaning, your cut will likely be leaning too.
Filing is not sawing. Probably one of the biggest mistakes made, and often seen, is someone
sawing away at a piece with a file. The file is made to cut in one direction, (for regular filing).
Push the file away from you.
Chalk your file. Get in postion behind the work piece and lay the file flat on it. Rock it side
to side to make sure you are not putting more down pressure on one side. Hold the file with
both hands. One hand grips the flat end of the file, either by lightly pinching it between your
fingers, or, if it is a great big ol'file, put the ball of your palm on the flat end of the file, and wrap
your fingers around the end. The other hand goes on the HANDLE. You need handles on all
your files. That goes double if you are using the file on the lathe! The handle not only gives you something to hold onto. It keeps the file tang from piercing your tender body if you should
happen to run the file into a spinning lathe chuck. It also greatly increases your control of the
file, helping you make better cuts.
Start off with a couple of light cuts, pushing away from you as in the picture above. Push
with an even stroke, going the same speed at the end as as the beginning of the stroke.
As you reach the end of the stroke, lift the file slightly so it just comes off the work. Then
go back to the starting position and make another stroke, making sure to get the file flat
on the work piece again.
After a couple of strokes, look at the work piece. By examining the cut, you can determine
if you are holding the file flat. Is the cut the same width on both sides? If not, now is the
time to correct the problem, before you get half way into the work and have a big mess to
straighten out. This takes practice. There's no way of getting around that. It's a technique
that takes a bit to figure out. If you continually get a cut that is deeper on one side than the
other, reposition your body and try again. Just moving yourself an inch or two to the right or
left can make the difference.
If you sit while you are filing, like you would when working on a very small piece
and need to get your face close to see, keep your elbows off the work bench. If
you put one elbow down, you will probably cut a slant, as you tend to slide the
file toward the planted elbow. Keep the elbows up.
Here's a shot of how you would grip a larger file. Instead of pinching the end between
the fingers, make a fist around it. The file in the picture is not big enough for this grip, (for me),
but it's the largest one I had handy. Usually you will use a fist grip on the end if you are using
a 12-14" or longer file that has a coarse cut, like a big double cut or a rasp.
How much down pressure you use depends on the file, and how smooth you want the
finish. If you are roughing a piece down with a double cut file, you can push down pretty hard,
but the stroke still needs to be steady throughout.
For finishing cuts with a fine file, less pressure is needed. As you come to your final strokes
on a finish cut, you only need enough down pressure to keep the file from skipping over the
cut. You want it to cut every time, no matter how light you press on it. If it doesn't cut a
little, you can get chatter, just like with a lathe or mill. A good, (or new) file will cut with very
little down pressure.
This shot, and the next, demonstrate draw filing. Draw filing is a method of getting very fine
finishes with certain file cuts, and for doing work on thin edge sections, like the spokes on a
wheel, (clock gear). If you want to file the edge of a piece of 1/16" thick metal, this is about
the best way to do it. Filing across such an edge will sometimes make so much vibration that
it's impossible to get a good finish, but draw filing along the edge makes it easy. To start a
draw file stroke, put the file on the work piece sideways, at the point on the piece that is farthest
away from you, and "draw" it toward you, as in the picture above.
Pull the file toward you, and end your stroke at an imaginary point somewhere past the point
where the file comes off the work. All the things about regular filing apply, with regards to a
steady stroke, even pressure, and keeping the file flat on the work piece.
Because of the need to use both hands for the demo shot, and to get my hands in the picture
while keeping out of the way of the camera, my grip is not optimum for demonstrating this.
Normally, I would grip the file the same with both hands, and usually more like the grip on the
left. The main thing is to do it in a position that will let you keep the file flat, and pull it toward
you with an even stroke. Take care not to increase the down pressure on the file as you bring
it toward you. It's what you are normally going to want to do, so concentrate on that aspect.
The following two shots are just examples from my current engine build.
This first shot is before filing.
And this is after a few minutes with a 6" single cut mill bastard. This is about as smooth as
I want this piece, because I want it to maintain more of a sheen than a shine. With finer files,
you can make things almost bright looking, and from there about all that can be done is light
sanding.
I hope this wasn't over long for a single post. It's mainly basic information. I know by looking
at some of the work on this forum that there are some pretty good file hands here. If you're
one of those guys, please join in with your comments, or corrections to my explanations.
Dean
")