Dial type lathe tool center gauge

Home Model Engine Machinist Forum

Help Support Home Model Engine Machinist Forum:

This site may earn a commission from merchant affiliate links, including eBay, Amazon, and others.

DICKEYBIRD

Well-Known Member
Joined
Sep 27, 2007
Messages
653
Reaction score
46
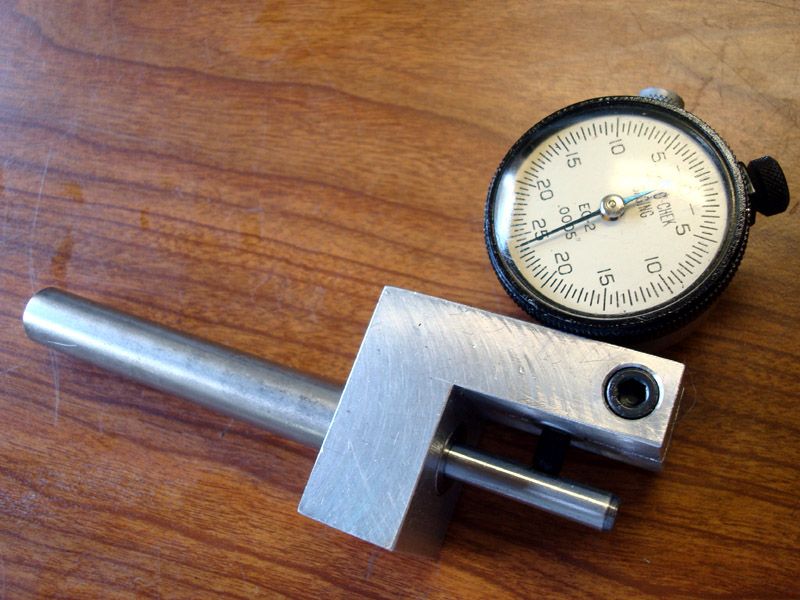
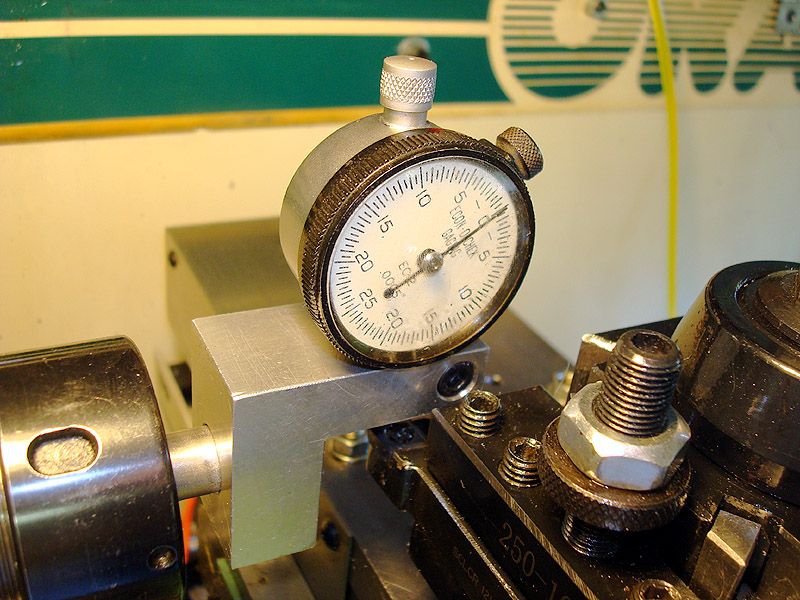
Here's a shop-made gauge for accurately setting lathe tools on center made from scrap aluminum, ½” drill rod & an ebay dial indicator. It helps to quickly & easily set the tool on center within a thou (or less) on any lathe. I used a short travel, small dial indicator so it would be compact enough to clear the ways on my 8” swing lathes.

It’s calibrated with a .250” dowel pin that slides in & out of a close fitting reamed hole in the center of the shaft. The indicator dial is set & locked so that the needle sits on zero with the dial tip extended exactly .125” It works great and is very consistent. The only variable is making sure it’s set at 90 degrees to the carriage but that’s pretty easy using an accurate square. I thought about adding a level but I think the square is more accurate.


That is brilliant! Going down to the shop now to make it. Thanks.
 
looks good but I cant figure out the purpose of the drill rodscratch.gif
can you please explain t

thanks
 
Maybe I'm thick-headed, Dickybird, but I still don't see how it works. Do you zero the DI on the rod? Then the tool bit, if zeroed, is still .125 high, right?
What am I missing?

Chuck
 
Maybe I'm thick-headed, Dickybird, but I still don't see how it works. Do you zero the DI on the rod? Then the tool bit, if zeroed, is still .125 high, right?
What am I missing?

Chuck

My understanding is that it is set at.125 with the pin in
and when remove the dial would show zero:hDe:
 
Do you zero the DI on the rod? Then the tool bit, if zeroed, is still .125 high, right?
Correct Chuck. I rotated the dial to read 25 at that point , locked it and removed the dowel. The dial tip then drops 5 rotations of the needle (.025" per revolution), touches a properly adjusted tool tip & the dial reads exactly zero. Much easier to do than explain in writing.

I just thought of another use of the thing, dunno why it didn't occur to me sooner. Once the tool is adjusted on center, I can back it off a hundred thou or so, rotate the gauge 90 degrees away from the tool & re-square it, jog back in (I'm using it on a Mach3 controlled CNC lathe) until the clock reads zero again and I can compute the tool tip offset to go into Mach's tool offsets table. Easy-peasy!;D
 
Nice tool, but it would take me longer to use that than using the steel rule trick.
 
I made one last evening. Works great. As far as the time that it takes, I set the height on 10 tools in about 20 minutes. I guess if one were not using a QCTP with a holder for each tool, time might be an issue. But, no one is paying me by the hour to make engines, so time isn't an issue. Finally, it's not like you need to do this every day. Once the tools are set in the QCTP holders, they generally don't move about.
If I ever move to a lantern toolpost and Armstrong tool holders, I'd probably use the 6" scale technique.:p
 
Had a regular size, not a small one. I also have a few HF digitals and am going to try one tonight. Just because I need a break from the engine detailing.
 
Correct Chuck. I rotated the dial to read 25 at that point , locked it and removed the dowel. The dial tip then drops 5 rotations of the needle (.025" per revolution), touches a properly adjusted tool tip & the dial reads exactly zero.
Beep....WRONG!

Sorry, it's actually 2 1/2 revolutions of the needle since the D.I. is .050" per revolution. Dohh!
 
Back
Top