D-bits, in my view, are one of the most underated tools you can make, but when push comes to shove, they can get you out of deep doo-doo when required.
This describes one that I made when I required a 22 degree angle inside a nozzle I was making. The angle couldn't really have been bored out as the depth was too long for such a tiny boring bar to survive the ordeal. People have other ways to do it, this is the way I found satisfactory for my use.
Mounted up a piece of silver steel (drill rod), and faced off the end.

Kicked the topslide (compound) over by half the angle required, in this case 11 degrees.

Then using the topslide, the taper was being cut.

The taper was finished when the small end was at about 2mm. I will be drilling a 3mm hole thru the nozzle material, so this D-bit will not require a cutting edge putting onto the very end, if it did, I would just give it a 5 degree cutting angle straight across the front face, after it is hardened.

The machining marks were gently removed with fine emery.

The bar was accurately measured up (this was 3/8" or 0.375"). Then it was divided by 2 and the figure rounded up. It was at this stage I changed my normal making practice. I would harden at this stage and grind the end down on my surface grinder. But because most people don't own such a machine, I am going to do it the normal way.

Mounted up perfectly level in the milling vice, the bar is reduced down by not quite half it's diameter. One or two thou larger is ideal.

Mine measured up when finished at 0.1885", one thou over half size. Take good notice on this shot, the 'halving' was done for a longer length than the taper, this is so that you can use the shank size to get to your half figure, rather than attempting to measure on the taper.

This is what it looked like close up. The machining marks are only tenths of a thou deep, so no worries over those. I would forget about deburring, as you can easily take too much off the edges and prevent it being sharpened.

It was now time to get things warmed up and hardened.
Just the part that was machined was heated up to cherry red, and held there for a minute or two, then it was quickly quenched in water.
This should make the tool as hard as glass. I don't bother tempering the tool, and that is just a personal thing.

The machined face is then gently smoothed down on a smooth oiled stone until the machine marks are gone. You should end up with edges as sharp as a razor.

So that is the D-bit made.
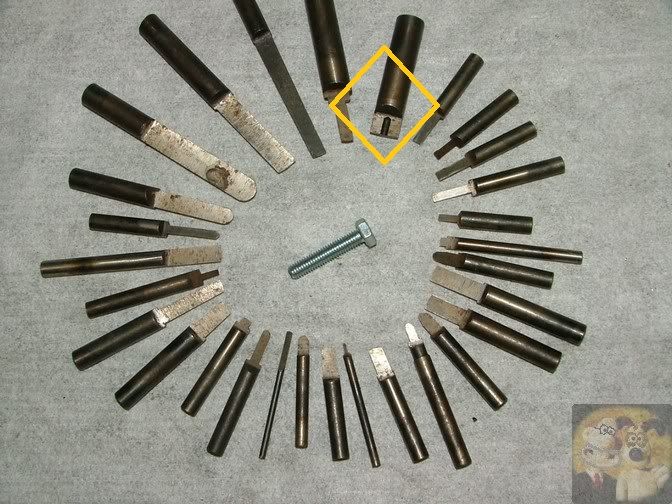
These aren't all the ones I have made over the years, just a few good ones that I hung on to. These are the straight sided ones. To give some idea of scale, the bolt in the middle is 6mm by I think 30mm long.

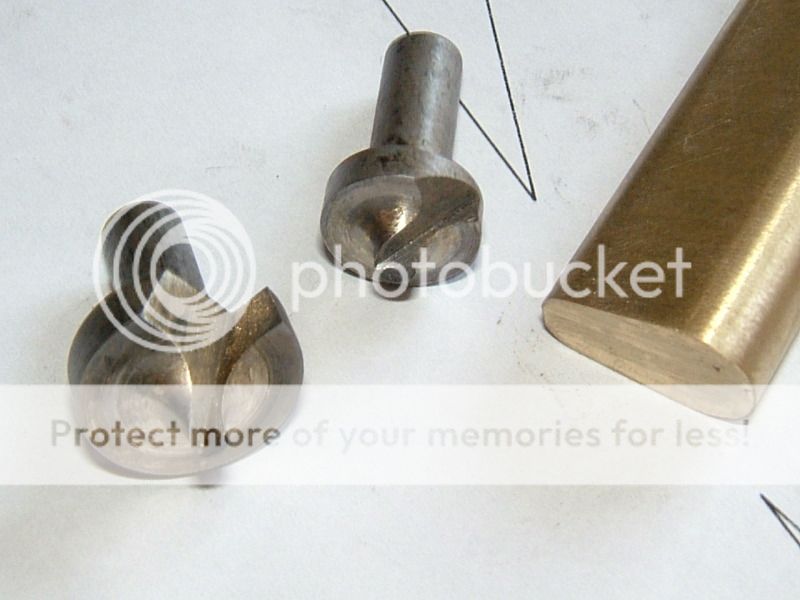
These being the taper ones I have made. I never realised I had made so many over the years.

Now if you need to discuss D-bits, you have a post to do it in.
John
This describes one that I made when I required a 22 degree angle inside a nozzle I was making. The angle couldn't really have been bored out as the depth was too long for such a tiny boring bar to survive the ordeal. People have other ways to do it, this is the way I found satisfactory for my use.
Mounted up a piece of silver steel (drill rod), and faced off the end.
Kicked the topslide (compound) over by half the angle required, in this case 11 degrees.
Then using the topslide, the taper was being cut.
The taper was finished when the small end was at about 2mm. I will be drilling a 3mm hole thru the nozzle material, so this D-bit will not require a cutting edge putting onto the very end, if it did, I would just give it a 5 degree cutting angle straight across the front face, after it is hardened.
The machining marks were gently removed with fine emery.
The bar was accurately measured up (this was 3/8" or 0.375"). Then it was divided by 2 and the figure rounded up. It was at this stage I changed my normal making practice. I would harden at this stage and grind the end down on my surface grinder. But because most people don't own such a machine, I am going to do it the normal way.
Mounted up perfectly level in the milling vice, the bar is reduced down by not quite half it's diameter. One or two thou larger is ideal.
Mine measured up when finished at 0.1885", one thou over half size. Take good notice on this shot, the 'halving' was done for a longer length than the taper, this is so that you can use the shank size to get to your half figure, rather than attempting to measure on the taper.
This is what it looked like close up. The machining marks are only tenths of a thou deep, so no worries over those. I would forget about deburring, as you can easily take too much off the edges and prevent it being sharpened.
It was now time to get things warmed up and hardened.
Just the part that was machined was heated up to cherry red, and held there for a minute or two, then it was quickly quenched in water.
This should make the tool as hard as glass. I don't bother tempering the tool, and that is just a personal thing.
The machined face is then gently smoothed down on a smooth oiled stone until the machine marks are gone. You should end up with edges as sharp as a razor.
So that is the D-bit made.
These aren't all the ones I have made over the years, just a few good ones that I hung on to. These are the straight sided ones. To give some idea of scale, the bolt in the middle is 6mm by I think 30mm long.
These being the taper ones I have made. I never realised I had made so many over the years.
Now if you need to discuss D-bits, you have a post to do it in.
John