Copper boilers

Home Model Engine Machinist Forum

Help Support Home Model Engine Machinist Forum:

This site may earn a commission from merchant affiliate links, including eBay, Amazon, and others.
Did you come here to gloat ? Kinda seem like it.

It pained me to read this impolite welcome and I will not let it go unchallenged.

I've been reading GWRdriver's posts for many years and have come to have great admiration and respect for him. His posts are level-headed, restrained, intelligent, polite and knowledgeable. Take my word for it, he packs enough gear to be able to say what he did in his introduction. I did not take it as a gloat because I know the man would never stoop so low.

Welcome aboard, Harry.

Best regards,

Orrin
 
Harry, sure could use some advise. The project is for a 5” diameter copper vertical fire tube boiler for a Coles model American LaFrance fire engine. The plans are dated 1964. I quit on this projects a few years ago because of the boiler. Engine, pump, wheels, frame and a few other things are done. Drawings may be OK. Instruction think are a little lacking for the novice that I am. I quote the instructions for the boiler.

Page 8 of instructions
“Section 8 – Boiler”
“It is believed about everyone has their own pet ideas about boilers. The one shown may not be to your fancy. O.K. Make changes as you wish.”

OK, gets some books and read. I got stuck on first basic question Not being very smart and barely passing high school and having taken only the minimum in math a little over 50 years ago Never could figure out the calculations for a safe boiler.

Am A little shy from drawing thickness for some of the copper. Outer shell is listed at 1/8” wall and have .106” wall thickness. The 3/8” fire tubes shown in drawing say .035” wall and have about .031” wall.

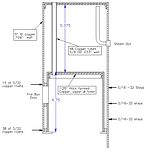
Am at a loss to figure out what the safe working pressure is for this boiler. Attaching sketch of the boiler.

Question. On the stays between outer boiler shell and fire box. Are these all done after the fire box and boiler tube are riveted together? Is the procedure tap drill both, clearance drill boiler outer, tap inside? Screw stay in and put nut on stay? Silver braze both joints?

Question. There is a big bunch of things needing silver brazed besides the seams there are 14 bushings for gauges and plumbing plus some brackets and studs. Having done some silver brazing, I'm a little intimidated at doing all this at one go. Would rolling the 46 fire tubes in using the squeezing rubber trick be OK?

Appreciate any advice or ideas.

Gary


sure could use some advise.
Hi Gary,
Let me say right at the start that you are to be congratulated for the substantial work you've done so far, this engine is not a simple project. And thanks for the boiler sketch, that has made answering your questions far easier.
Never could figure out the calculations for a safe boiler.
You shouldn't have to be bothered with this. Them's wot we pays our drawin' money for, to have that information worked out for us in advance by the designer. We could reverse-calculate the max safe WP (working pressure) for this boiler but I wouldn't bother. I can just look at the design details and say with a fair amount of confidence that it will be good for 100psi.

It has traditionally been accepted that the maximum practical working pressure for a properly designed copper boiler is about 125psi. Above this pressure steam temperatures are such that copper begins to lose some tensile strength, enough to begin to affect the design safety factor (ideally 8X), so most copper boilers are generally assumed to be operated at 100psi or less. Although it can be mathematically substantiated I ask you to accept my statement that this practice is "widely accepted" without supporting evidence. As above, I don't see anything about this boiler design that would prevent it being steamed at 100psi WP, if you wanted to, but knowing what I do about small engine behavior my thinking is it would be happiest running at somehere between 60 and 80 psi, but that's just a guess. Somewhere in your documentation it should state what the inteded operating pressure is.
Page 8 of instructions . . . “Section 8 – Boiler” - “It is believed about everyone has their own pet ideas about boilers. The one shown may not be to your fancy. O.K. Make changes as you wish.”
Hmm . . well OK, but if I'm paying good money for drawings I don't want to have to guess what to do next. Also, it's easy for the inexperienced (or short-cut takers) to say "That oughta hold . ." There is another aspect of this is, liability, but I won't go there today.
I am a little shy from drawing thickness for some of the copper. Outer shell is listed at 1/8” wall and have .106” wall thickness. The 3/8” fire tubes shown in drawing say .035” wall and have about .031” wall.
I think all your tube thicknesses are adequate for the intended service. I always prefer as much wall thickness in flues as can be had and it appears what you have is Type L (.030" nominal wall thickness) but tube thickness varies a bit from mill to mill. If you were to use coal firing, a Type K (.035" nom) flue would be better from a cleaning wear standpoint but there would be no appreciable gain in safety AND 3/8" Type K is very difficult to find in small quanities.
Question. On the stays between outer boiler shell and fire box. Are these all done after the fire box and boiler tube are riveted together? Is the procedure tap drill both, clearance drill boiler outer, tap inside? Screw stay in and put nut on stay? Silver braze both joints?
This needs a lot of explaining and I'm running out of time this morning but in a nutshell, I would eliminate all but maybe one ring of of waterleg stays. Although there are crush limits, generally speaking tubular sections such as you have here are self-staying and need no stays however I would put in one row (or ring) about 2/3 way up in the water leg to maintain internal alignment of the inner and outer tubes. Also, ALL the joint strength in a silver-soldered boiler is derived from the silver solder so riveting the thing to death really doesn't gain you anything. You can use only enough fasteners to hold the thing together for soldering and not lose any strength. More on this later.
Question. There is a big bunch of things needing silver brazed besides the seams . . . there are 14 bushings for gauges and plumbing plus some brackets and studs. Having done some silver brazing, I'm a little intimidated at doing all this at one go. Would rolling the 46 fire tubes in using the squeezing rubber trick be OK?
I would do this boiler in two stages, possibly three. I would first assemble the inner firebox tube, the firehole ring, firebox head, and flues and solder that all up. Rolling the tubes wouldn't be needed. I would deform them a bit so that they push/pressed into their holes and stayed there on their own and then temporarily slip on the top head to hold them in alignment while the firebox assembly is soldered up. I would then slip this assembly into the assembled outer shell and finish up with a second heat. It will be VERY important that you have a large heat source for this job. More on soldering in assemblies when I have time.

Sorry I had to cut this short for today.
 
Thanks for the detailed reply to my question on 'chilled cast iron'.
Also thanks for the detailed information for Gary.
Someday I'll do a boiler...so I'm interested in anything about it I come across.
 
Harry, thanks for quick response. It is quite a load of my little mind to not have to prove mathematically what is needed for boiler pressure requirements. Feel much better about not having to do the sliver soldering (brazing) all in one heat. Is there not much problem in bringing a silver soldered joint back up to or close to flow temperature a second time?

Went back and read the 13 pages of instructions that came with the drawings. No mention is made of intended working pressure of the boiler.
There is mention of adding (1) Superheater tube. (2) valve and jet to produce blower. (3) A blow down opening, near the mud ring.

Don't know about a superheater tube but would like to have a valve & jet for draft blower and also a blow down opening near bottom for draining boiler.

In the addendum page 12. A builder states he “feels that stays are not necessary between the boiler and fire box.” Like your idea of one row of stays.

I'm near completion of couple other projects and hope to be back on this boiler in a month or two. With your help I'm looking forwarded to getting started back on the boiler. Tanks.......gary
 
ghart3 said:
Is there not much problem in bringing a silver soldered joint back up to or close to flow temperature a second time?
Gary,
Most people will say you need solders of two temperature ranges in order to solder in phases, and I wouldn't argue against that if one is a little short on experience. However one of the convenient peculiarities of 45% silver solder is that it takes a bit more heat to re-melt it than to melt it the first time. With some careful planning and weilding of the torch I have found that in the great majority of situations I can get by with one solder. We can revisit this later when the time comes.
There is mention of adding (1) Superheater tube. (2) valve and jet to produce blower. (3) A blow down opening, near the mud ring.
You can get by without any of these but I think all of them are worth having, and if you fire with coal or other solid fuel a blower is a must. The so-called "superheater" tube would be more accurately described as steam "dryer" because that's about all it actually does for us, but I think it's very beneficial as it will make the model less "slobbery" while its running and you know how we hate slobbery engines.
In the addendum page 12. A builder states he feels that stays are not necessary between the boiler and fire box. Like your idea of one row of stays.
A tripod (three) would do the job but I would put in maybe six just for good measure. Remember these don't have to be threaded although certainly you'll need some way to hold them fast in place while the soldering is carried out. You don't want to be interrupted while you stoop to pick up a stay that's landed on the floor! One common practice is to use copper rivets with the heads inside. The long (outer) end of the rivet, or the outer hole, is then deformed in some way (a center punch will do this) to hold the rivet in place. Once the soldering and pickling is done the long end of the rivet is snipped and filed off.

I might a well go ahead and add this now. It is not good practice to cut stays off flush with the surface of the copper because this can cause weeps and leaks. It is my practice to countersink stay holes slightly, the amount varies with the diameter of the stay, but no more than 1/2 the thickness of the sheet. This gives the solder a place to "puddle" and completely surround the stay shank. The surface of the puddle (or resulting meniscus) usually come up to flush with the surface of the copper, or a little more, after which (if needed) the stay can then be snipped off nearly flush with the barrel surface.


This is great info.

How about 56% solder? Is it like 46% with respect to the reheating?

There are boilers in my future too. ;D ;D
 
ozzie46 said:
How about 56% solder? Is it like 46% with respect to the reheating?
Ozzie,
I don't know. Everything I've ever bought for myself has been 45% (mostly Harris Safety-Silv 45) but I've also been supplied with small amounts of silver solder by folks I was doing work for. If some 56% sneaked in on me it was in a stituation where I wasn't concerned about reheating but my guess is that the 56 will behave the same way as the 45.


Thanks GW.

Forgot to sign my name on last post.


Ron
 
I'm sorry to have to do this, but for the first time, ever, I've gotta add my 2¢ worth to a thread for the second time. To explain:

Ghart3 said
I got stuck on first basic question Not being very smart and barely passing high school and having taken only the minimum in math a little over 50 years ago Never could figure out the calculations for a safe boiler.

Mr. GHart doesn't give himself the credit he is due. He says he's not very smart, but don't believe him. I've drooled all over the inside of the shop, repeating to myself all the while, "This guy is a clever genius."

Never, ever, have I seen such a well organized, neat and clean machine shop. Frequently used hand tools are located at the machine, within short grasp of where they are needed; not at arm's length, mind you, but right at ones fingertips. If I lived to be a hundred I could never have come up with such a clever layout.

I'll go you one further. His CNC mill sports a scraping job that is a work of art. The ways and dovetails are gorgeous! Furthermore, it is a working mill and the things that GHart turns out on it make me turn green with envy.

How many of you have ever seen a left-hand and a right-hand nut on the same bolt, the same set of threads? Neither have I until GH gave one, each, to a whole bunch of us, along with a generous supply of other goodies.

Then there's the matter of craftsmanship. Superb. Need I say more?

The man is one-in-a-million and I'm very proud to have made his acquaintance, button-bustin' proud.

He's one of the smartest men I know.

I'm sorry if I embarrassed you, GH, but I had to do this.

Best regards,

Orrin
 
Hi Harry

Welcome to HMEM.

I will also have plenty of questions in the future. I love steam and have completed 2 small boilers, both of which I have posted on this forum. My intention is make a few more yet so I will need some help.

Cheers

Rich
 
GWR. Are there any good alternatives to copper for boilers? I priced a 1 foot by 4in dia length on the web and it was appox. $127.00. Thats a lot more than I want to pay. maybe boilers are out of my league. At least in that size.

Ron
 
Hi Ron,
The only practical alternative is carbon steel, but even then anything smaller than about 6" diameter makes it difficult to build a boiler with proper internal clearances and an allowance for corrosion (which is advisable.) Some will ask why not stainless steel, and there are quite a few stainless model boilers, but I'm not a proponent of stainless because there are known electro-chemical problems with it which make it unsuitable for miniature boilers.

It's unfortunate that copper has gotten to be so expensive. I try to keep my eyes open for scraps and cutoffs (new, never used material) from local plumbing and mechanical contractors. That used to be an good source, and it still can be, but because the price of salvaged copper is so high shorts and cutoffs aren't allowed to lay around very long. An alternative is to roll the barrel from sheet stock but that's not always more economical than buying tube.
 
Are there any good alternatives to copper for boilers? I priced a 1 foot by 4in dia length on the web and it was appox. $127.00. Thats a lot more than I want to pay. maybe boilers are out of my league. At least in that size.

Depending upon where you live, you might want to check with salvage/recycling yards. One in our area frequently has brand-new short ends of usable lengths. My best score is a piece of new 6" copper about two-feet long and several other shorter pieces. Hopefully, it will some day be the basis for a vertical boiler.

I'm always finding smaller stock on the order of three-inches. They are useful for reservoirs on water-cooled projects, gasoline tanks, etc.

Regards,

Orrin
 
A 48" length of 4" Type L copper tube has been on eBay for a while at $100/Buy it Now and didn't move. Finally last week someone bought it for $100 . . . $25/foot or $4.65/Lb. Cheap . . . if you need 4" copper.
 

Latest posts

Back
Top