Color Casehardening: A photo and video tutorial

Home Model Engine Machinist Forum

Help Support Home Model Engine Machinist Forum:

This site may earn a commission from merchant affiliate links, including eBay, Amazon, and others.
Hello Henry,
Do you find that the use of Barbeque charcoal in case hardening is acceptable, or is this a modern synthetic substitute for willow charcoal, also what size "lumps" do you break the charcoal into? I am sure the size must make a difference to the colours obtained, I am about to use a 50/50 Wood, Bone charcoal mix, held close by wire wraps. I have tried to contact you via your old University E-mail address to no avail.
Regards,
Chris Buckingham.
France.

Sorry, I haven't been around for awhile, so forgive the late response. I have recently updated my profile with current info; however, I am still at the University. I have not personally attempted the use of briquettes, but I highly doubt they would work well due to the use of binders. My best results have come with the use of chemically pure charcoal. Brownells sells it, and so do some other companies. I have made charcoal in the past from wood, leather, fruit pits, and some other stuff I won't even mention, it works, but it is much less trouble to just buy the stuff from one of the above sources. It really isn't that expensive for the quantity that you will use. We use a fair amount at the lab, but for normal usage a couple buckets worth will last you a long time. I have even reclaimed it from the bottom of the tanks and, once dried, it works just fine and gives great colors.

The size is important, Brownells lists the bone as 10x28 sieve size and the wood charcoal is #6 mesh. The wire wrap is a good idea, and your 50/50 mix is a good place to start.
 
This is great information. I have a chance to buy one of the smaller Neycraft furnaces for a very good price. The inner chamber is 9"x9"x6.5". What did you find the limitations to be in practical terms? Also, what have you found to be the lowest temp that you can produce colors at? I'm more interested in producing colors in alloy steels rather than hardening and am very concerned about warpage.


I have got some really impressive colors in the 1200 degree F range, but at that temp I wouldn't exactly call it color case hardening. The Neycraft is a good furnace. The chamber is a bit on the small side, but if you can fit it in there it will do just fine. The downside is that the elements will eventually have to be replaced just due to the dirty nature of the process. My preference is really a gas oven, but these are a bit more difficult to find and can be difficult to regulate precisely. The furnace I currently am using is a Johnson Tripple Treat that has been fitted with Honeywell digital controllers. Great furnace, but it costs more than a lot of SUV's. The equivalent could be built for much less however.

Warpage is certainly an issue that you need to think about. It is less likely to occur at the lower temperature ranges, but can and does still occur. I generally block anything I am really concerned with and this can take a lot of time. Even so, some refitting is often required after everything is said and done.
 
Henry,
Thank's for the great article and video. I have a question regarding CCH on the receiver of an older Ruger No.1. The Receiver is made of through hardened 4140 or 4340. I have been told that it may not be a good idea to CCH this material. I am really looking for the color, not the case hardness. is it possible to do this process at the lower temperature you talked about in the artcle? if so what is the lowest temperature that you have seen good color?
Thanks,
Brad


I cannot really speak towards the casehardening of an action like the Ruger #1. All of the work that I have done at the university has been non-gun related for obvious reasons. Anything that I do that is firearms oriented takes place in my well equipped home shop.

As for the #1, I have seen them done like you speak, and even handled them, but I wouldn't go out on a limb and tell you how to do it. When you get involved with casehardening a receiver that is going to be used with high pressure cartridges, you really need to know exactly what you are getting into, and there are a lot of factors that need to be considered that you have not mentioned above.

Experts like Doug Turnbull would be my choice for something like you are proposing, and, FYI, the last #1 that I handled that had been casehardened had been done by them.
 
I don't understand how the wrapping with iron wire works-do you wrap a layer of charcoal up against the parts? Or something else?
 
The wire is used first and than the part is packed in charcoal as usual. On small parts I try to make a grid of about 1/4" square with the iron wire, sometimes I just wrap it in one direction. One of the keys to getting good colors is to keep the bone charcoal in close contact with the part for as long as possible and the wire helps to do this. It also likely works to disrupt the water during the quench which helps with the colors. I used to use an air stream in the quench tank much like you see others recommending, but the wire pretty much accomplishes the same thing and is more consistent, at least for me and the students that I have taught.
 
Thanks for the info on the wire. Is the wire wrapped tightly around the part, or loosely?

Another question: Do you not find it necessary to seal the pipe to the stainless carrier during soaking? Does the loose charcoal around the base of the pipe take care of this?
 
I wrap the wire fairly tightly around the parts, sometimes it is used to secure blocking to the parts to help prevent/reduce warpage during the quench. The fit of the crucible to the steel carrier (stainless is nice but not necessary) should be close, but air tight is not required or even desirable.

During the process the charcoal gasses off to create both carbon monoxide and carbon dioxide which should prevent oxygen from getting in. The charcoal on the outside probably helps burn off oxygen present immediately around the opening, but it really isn't necessary. If you are using an electric furnace I wouldn't do it at all because it will definitely shorten the life of your heating elements. Some knife makers do burn charcoal or other organic materials in their electric furnaces during a heat treatment cycle to reduce oxygen inside the furnace and help reduce scaling on the parts, but they also have problems with the life of heating elements doing this.

I personally prefer gas furnaces for this and other reasons, but I have successfully done color case hardening with electric furnaces also.

Hope that helps.

Regards,

Alex Johnson
 
Thanks, Alex, I appreciate the effort you take to pass on this knowledge.

I am gearing up to try CCH soon, and your article was one of the best sources of info I have found.
 
Just finished Tubal Cain's Hardening, Tempering and Heat Treatment.
Very interesting!!!!
 
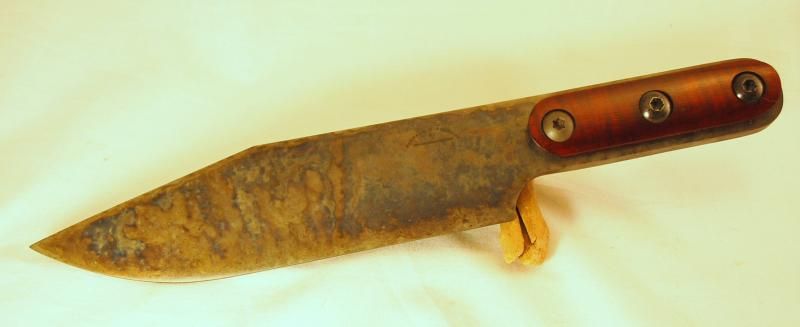
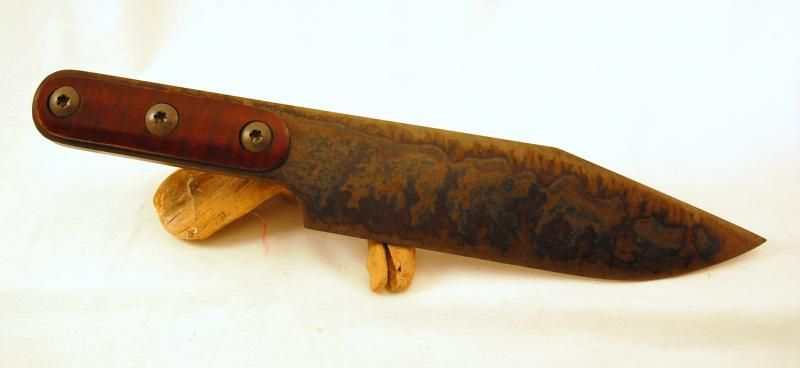
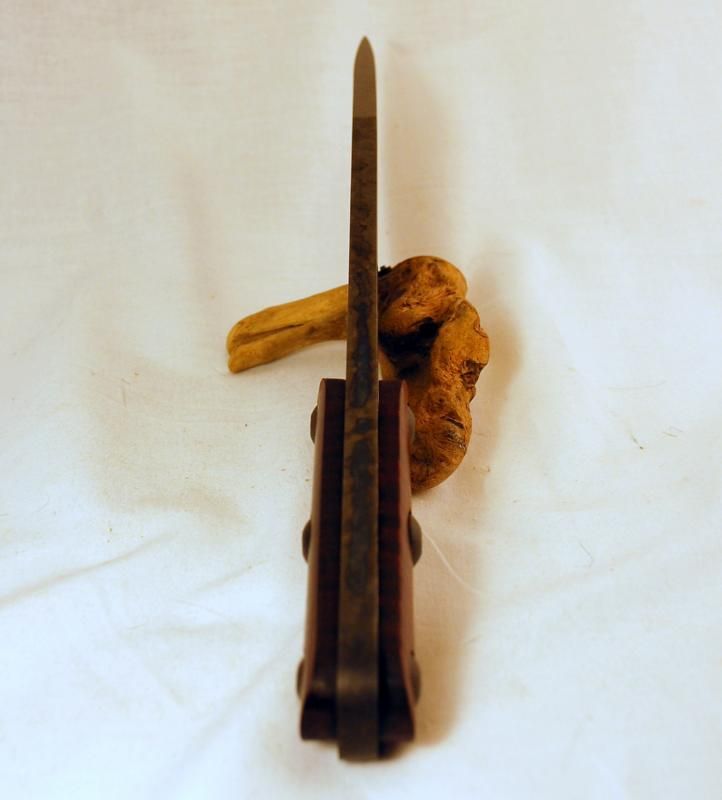
Thought some of you might be interested in this. This is a large throwing knife made out of 3/8 inch mild steel plate that I color case hardened using the same process that I described at the beginning of this thread. The knife measures about 14 inches long and just one ounce shy of 2 pounds and is going to be used by a gentleman that participates in knife throwing competition at local muzzleloader matches. I was trying for something that was a bit unusual and more traditional in appearance than some of the other ones out there.

RandallandJohnsonBowie1.jpg


RandallandJohnsonBowie2.jpg


RandallandJohnsonBowie3.jpg


It is a bit different color case hardening something this size in my home workshop and having it come out of the quench tank with no warpage, but the basic principles are still the same.
 
Well Henry, I reckon you have got just about the perfect English Sporting Gun colour there, I think the spread of colours is about as good as I have ever seen with none of the modern bright blues. Can you tell us what mix you used to achieve this ?
I would be a very happy man if I could get colours like this.
Chris,
France.
 
Thank you. The mix in this instance was about a 50/50 ratio of wood to bone. Changing the proportions of the mix will have some impact, but how you introduce the contents of the crucible to the quench and how they are prepared makes a huge difference also.

One thing that I do is to wrap the parts in soft iron wire before I place them in the crucible, the other thing is to make sure that the surfaces are properly prepared. I generally polish to at least 320 grit by hand before starting the case hardening operation, rougher surfaces will produce more muted colors. Knife blades like this and others that I do also have to be properly blocked to help prevent warpage which generally will occur on thin sections without prior planning.

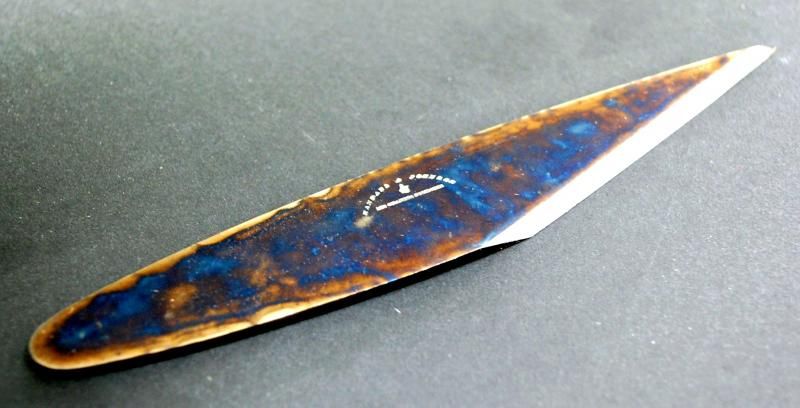
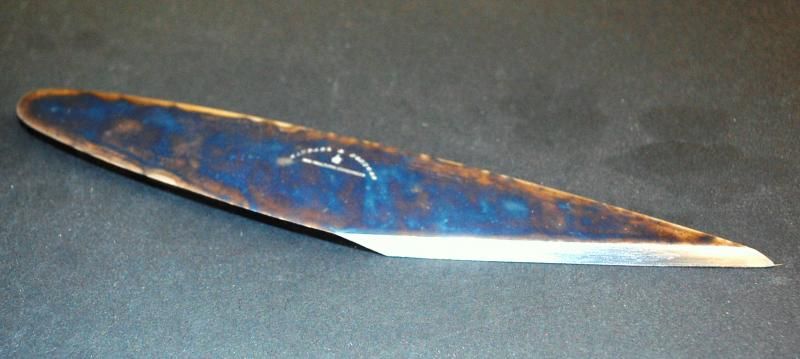
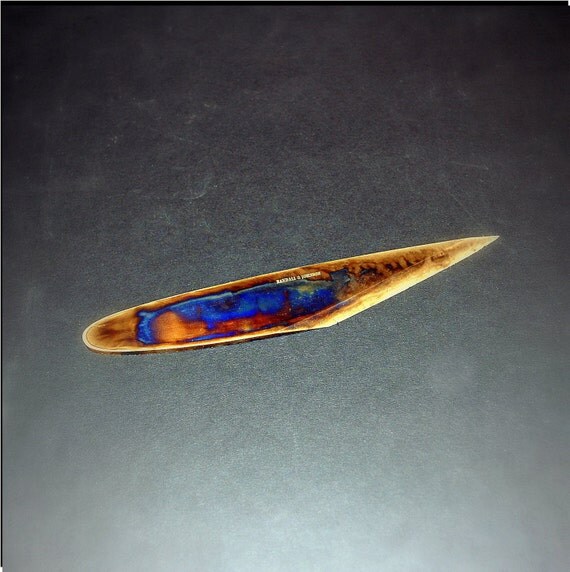
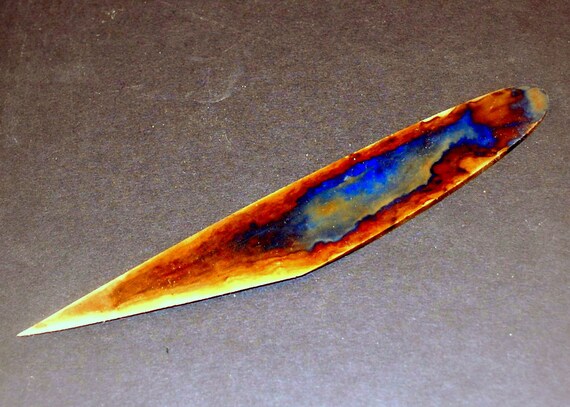
The following picture was a small letter opener that I just finished this evening and it shows a higher concentration of blue which was achieved in part by a higher concentration of wood in the pack. The photos aren't the best, but it should give you some idea of the colors.

DSC_1139.jpg


DSC_1141.jpg
 
Well 44 Henry,
That is fantastic! I am not normally a great fan of the intense blues, they look much too modern when used on an early English gun but in this application it looks really nice, I always block any thin section that I intend to quench, but I think a great deal on effort is required in "presenting" the piece to the water at the right angle on thin sections, or they will have tensions set up within which can cause distortion , we have all fund that out the hard way!
Chris ,
France.
 
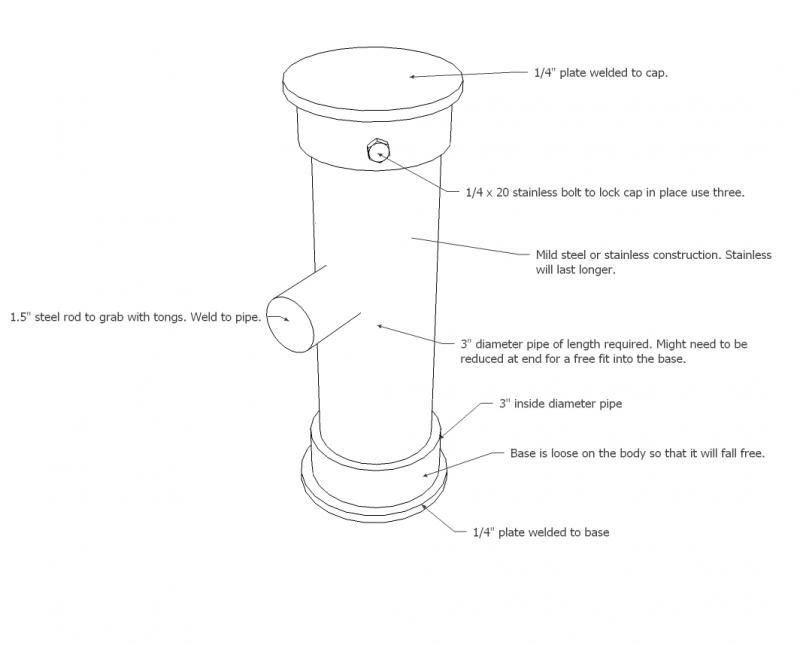
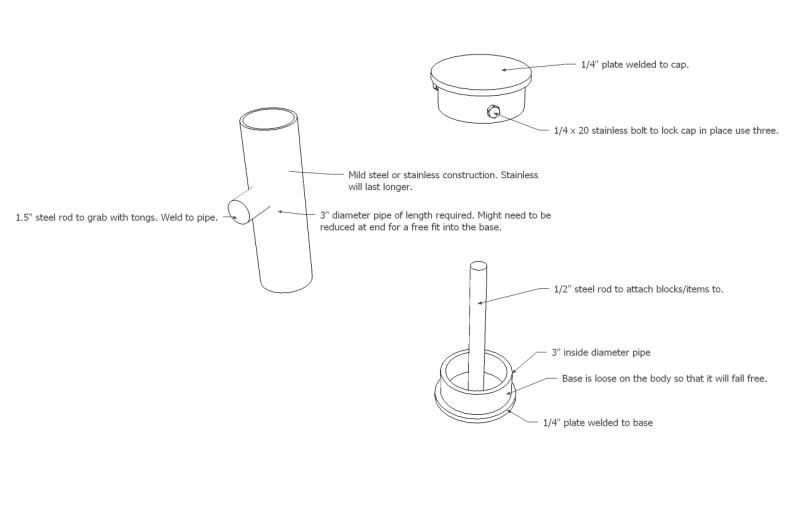
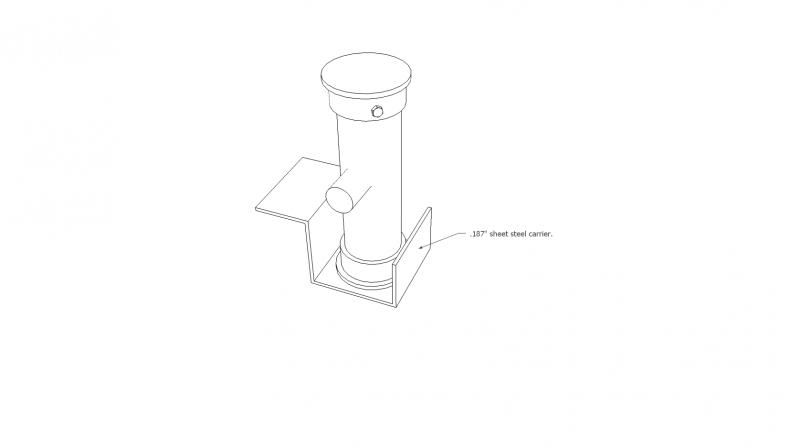
This is an example of a type of crucible that I use. I am not at home at the moment, but put this sketch together so you can see. Introducing the parts to the quench is critical, but sometimes it is nice to be able to displace the water and than have it crash around the parts from the sides uniformally. I do this by creating a three part crucible where the body is free to fall into the quench water and it has the parts attached to a central rod either directly, or with blocking. Sometimes it is useful to place a shield (roof) on top of the rod that covers the parts but this is a bit more involved. This style of crucible must be handled a bit differently in that the parts need to be attached to the rod and the main body of the pipe placed over the assembly. The pipe must be a free (read loose) fit on the base so that it falls freely. Sometimes after a number of cycles the end must be ground down to allow a smooth fit. Once the body is placed inside the base the charcoal mix is placed in through the top, being careful to tap frequently to settle the charcoal in all the crevices. At this point the cap is placed on the body and the three bolts tightened to secure it. Once this is accomplished I generally place the whole assembly in the the standard carrier shown at the beginning of the thread and proceed in exactly the same fashion. I do on occasion place the whole crucible on its side in the furnace and than need to creatively lift it out of the oven without letting the base fall free and tip it onto the quench tank lid. This is a bit difficult and can be dangerous if not done correctly, but sometimes the parts that I am doing do not fit height wise in my home furnace. If you have questions please let me know.

carrierassembled.jpg


crucibleexploded.jpg


crucibleoncarrier.jpg
 
Hello 44 Henry,
I would imagine that the base cap plunging into the quench will cause some kind of cavitation giving an air/water quench to the part being CCH, a very interesting departure, and one which I will certainly try, I think that the range of colours obtained must be a product of very local temperature variations, just the thing you could get with this turbulent plunge method, very interesting, many thanks for passing this knowledge on !
Chris,
France.
 
Hello,
My experience has been that the best colors seem to happen when the water displaces and than comes crashing around the part at all sides, you are correct that the cap does have this effect. I have also found anyway that you can keep the charcoal in contact with the part longer will help the process. I have several students casehardening parts this afternoon and we have actually fastened a mesh steel cage that traps some charcoal next to the workpieces, the whole cage goes into the tank from the crucible and the colors we are getting look very good.

Here is one of my latest projects using the cage technique.

il_570xN.717173692_dz7w.jpg


Here is a shot of another side

il_570xN.717299219_g964.jpg
 
Hello Alex,
I think you have got a really nice colour balance here with fantastic blues, and really nice red hues, it would be an interesting experiment to try this formular/heat cycle, on an object with different sections, I still find I have problems around the edges of holes, maybe I should lodge a large lump of charcoal in the hole.Realy impressed with this project.
Has your new Paper been published yet?
Regards,
Chris,
France.
 
Hello,
Thank you for the compliments. I submitted my paper recently to the International Journal of Modern Engineering (IJME). It will need to go through the peer review process before any word is given on possible acceptance, but it is an open access journal so it will be available if published. I hope it is the start of much more research in this area.

Regards,

Alex Johnson
 
Brand new here and must thank Henry 44 for his fine thread. I have picked up a few ideas reading all this and would like to add a bit. For the fellows that want to do a small item you can with a half a tea spoon of Kasenite or a cup of bone charcoal mixed with quart volume of natural lump charcoal broken to about pea size. Place the polished part in a steel container with a cap over the top and this is placed in a good camp fire for an hour or two. Quench in a 5 gallon bucket of water that has been poured form one bucket to the other a few times just before dumping the part in. Use all the tips posted here and you will get something like this.
 

Latest posts

Back
Top