Boring Head - Sketchup Drawing

Home Model Engine Machinist Forum

Help Support Home Model Engine Machinist Forum:

This site may earn a commission from merchant affiliate links, including eBay, Amazon, and others.

sparky961

Well-Known Member
Joined
Jun 10, 2008
Messages
130
Reaction score
0
EDIT: File re-uploaded... should work now

-----

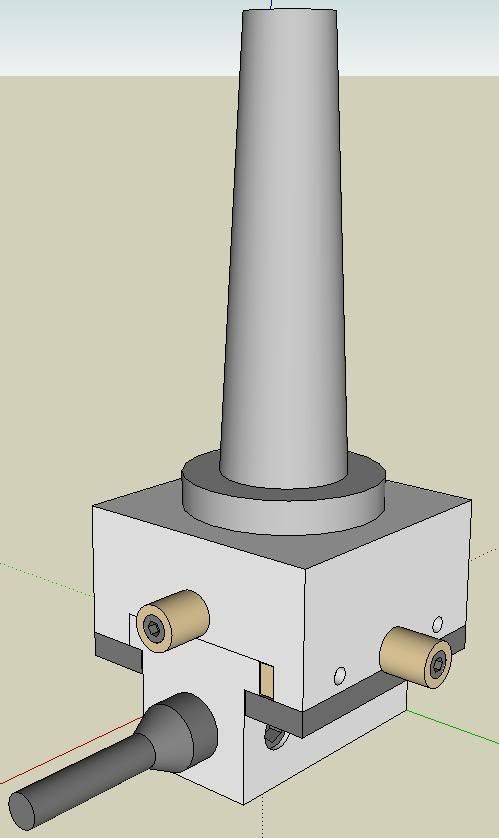
After a few hours of work, I've come up with two 3D designs in Google's SketchUp. One uses dovetails and a similar adjustment configuration to the Criterion heads I've seen pictures of. If made in multiple pieces, a dovetail cutter isn't needed.

The other uses a sort of I-beam configuration and an adjustable gib.

The main horizontal hole is 1/2", and the vertical holes allow for both 1/2" and 3/8" boring bars. I figure the horizontal could be used with a 3/8" bar with an adapter sleeve.

Note that some of the fasteners and holes may not be standard or perfectly placed at this point. If there's enough interest, I can fix this as well as do a bit of a write-up.

BoringHeadDovetail.jpg


BoringHeadI-Beam.jpg


Since I've never actually used, or even held a boring head, I was wondering if you folks out there could add your two cents on these designs... the pros, cons, suggestions, preference for one or the other - both for construction and use.

I've included some pictures here, and the SketchUp files attached. Feel free to use the design. I figure there are a bunch of patents on this stuff, so I'm unlikely to make any money on it. The only thing I ask is that you drop me an email to say "thanks". :)

-Sparky

View attachment BoringHead.zip
 
I re-uploaded the file with the original post, and double-checked it by downloading it. Works here now...

-Sparky
 
Not too sure the clamping action on the "I beam" construction will hold if it's only the gib force that is
doing the clamping. The dovetail one looks good. I don't get how the adjustment works with the
screw up where it is. What does the "innards" of the adjustment look like?
...lew...
 
Well, it's a bit difficult to explain this without "taking apart" the 3-d model and seeing how the innards go together. I've cut it down the middle in one of the attached pictures to show how the inside looks, and hidden a few components and rotated it around...

Basically, the main screw sits in two bores in the front (closer in this view) and the back. It's not clear from the diagram, but the bore in the back would be slightly larger than the major diameter of the threads. There would also be a slightly larger diameter section on the screw that fits snugly into the bore.

In the centre is the lead screw (brass-coloured here), and is attached via two countersunk screws to the slide below (the part that holds the boring bar).

At the front, the screw is reduced in diameter slightly, providing a shoulder that the lead screw bottoms against when inserted from the back. The screw's diameter and the bore are again a snug fit.

The section that fits through the bore at the front is a precise fit so that when the knob on the front is attached, the screw has no end play. This seemed like a simple way to do it, but it would be difficult to adjust after any wear.

The two screws on the side set the friction on the dovetail, and the knob between them is meant to lock the slide while cutting.

-Sparky

Boring Head (Side Section).jpg


Boring Head (Lead Screw & Nut).jpg


Boring Head (Lead Screw & Nut - Bottom).jpg
 
with boring heads, the more rigid the better

i came a cross a CRASHED criteron 2 inch head and r8 arbor at an old jobber shop i worked at (with NO r8 machines)

i dialed the head in, re aligned it...tig welded it, and turned the weld off to true it up (mainly for looks)...

its the best head i have ever used for being rigid...no rings on finishing cuts (i can also run it in reverse without fear of the head unscrewing from the arbor)

thats kinda it for suggestions...every machinist i've worked with had his own 'style' for using a boring head...as have i use to have a few different setups at a manual jobber shop i use to worke at...a head setup for roughing(5 inch chinese head welded to its nmtb 40 taper)....finsher (criteron 3 inch)...rough line borer (shop made bar chucked in endmill holder), and a finishing line bore (solid one peice 1.5 dia bar, 8 inch long bar on ntmb 40 taper...all ground, 3/8 square pocket by 45 deg for tool....)....I also had anoth POS head (3 inch or 4, forget) setup for fly cutting with a shop made boring bar...1 tool up to 12 inch with counter weight

nowadays, if i have a critical bore at work, its typically done on cnc....home i dont do much with my 2 inch head besides some work i take home...0.05 to 0.02mm tol stuff in 6061....

...just keep machining heads till you find one you like...i'm happy with my refurbished head at home...at work i have a adj nikken single point boring bar on a cat40 taper for our cnc machines....as welll as a cheap chinese 2inch head for our manual machine...the joke at the shop is my manual machine at home is better out fitted than the work one....
 
Great timing - I have been thinking about building a boring head for a couple of weeks now. You sure made some nice drawings! I am wondering about the one that uses the dovetail. Your drawing shows what looks to be a hinge of some sort. What holds the hinged part to the hinge pin?
 
Wouldn't it be more ridged to have a solid block and use a gib strip for adjustment, also round off the corners some just to give a bit of clearance and less rotating mass were you don't want it.

What kind of mill are you going to use it on. I had a round column mill/drill and it didn't take to it very well. No matter how hard I tightened down the head on the column it would always oscillate back and forth and bore out of round, not rigid enough I think. A more sturdy machine with dovetailed columns or a "big boy toy" would be OK.

Nice drawings.
 
Thanks Sparky for the "innards" view. Looks like it would work. I like the idea of the 3 peice dovetail.
I'd probably pin the non-movable part as well as screw it real well. The hinge bit is probably a little
more complicated than it needs to be. A simple ridge on the top of the "movable" peice will work. I did
that on the adjustable bit holder for the radius truner I made or was that the clamp on the "diamond"
turning holder, Well somewhere and it worked good. :)
...lew...
 
"3 Piece Dovetails" are known as box ways. They are more rigid than dovetails but you really need three gibs to make them work right.

If you plan on build a 2 or 3" boring head why not just buy one? I could see building your own micro boring head. You can pick up used criterions cheap on ebay and some of the off brands dirt cheap
 
macona said:
"3 Piece Dovetails" are known as box ways. They are more rigid than dovetails but you really need three gibs to make them work right.

Where can I find some pictures of "box ways" ? I can't picture how anything I'd call a Box would look
like a dovetail. And I also cant see where you'd put 3 gibs in a dovetail. Please explain.
As to "why not buy it" for the same reason that people build instead of buying model engines. and the
reason given for climbing mountains, (sort of) . :)
...lew...
 
If you can heat treat the parts and grind them to perfect precision then it makes good sense to build your own....But if you are capable of the work then more likely you already have boring heads in several sizes.....I can , I do. ;D
 
Lew Hartswick said:
... and the reason given for climbing mountains, (sort of) . :)
...lew...

You climb mountains becaus they are there, you build things because they are not.
 
You build something because buying one is way beyond the budget, if you can get what you need cheap enough it is better to use your time on other projects.

On the other hand maybe you just want to see if you can make one, I did, spent a lot of time doing it because I just wanted to do the machining, it's a challenge, requires some real accurate work to make one that even just passable. I've only used it once, but thats ok.
 
Rutland has a 2" head on sale for $47. How much us your time worth?
 
I don't want to calculate the cost of the one I built on an hourly rate, I knew going in that it would no doubt be way cheaper to buy one. On the other hand, building one let me try a number of machining operations that I'd never done before, and it was good practice to have to adapt a set of plans for an entirely different mounting system...So: economy:fail. Learning experience: top marks.

Joe
 

Latest posts

Back
Top