Bazmak-A Model Horizontal Shaper

Home Model Engine Machinist Forum

Help Support Home Model Engine Machinist Forum:

This site may earn a commission from merchant affiliate links, including eBay, Amazon, and others.
Having just posted the above and reading a thread on the pros and cons of slide valves and piston valves,i will post this short post
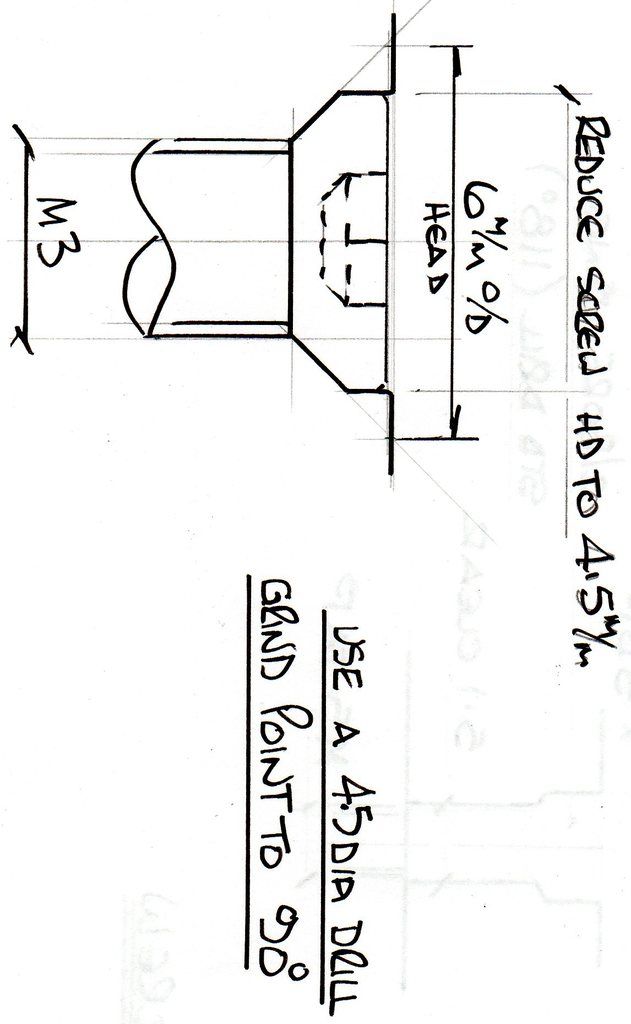
Many years ago I was in the process of making a 3.5 g 3 cylinder pacific loco
Heilan Lassie.The two outside cylinders had slide valves.They were mounted
thru the cover plt and body and fixed to the cylinders with 12 7ba slotted hd CSK screws.Im not a lover of slt csk so went for M3 hx sock.Problem with them is the large head being out of proportion,so I turned the hds down to 4.4mm
in a simple fixture in the collet ,lathe.I ground the point pf a 4.5mm drill to 90o
and using the above procedure.All fixings lined up perfectly and looked good/proportional to the model.Most of the fixings were 5 and 7Ba which are
near enough M3 and M4.Still used a lot of hex hds for details but they have reduced hds and are difficult and expensive to source.As a note I have kept a set of drills sized and ground for a no of small fasteners both metric and imperial and I don't own any counterbores
 
Almost there but in the meantime,spent some time playing with the shaper
and making brass and STEEL chips.It works really well for a model
A minor problem is when I swung the clapper box out of vertical it clahed with the body on the return stroke.The stroke is set at max(about 80mm) but it can be set a little shorter to solve the problem.Took a couple of short videos
 
I've been adding fasteners now for three days, so that they will all show up in the bill of materials on the general arrangement drawing. My software tells me that there are now 197 individual components in the model (which includes the fasteners.)
 
Well Brian has almost finished and is doing a great job.A lot of time on my part
doing manual drgs on the drg board and Brian producing some excerlent drgs
in the computer,When they are made available I do hope someone will make a start and then ,I speak for both of us, it will be well worth the effort.Its not difficult or expensive and it makes a wonderful working model
Meanwhile I am making a start on design improvements and along with a build description will endeavour to get all the additional info thru email to anyone who does make a start at a later time
I have just remade the brass spline/bush and cut 12 larger splines instead of 24
This works better,and with the eccentric set at max moves the feed 1/12 rev
or 4.2 thou inch per stroke.About right.
 
Almost there but in the meantime,spent some time playing with the shaper
and making brass and STEEL chips.It works really well for a model
A minor problem is when I swung the clapper box out of vertical it clahed with the body on the return stroke.The stroke is set at max(about 80mm) but it can be set a little shorter to solve the problem.Took a couple of short videos

Hi Barry,

Its probably a bit late now to suggest that the tool clamp should be able to rotate rather than the whole clapper box. That would solve your fouling problem and it might make that item easier to build.

Other than that, I think that its a great build, it does you credit producing such a nice machine.

I'm also going to stand in line for a set of drawings.
Thanks for a great WIP thread.
 
I THINK I may be finished. It ended up at 70 drawings, if I haven't missed anything. The hardest part of this for me is the fact that the sketches I had to work from are all first angle projection, as drawn by Barry in Australia. I have worked for 51 years using third angle projection. This makes for a major confusion. Many of the parts I modelled ended up sort of bass-ackwards and had to be reworked. I know that first angle projection is common throughout Europe, but I didn't know the Aussies used it. Canada and USA uses third angle projection.
 
I know that first angle projection is common throughout Europe, but I didn't know the Aussies used it. Canada and USA uses third angle projection.
http://s307.photobucket.com/user/Br.../FULL ASSEMBLY OF SHAPER_zps7vugayog.jpg.html

From what I understand, we use third angle down here as well, however Barry is not originally from Australia so may have been trained in Europe (I'm pretty sure he's English).

It took me a little while to get my head around the different projections but I think I get it now. I haven't made anything backwards from your plans, or other North American plans, so I guess I'm used to the third projection.
 
As you say, English born and bred.Brought up on 1st angle but i can use 3rd angle where necessary.Anything other than 1st I usually put view on arrow X etc.With a little thought this exercise could have been made easier.Almost there and I have enjoyed it.Again many thanks Brian
 
All 69 drawings are finished. I could not get the HMEM upload/download section to work for me, so I have put the files up on a free web hosting site, which you can download from.--Somebody please try this download site and let me know if it works for you and if you are able to access the drawings okay. They are all .pdf files, so you won't need any cad program to open them.-Brian Rupnow
http://www.mediafire.com/download/da00sk1cg0yxa4e/SHAPER_DRAWINGS-BAZMAC.zip
 
Many thanks again from me Brian.I too now have a full set of drgs
but as I can only read and print them I have done the following
Print them off and scan them back into the computer as Jpeg image files
with the limited software I have I can now produce new drgs or revise existing
I have made a blank template from brians drg so can hand draw new ones or revise/amend existing without bothering him further.There was one minor change that we were too late to catch so if anyone makes a start let me know and I will email.I am now looking at making modifications/improvements.Instead of reverse engineering I can now draw first and manufacture/prove and upload or email as image files
My first intent is make a new toolholder to fit the clapper box which hopefully
will do one of the few jobs that the mill wont do.To cut an internal keyway.
If anyone is intending to make a start let me know and I will make a detailed build description,also any new ideas please post. Regards barry
 
I made a new toolholder for the clapper and ground up an M4 tap
Drilled and tapped an additional M4 to the rocker brkt and fitted a clamp screw
to lock the Pawl in neutral.The following videos show the results.It works but not satisfactory,the stroke is too far forward,even when reduced in length the vice overhangs the front of the table and setup is not rigid enough
Attached videos show,but at the end of the day it is a model
 
Back
Top