Bazmak-A Model Horizontal Shaper

Home Model Engine Machinist Forum

Help Support Home Model Engine Machinist Forum:

This site may earn a commission from merchant affiliate links, including eBay, Amazon, and others.
Well I struggled to get the videos uploaded but I think you all get the gist
The new tool holders need to be bolt on to suit different tools and I think
a parting off blade typ would be more suitable.Two main changes I am now investigating are
1-Make the stroke position adjustable to enable the cut to take place nearer to the body with less overhang for the vice.I need to be able to adjust the position of the drive pin in the ram.Lots of thoughts
2-I would like to change the vertical feed from the thumbscrew to a worm drive
as the authors orig. intent.If I make brass wheel to replace the thumbscrew
about 38 dia and use an M6 worm thread can anyone advise.Is it easier to use the mill
and a m6 tap to cut the wheel, what dims are needed,how many teeth would be on nom 38 dia wheel.Should I gash the teeth first using the rotary table ,what dims should I turn the wheel to etc etc Any advice would be great before I start experimenting. Regards barry
 
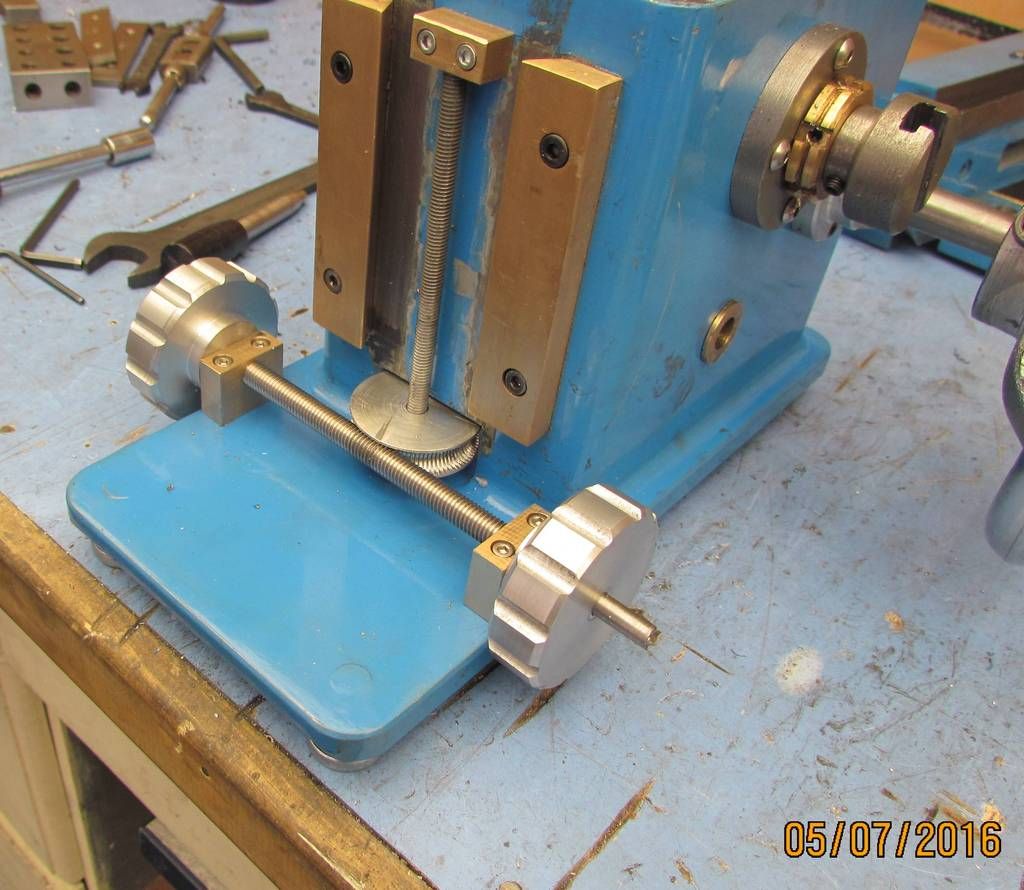
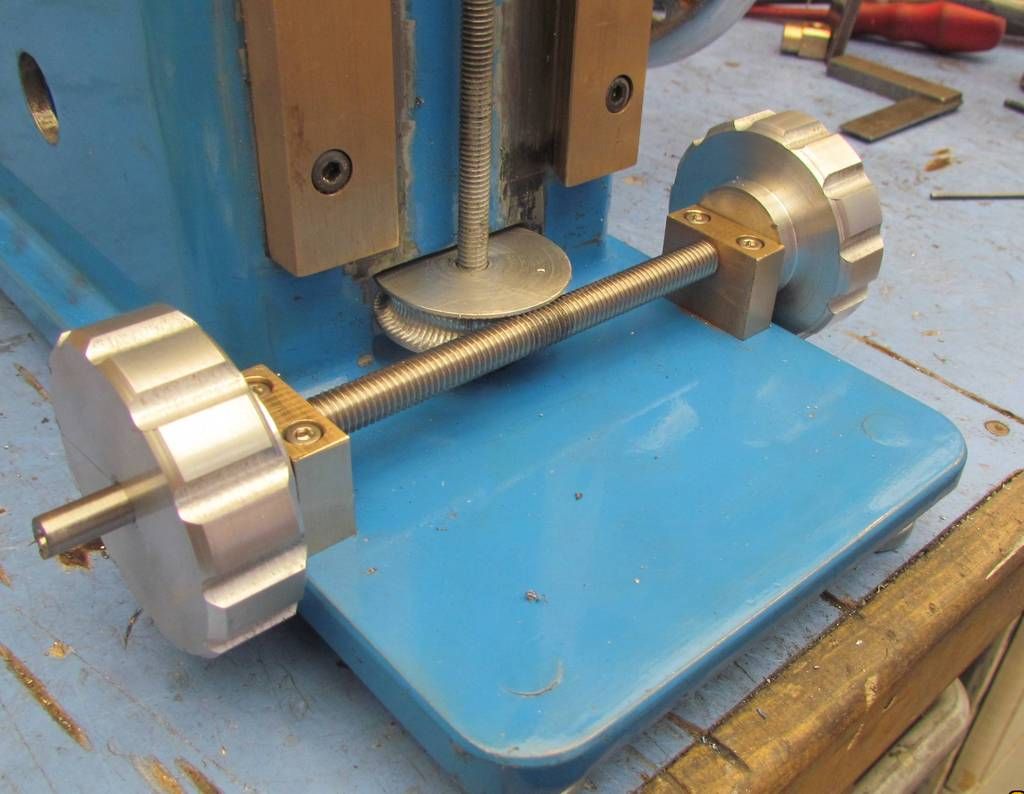
Well I have started on the first modification to the model shaper
I had made a thumb wheel drive as I thought a worm and wheel was too difficult.On the last post when using the vertical feed for cutting a keyway
it was apparent the thumb screw was adequate for a model but limited
for useful work,so with nothing to lose I decided to have a go.Seen it done on U tube and that's it.Trial and error.Turned an alum blank to nom 38 dia (same as the thumbwheel) and cut a semi cicle on the outer face 6.8 dia x 3.4deep
The core dia of the M8 s/s screw I made and nudged it to give it divisible x pitch of 1.25 Set up in the mill to spin on my angle plate and with an M8 tap
lined up by eye and fed in.Never thought it would be that easy.Depth of cut until it looked right and engaged smoothly with the shaft.Made 2 brass bearing blocks and 2 alum handwheels and as you see from the photos,it works a treat
About to make a new wheel in brass when I REALIZED
When I came up with dims I forgot about Pi.Dont have 25t as I thought but 78
Now 1 full rev of the handwheel turns the vert feed crew 1/78 x 1mm pitch
or half a thou.It will take forever and day to move the table up or down
Next I will look at fitting a larger thread setion to the centre of the M8 screw
And make the new brass to wheel to suit.Wait for next instalment


Yes you are correct.In that video the lathe was running as normal,it should have been running in reverse.It means that the cutting stroke is in the lower section of the eccentric and means full leverage is on the return stroke and not the cutting stroke.Maybe explains some of the difficulties on cutting the keyway
Will remember next time many thanks for making me aware
 
Thanks for your input.Dont know the tech terms but I knew the thet
the cutting stroke was slower with more torque than the return stroke
I just forgot to put the lathe in reverse on that video.Any further input is most welcome.Any thoughts on making the stroke location adjustable ?
 
I'll probably not use the correct terms here, but on the full size shapers I've seen the crank pin is moved closer to, or away from, the center of the
bull gear to adjust the stroke. I seem to recall a block that slides in a U shaped
slot, on the gear, that is moved by a screw that goes through the block. Sorta
like a cross-slide set up....

Pete
 
Thanks for your input.My thoughts are to slot the ram so the pin can be moved
,I will give it more thought when I finish the worm/wheel
In order to increase feed and having a new M20 tap never used with M20
bolts comm available I did the following.-
Machined a 50mm lg piece of M20 thread and fitted to the centre of the M8
s/st shaft. Made a new worm gear from brass 25t.Much improved the feed is now 5 thou per rev an increase of 10x. Now I am happy with that I will turn a new
single piece screw from M20 allthread and avoid single point screwcutting
Will also increase the M6 vert screw from M6 to M8
 
Apologies if I am 'rambling a bit' but years ago I restored an old hand Drummond shaper- along with a Round Bed!

I had Ian Bradley's book called the Shaping Machine . It went with the shaper.

So where is a copy of bits of the book etc? As far as my memory holds, I went through the bits on 'bedroom-workshop.com' which is on the Perfecto principally. Again, bits of the old book appear here but there is also a reference to NEME-S.org site. I recall 'digging this' stuff out in the days of yore.

Maybe this will help to complete your most interesting article and project.

Cheers

Norman


PS

I suffixed the neme-s.org site with 'shaper'. Bradley's book seems to be there and lots more.

N
 
I made a new worm shaft from 12dia and press fit a 40mm length of M20 allthread to the centre.I also made a new vert. feedscrew from M8 s/st
allthread to replace the original M6.Minor mods to mating parts.
I was struggling to get a nice sliding fit to the vert. dovetail so I cut 1 side with a slitting saw and added 3 no M3 grubscrews.Then I played about for a couple of hrs scraping etc until I was happy with the vertical slide fit.Video and image
shows the end result.I had to modify the handwheels to obtain max stroke and feed etc Stroke is 0 to 80mm.Horiz feed is 75mm and vert feed is 45mm
I am now starting on the adjustable ram stroke/position [ame]https://www.youtube.com/watch?v=D17VlhiQjTw[/ame]
 
Made a start by changing the 6mm lever pin hole to a 30mm long slot
and cbored 10mm dia x 7mm deep. Elongated the slots in the ram core to suit
Made a new pin and sliding bushes and the pin can be set in posn and
locked with a single M6 locknut.Photos explain now to reassemble and try it all out by cutting a keyway on a short stroke set close to the bod y.TBC
 
Finished the 2 major mods and happy with both.Will now strip down and
complete the finish etc.Will redraw the revisions to suit the mods.If anybody wants to make a start I will email revised drawing.Will also make a start
on a build description.I think I have taken this 3" model shaper as far as I can
and I must say its been a pleasure to make and I am happy with the results
Anything else is just playing about.The size is about right for a model that can do work,but to do useful work it should be larger,that will bring other problems
Any larger and it encroaches into the area of existing small shapers etc
 
Your link looks to be the right format Baz - except your typing is letting you down a bit. I believe you meant to type etc? maybe before the link, but you missed a space so you put : ethttps://www.youtube.com/watch?v=GDC78zx1o6Mc

Without the 'et' at the front : [ame]https://www.youtube.com/watch?v=GDC78zx1o6Mc[/ame]


EDIT : but for me, that video is not valid...
 
Remove the extra c from the etc and then the link becomes: [ame]https://www.youtube.com/watch?v=GDC78zx1o6M[/ame]
 
Hi Baz,
Gus missed the China Shaper he had for 20 years.We had made in UK Shapers in Trade School. The poor vice was bashed by many students and Gus was given the task of replace the vice nut. Now trying very hard not building this shaper. About to D/L Win/Zip Files and spend time reading and sizing up before jumping in. With a mini lathe and mill,it will tough.
 
Zip Files D/Led . Now studying the Main Shaper Body Drawing, giving me the impression that I could manage the machining. Next to review would be the shaper ram. May go for C.I. for easy machining. Please advise sourcing for main gears. Plan to motor drive Shaper.
 
Hi Gus,you happy fisherman.I built it with a mini lathe and mill and without drawings etc and I didn't find it difficult at all.And I am not the most confident of people.If you make a start then FOLLOW THE THREAD and photos and do it in stages as I had to with no drawings and details.Its not difficult and now I have ironed all the problems out its a beautiful little machine.I couldn't be more pleased.As seen in the last video,with the stroke position now adjustable
the cut becomes better and the machine much more rigid.If you buy the RHS and top/bottom plates it makes a good start.I will email you a build guide
but I have full confidence in your ability
 
Back
Top