Arrggh...aligning minilathe tailstock

Home Model Engine Machinist Forum

Help Support Home Model Engine Machinist Forum:

This site may earn a commission from merchant affiliate links, including eBay, Amazon, and others.

compressor man

Well-Known Member
Joined
Jan 3, 2010
Messages
107
Reaction score
2
Location
USA
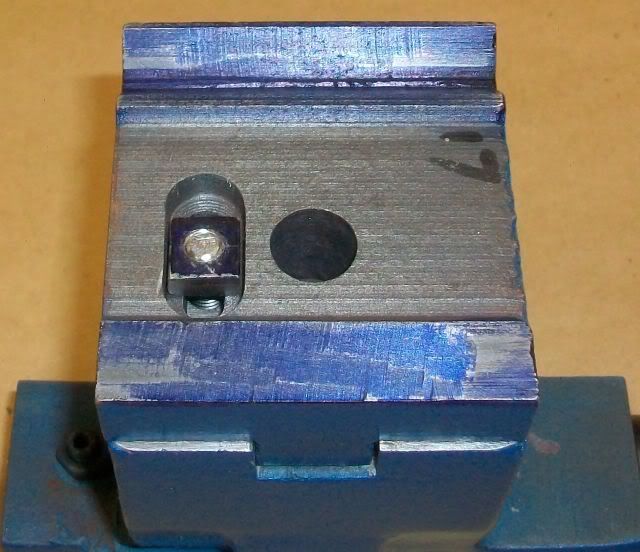
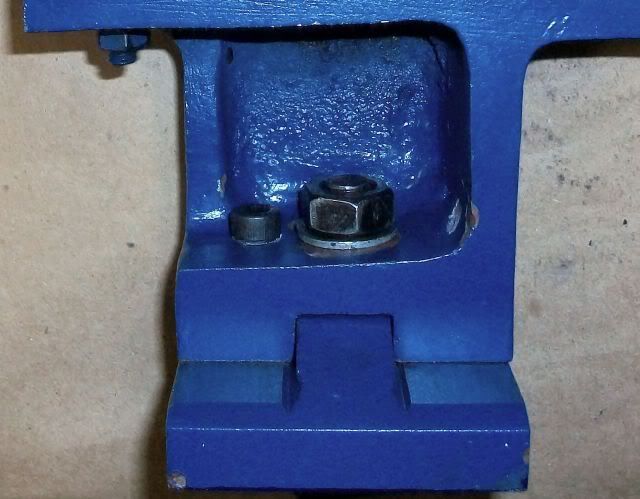
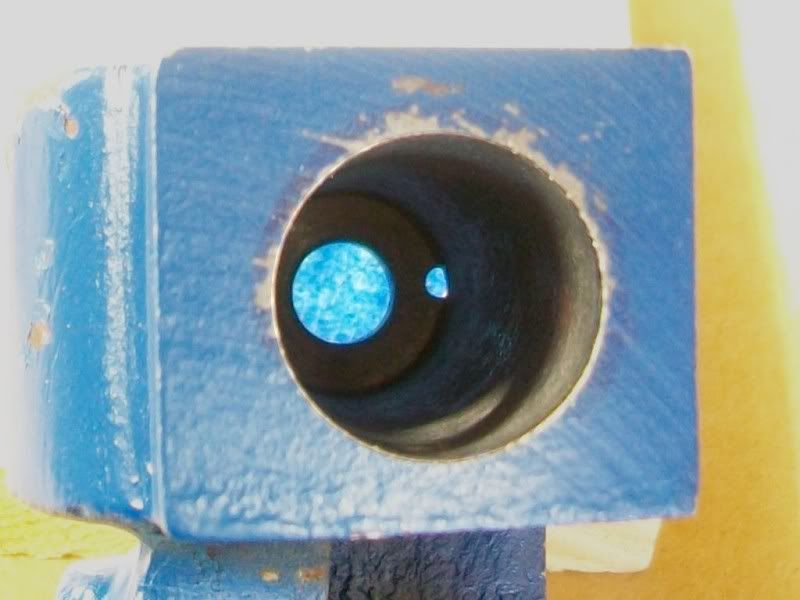
Not that long ago I aligned the tailstock on my minilathe. It has since lived in the cabinet under the lathe. Maybe it got bumped or something but...I was turning some small pulleys yesterday and it eventually came time to bore the axle holes. I started with the center drill and could tell that it was not exactly in the center of the shaft but it didn't seem so bad. But then, when I drilled it out with a 1/4" bit I actually saw the drill bit "spring" back into straight when withdrawing it from the workpiece. Puzzled, I cranked the bit back into the bore hole and saw it bend as it entered!! :wall:

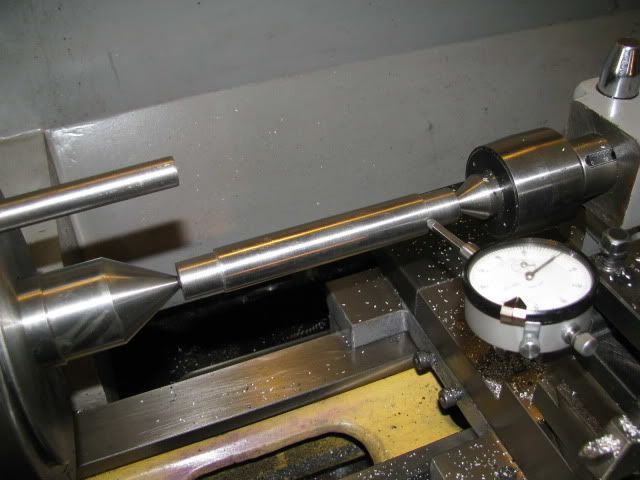
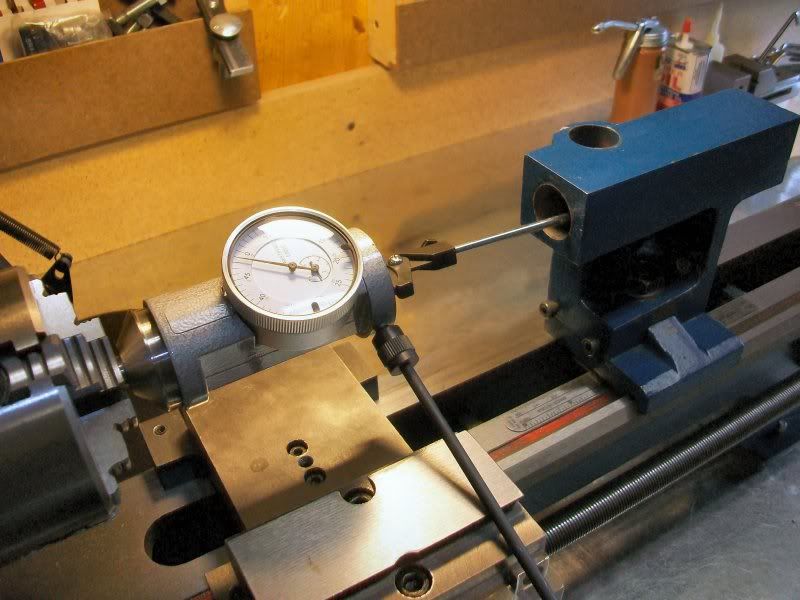
Could someone please describe to me their "fairly simple since I am not a machinist" method of aligning the tailstock on this machine? I had considered centering a piece of shaft in my 4 jaw chuck , then sliding the tailstock up and (with loose alignment bolts) chucking the other end of that shaft into a drill chuck which would of course be inserted in the tailstock. Would this give me a nice alignment which would upon tightening give me good results?

Help!
 
It may not have been bumped Chris.
Ambient temperature differences can cause the same problem.

I don't know that it is the "best way" but this is what I do.

Chuck up a long piece of stock that will fit through the spindle with just enough out of the
chuck to center drill that end. Move it out and engage the center. Take light cuts until
the entire length is cleaned up. Mic it for taper. If it's .010" bigger at the tail stock end,
than at the chuck, move the tail stock toward the compound side .005" Clean it up again
then take another light cut. It may take several attempts but you can get it perfect.
That doesn't mean it will be perfect tomorrow. There are just too many variables.

Rick
 
Chris,

My way with a test bar, (accurately machined and centred steel).

IMG_1172.jpg


Hope this helps.

Best Regards
Bob
 
Thanks for the help guys. Rick, I might try your idea. It certainly is better than the method I have used (which I will not describe due to the laughter and raised eyebrows that would result if I did).

Bob, I love your method but alas I have no test bar and cannot turn one with my currently inaccurate lathe!
 
A combination would be best.

Once you get that tail stock set so the test piece has no taper in it,
SAVE THE TEST PIECE!
Then use it as Bob suggests for future adjustments.

I have never saved that test piece myself, but I will the next time!

Rick

 
rake60 said:
It may not have been bumped Chris.
Ambient temperature differences can cause the same problem.

I don't know that it is the "best way" but this is what I do.

Chuck up a long piece of stock that will fit through the spindle with just enough out of the
chuck to center drill that end. Move it out and engage the center. Take light cuts until
the entire length is cleaned up. Mic it for taper. If it's .010" bigger at the tail stock end,
than at the chuck, move the tail stock toward the compound side .005" Clean it up again
then take another light cut. It may take several attempts but you can get it perfect.
That doesn't mean it will be perfect tomorrow. There are just too many variables.

Rick

Nice one Rick! I must try and remember that.

Vic.
 
A good source for "cheap" test bar is an old printer; the steel bars are perfectly straight and round, and the diameter has a very small tolerance.

Roberto
 
Chris, hopefully you've resolved your alignment issues by now. But if you haven't, you may want to check your alignment with the quill extended and with it retracted. I had a terrible time recently trying to align the tailstock on my 7x12. It was out of alignment when I bought it, but I didn't realize how much until I was almost finished with my first project. Alignment seemed to be a function of how far the quill was extended. I could get it aligned with the quill fully extended, but then when I retracted the quill it would be out of alignment, and vice versa. No manner of twisting or moving the tailstock side to side seemed to help. I even checked the quill to see if was bored straight. It appeared to be OK.

I finally checked the tailstock bore. I wondered if maybe it was curved or out of round or tapered somehow, so I removed the quill and checked the inside of the bore along its length with a coaxial indicator (bought during a moment of weakness), from the bore opening to the bore bottom (about 4.5 inches), along the back (back side of the lathe), top, bottom, and front (front side of the lathe) to see if I could find anything grossly wrong.

CoaxIndicating.jpg


The back side of the bore was straight. The top side of the bore was straight. The bottom side of the bore was straight. But the front side of the bore looked like it had a deep gouge or scoop along its length. I took a lot of measurements along the length at different angles around the bad part to see if the gouge was just a deep scratch or something worse. The diagram below shows what I found. The red lines show where the bad part of the bore was, and of course it's not drawn to scale. The actual maximum deviation was about 0.011" about a third of the way into the bore. The problem area is only on the front side of the bore.

TailstockBoreDiagram.jpg

I took a picture of the inside, but it didn't turn out very good with my old camera. If you look closely at the right side of the bore about half-way down you can see what looks like a rough area. It felt a bit rough along that side to my finger, and I think it corresponds to the bad part I measured. (That light area on the inside at the bottom is just light coming through from the hole where the quill lock fits.)

TailstockBoreInterior1.jpg


There was also a lot of clearance between the quill and the bore on my lathe (0.870" diameter at the bore opening for a 0.866" diameter quill), but I always figured a little pressure on the quill lock would push on the quill and keep it straight against the side of the tailstock bore. I think that might be true if the bore had been in good shape. But with the bad bore, my assumption is that the quill lock was pushing the side and bottom end of the quill into that bad area as the quill was extended or retracted, causing it to move around and giving me poo poo for overall alignment.

Don't know what might have caused a flaw in a bore like that, maybe a bad casting? I ordered a new tailstock, and turned a test bar like Rick suggested above, and got the new one aligned to my satisfaction.

Hope this is of value to you or others who might have the same problem.

Regards,
Rudy
 
Thanks Rudy.
Tailstock alignment has been a recent issue/topic for me.
I'd been questioning whether extension made it better/worse.
When I get a chance I'll take a look at it.
 
Wow Rudy, talk about worse case scenarios! You have given me new things to lay in bed and worry about :-\ . I havent yet had the time to align my misbehaving tailstock. But I have begun to work on it, today I was able to get a little shop time in. While lining it up I have been dealing with one very aggravating trait of this particular type of tailstock. Of course the bottom screw must be loosened to allow the tailstock to be adjusted. This forces one to depend on the (crappy) rear screw to hold the tailstock in its new alignment. Well, once you slip it off the lathe and begin to tighten the bottom screw, that same bottom screw actually slides it out of alignment while tightening. Now that is frustrating. After seeing this happen once I used a pair of vicegrip pliers to hold the to parts together while tightening the bottom screw. Seems to work pretty well. I also extended the tailstock quill to its maximum length and ran a DI down it. I got a .005 difference from one end to another :mad: 
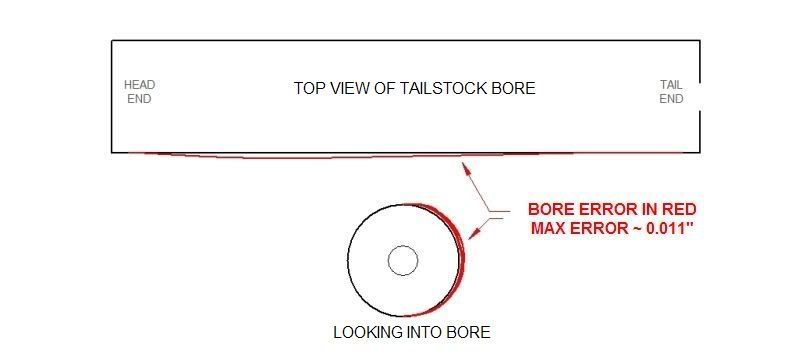
A shim took care of this but I then had to come inside and take care of household duties. I really hope that tomorrow I can get out there (I took the day off) and get this thing straight (no pun intended!).
 
Rudy,

I think you have raised a couple of good points there.

The first concerns these cheapish lathes, and how they make them down to a price where they represent good value for money for the new machinist.
I am sure a lot of 'what the eye doesn't see, the heart doesn't grieve about' goes on. That is if there is a small fault, and it isn't obvious, they do let it pass inspection, hoping that it doesn't rear it's ugly head for a fair while.

The other point, and a very valid one was your mention of the ram lock. How many people put on a bit of pressure to stop things wobbling about, then leave that pressure on, or just part of it, rather than taking the lock fully off. If the parts aren't too well lubricated, that minute bending of the ram will wear away the inside of the casting in no time, and looking at the where your wear pattern is, directly opposite to the lock, which is about 1/3rd back, just as you mentioned. I would say that is the major contributor to that wear pattern.

The same sort of wear pattern occurs where jib locks are fitted on sliding faces. If the pressure isn't removed after you have finished the job, either the gib will get a wear patch where the lock is, or the dovetail will get the same fault, depending which material is the softest. In the situation where your gibs need a tweak, reset the gibs rather than trying to compensate with the gib locks, otherwise wear like this will and does happen.

It isn't usually how the lathe was built that is the fault, but how it is handled during it's lifespan. Lots of lube and regular maintenance will prevent most nasty wear patterns forming.


Bogs
 
very interesting thread here, and many things to remember to avoid premature wear of parts (thanks bogs)

compliments rudy, not many people would had find that fault

 
Chris, I agree with you about that cap screw at the bottom of the tailstock. I found it almost impossible to hold the base sections together to tighten that screw without losing alignment. I finally replaced the bottom screw with one that I could tighten from the top. (Not my original idea, I found the idea at http://myweb.tiscali.co.uk/silkstone/minilathe/minilathe01.htm down toward the bottom of the page, probably at other sites as well. And there also some other interesting mods at that website.)

I drilled out the threads in the top section of the base, all the way through so I could slip a cap screw in from the top.

DrillingOutTailstock.jpg
Then I ground down a nut so it would fit in the existing slot in the bottom section of the base without turning, and ground down the end or the cap screw so it was flush with the bottom of the base and wouldn't interfere with the ways.

TailstockCapscrewBottom.jpg

I used a cap screw so I could use an allen wrench to tighten the two sections together, but you could use a hex head bolt. With the cap screw I still had room to get a wrench on the locking nut.

TailstockCapscrewTop.jpg

Zee, your tailstock is probably much better than my original. The replacement I got wasn't perfect, but much better.

Bogs, I agree, and appreciate your comments. Yes, even with their limitations, these imports have allowed lots of us to pursue our hobby on modest budgets. Even after replacing the defective tailstock, I've found that the new tailstock still requires a little quill-lock pressure to stabilize the quill while drilling. I've added a spring washer under the lock handle to allow me to fine tune and minimize the force. And as you suggest, I lubricate the quill and tailstock bore.

Ariz, thanks. As usual, the problem was at the last place I looked. ;D

Rudy
 
Alright, I have an update on my lathe

First of all...Rudy, thankyou for posting that truly excellent suggestion about putting the adjusting screw on top of rather than under the tailstock. I did this (it was quite simple) and it made things 1000% easier.

Secondly, I turned a rod according to Ricks method and began to get things into shape. I noticed that my adjustments were sort of hit-and-miss and what should help sometimes did not. Curious, I put my di on the base of the tailstock and noticed that even when locked down I could wobble it severel thousandths with firm hand pressure. With this new information in hand I set my DI against the side of the extended quill and took a reading. I then released the tailstock (homemade camlock) and slid the tailstock back down the ways and slid it back into position and locked it down again. Sometimes it would come back to the same setting as before but just as often it would be out of alignment a few thou or even 10 thou.

Here was my problem, how in the world can one align their tailstock if its setting is not repeatable when removed and put back on? Surely you cannot realign every time it is slid around!!? I wonder if my camlock simply does not hold firmly enough and would I be better off with the old style nut and wrench. Anybody else ever ran into this?
 
Chris, glad the mod worked for you.

If your camlock is locking the tailstock down securely but you can still get some rocking movement, your tailstock may not be sitting flat on your lathe's ways. You might try putting some layout ink or magic marker on the bottom of your tailstock and slide it back and forth on the ways to see where your contact points are. That blue color on the bottom of my tailstock in the middle picture of my last post is layout fluid, and you might be able to make out some lighter areas on each corner where it's worn off from sliding on the ways. My tailstock wasn't sitting flat on the ways initially and would rock back and forth a little when it wasn't locked down. I got some aluminum polish and lapped the tailstock bottom on the ways with it, similar to the lapping shown on the mini lathe website at http://www.mini-lathe.com/Lapping/mt_lap.htm. It took me a few hours, IIRC, but I finally got rid of the wobble and a stable seat on the ways.

Rudy

 
After reading this thread I decided to check my mini-lathe tailstock out. I have never adjusted my tailstock, but I've known it needs to be done. As prof65 mentioned, I made a test bar out of a steel rod I took from an old printer. Side to side looks good, but the tailstock seems about 3 thousandths high. What is the best way to fix that problem?
 
I wouldn't mess with it keys.

High or low will have very little effect on the machines taper.

Rick
 
rake60 said:
I wouldn't mess with it keys.

High or low will have very little effect on the machines taper.

Rick

Touche :)

Best Regards
Bob
 
rake60 said:
I wouldn't mess with it keys.

High or low will have very little effect on the machines taper.

Rick

Duhhhh! I guess high or low doesn't change the distance the work piece is from the cutting tool. I will just consider myself lucky that I don't have to adjust it yet. It looks like a lot of fun with the locking screw on the bottom and all.
 
I would have to disagree with Ricks' statement just a little.

All would be well and you wouldn't notice much of a difference if it was only a couple of thou high or low, but any more than that can have a pronounced effect on the cutting action of the lathe tool.

Say your lathe tool was set to height by the chuck as is usual, if the tailstock is high (unusual) then as the tool begins to cut, the tip is lower than centre height of the job, and would most probably cut OK, but you would get a slight taper from the larger diameter at the tailstock to the smaller at the chuck end.

The main problems begin when the tailstock centre is low (normal condition). Again, with the tool at centre at the chuck, the position of the cutting tool tip will in fact be higher than the centreline of the piece being cut, and will not cut correctly, but rub against the side of the job, depending on depth of cut, it would be more pronounced the shallower the cut, and wouldn't start cutting correctly until the tool was back to correct centre height as it neared the chuck. This would be liable to give you a rubbish finish towards the tailstock, and yet again a tapered cut.

All points of the compass, when it comes to the tailstock centreline, has some bearing on how the job will proceed, not just side to side. It all depends on how accurate you want things to be.

Bogs
 

Latest posts

Back
Top