An unspillable oil can

Home Model Engine Machinist Forum

Help Support Home Model Engine Machinist Forum:

This site may earn a commission from merchant affiliate links, including eBay, Amazon, and others.

mklotz

Well-Known Member
Joined
Aug 29, 2007
Messages
3,047
Reaction score
27
Location
LA, CA, USA
This is an old idea - my Dad made one eons ago - but it may be of interest to some of you. I know that it was a hit with some of the members of our club.

If you use a can and brush to apply cutting oil on the lathe, you probably have spilled the can once or twice. This can can prevent those messy spills.

It consists of nothing more than a can (e.g., tuna can) with a metal lid soldered onto it. In the middle of the lid is soldered an open-ended tube (copper plumbing tube works well) which extends into the interior of the can. The can is then filled with a small amount of cutting oil such that, as the attached sketch shows, when the can is laid on its side or turned upside down, no oil can escape. Your oil brush goes into the central tube to access the oil.

Designing such a can is an exercise in elementary mathematics. I wrote a program to do it but most of you won't want to get that deeply into it, I suspect. Simply make up something that looks reasonable. Fill it with water and try turning it to different attitudes over the sink until no more water comes out. The water remaining in the can will tell you how much oil you can put into it and have it remain unspillable.


OILCAN.jpg
 
Mklotz
Said affectionatley as a newcomer.
Sometimes you amaze me
Baldrocker
 
Great solution as normal Marv.

But one question.

After testing in the sink, how do you pour the water out, so that you can put the oil in?


Now about the royalty payments for the use of my Crap-O-Cad program.

John
 
You beat me to it Boggy - I wanted to know the 'zact same thing.
 
Years age someone made a commercial one of these molded out of polypropolyne plastic. The only difference was that the top screwed on so it could easily be removed for cleaning, changing contents, etc. Seems like they were under $5.00 at the time. A quick search of usual suppliers didn't turn up anything, and unfortunately I don't remember the trade name. Does anyone else recalls these or know of a current source?

Bill
 
Bill,

I am renowned for making do and not making tools for the shop, but in this circumstance, I think $5 + postage (double if available in the UK), justifies a quick tin can modification.

John
 
Busy Bee has the ideal non spill container sold as a glue container. You fill the large container and then tip it to put a small quantity in the smaller reservoir. A screw on lid for the small reservoir holds an ordinary cheap paint brush.

http://busybeetools.ca/cgi-bin/product10?&NTDESC=b2033

Not trying to steal Marv's thunder, but just another suggestion. I have two on the lathe, one for cutting oil and one for way oil.


I take a small plastic bottle with a small neck, cut the top off, put metal slug in the bottom for a counterweight then put the top back in upside down and press it in. then face the edge off at high speed to fuse the two pieces together.

<table style="width:auto;"><tr><td><a href="http://picasaweb.google.ca/lh/photo/iNsCf7mDXCpCt23gJY8eVQ"><img src="http://lh5.ggpht.com/kustomkb/SMp4XuG8A4I/AAAAAAAAAHU/j8rajajZERc/s400/oil can.jpg" /></a></td></tr><tr><td style="font-family:arial,sans-serif; font-size:11px; text-align:right">From <a href="http://picasaweb.google.ca/kustomkb/WorkPics">work pics</a></td></tr></table>
 
How do you get the water out? C'mon, guys, you're cleverer than that. Straw, wick or sponge. I prefer a more ingenious technique. I dump some sugar into the water and let the hummingbirds vacuum them out for me. :)

Kustomkb,

I've made some children's paint containers like yours from the designer water bottles that litter the California landscape. Cut off the conical top section, invert into remaining part of bottle carcass and secure with silicone sealant.

Ok, now here's the math challenge for you. Given the dimensions of the can and the diameter of the central pipe, how do you determine how long the pipe should be?
 
wlindiii said:
Years age someone made a commercial one of these molded out of polypropolyne plastic. The only difference was that the top screwed on so it could easily be removed for cleaning, changing contents, etc. Seems like they were under $5.00 at the time. A quick search of usual suppliers didn't turn up anything, and unfortunately I don't remember the trade name. Does anyone else recalls these or know of a current source?

Bill
We have about a dozen of those at school. I just cleaned them out, got rid of all the chips that accumulate
in the bottom, a little while ago. They are white but I don't remember the name on the side of them.
I still prefer to use a little can with an open top, it's a lot easier to remove the chips and curles that
always end up in them. The cans that mushrooms come in seem about perfect, about 2" dia by 2" high.
I've only dumped one once in, I guess about, 5 years. It did make somewhat of a mess but I only ever
have about a half inch of whatever liquid I'm using in them. :)
...lew...
edited: Yep that is the ones we have. ..lh..
 
Marv,

I'll venture a guess.

l = h/(2-(rp^2/rc^2))

l = length of pipe
h = height of can
rp = radius of pipe
rc = radius of can


Scott
 
Scott,

I'm not sure how you arrived at that but I don't think it's that simple.

The maximum amount of fluid one can have in the can is determined by its height when the can is lying on its side - see my third sketch. A fluid level higher than the tube wall will flow out of the tube.

When the can is upside down, the tube must be long enough that that amount of fluid does not reach the top of the tube and flow out.

When the can is in the normal position, that amount of fluid can't be higher than the bottom of the tube. (Trapped air pressure in the rest of the can would prevent filling the can above the bottom of the tube. When the fluid reaches the bottom of the tube, further filling will simply fill the tube and not the vacant portion of the can.)

For such a simple device, the mathematics of a rigorous design are surprisingly complicated, though the actual computations are simple.

The more interesting math problem is to compute the combination of can and tube dimensions that would maximize the ratio of allowable fluid volume to can volume. Maybe tonight, while watching TV, I'll work on that.
 
Marv,

I assumed you were simplifying the problem to solve only for the condition of the container being upside down. As stated:

"Given the dimensions of the can and the diameter of the central pipe, how do you determine how long the pipe should be?"

Therefore, the only variable in that question is the length of the pipe. The length of the pipe does not determine whether the liquid will spill out when it's on it's side. All else equal, if the liquid is going to spill out when it is on it's side, it will spill out whether the pipe is short or long.

So, my equation only solves the problem for it being upside down. It does not account for the fact that the fluid level can't be above the bottom of the pipe.

I agree that solving it for all orientations is complicated.

Scott
 
Well, I made one last night, and it works. The simplest way to compute the capacity is to fill 'er up with a measured amount, then spill out all that will and measure that.

Good 'un Marv - I'll have to make a couple more now
 
Tel,

I'm pleased that you're pleased. Since I haven't built one of these (I use other methods to apply cutting oil), perhaps you can post a picture of yours for future readers of this post.

I did some more work on the mathematics. There are three volumes of interest...

V1 = volume of oil that can be contained with can on its side
V2 = volume of oil that just reaches bottom of tube with can standing upright
V3 = volume of oil that just reaches bottom of tube with can upside down

Ideally, we'd like V2 = V1 so that the bottom of the tube will denote how much oil to put in the can. The math to adjust the tube length so this condition obtains is trivial - see below.

For mathematical elegance, it would be nice if V1 = V2 = V3. However, that seems to require an iterative solution where one is free to adjust the can dimensions and the tube dimensions simultaneously. Since most folks will start with an available can and I doubt that anyone besides me wants a mathematically elegant oil can, I've abandoned this approach.

For anyone with the patience to still be reading this, here's how to obtain the V1 = V2 solution.

R = radius of can
H = height of can
r = radius of tube
l = length of tube

V1 = PI*R^2*(ACS(r/R)/180) - r*SQRT(R^2 - r^2)

l = V1/(PI*R^2)

After calculating l, one should check that V1 < V3 where:

V3 = (H-l)*PI*(R^2 - r^2)

to ensure that the can won't overflow when upside down.

 
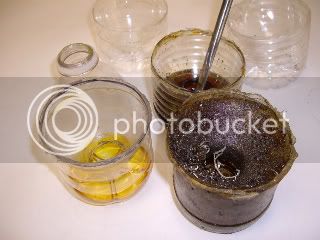
I have been using Marv's unspillable oil cans as coolant dispensers. I am referring to discarded 16 oz plastic water bottles. What I like about them is that they are disposable, free and work quite well. I use to glue the tops with silicon adhesive but now I use 2 step epoxy which gives a more lasting bond.

cool_cup.jpg


You can notice in the picture that these jars load up with swarf and do so quite quickly . But being free, this is no problem. I keep several in the wings waiting for use.

I shorten the spout with a hack saw to keep the overall height low.
 
In view of Marv's latest arrival
these should be in plentiful supply
BR

tank 001.jpg


tank 002.jpg
 

Latest posts

Back
Top