


GWRdriver
Senior Member
- Joined
- Jan 22, 2009
- Messages
- 721
- Reaction score
- 109
This is a Stuart Beam engine I built a few years ago and although it was not my first Stuart engine it was my first beam engine and it was not as simple a build as you are sometimes led to believe. It's a stock Stuart Beam kit built essentially to their drawings with the only deviations being in the minor details and fitting out. The engine is no longer in my possession because it was built for the collection of a fellow in Detroit who is now deceased. Unfortunately I no longer know where the engine is and I was told that before his death he . . . ummm . . . considerably "improved" it.
It's unfortunate that I didn't do a better job of photographing it before it left my shop. The surviving photographs are marginal because they were made in poor lighting with a 35mm camera and subsequent scans and cleanups with such software as I have haven't improved them much. The color also is very badly off. Rather than being a bright red it was actually a deep red, almost a maroon.
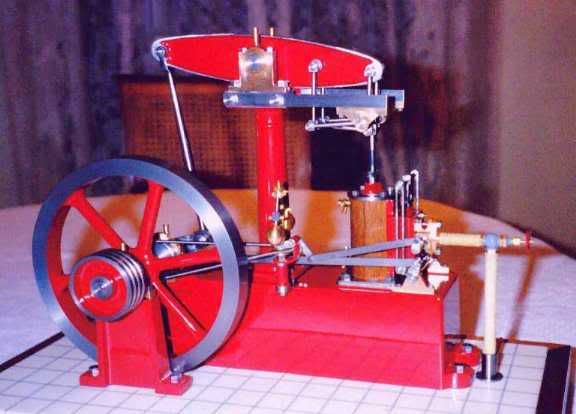
Mechanically, as I said, it is pretty much stock and as I recall I didn't run into any design or dimension discrepancies in the basic model. I did however discover that if installed it as-drawn the governor flyballs would foul the flywheel rim at full twirl so I moved the governor stand away from the flywheel a bit. Most of the bright metal bits were finished either with a final lathe cut, sometimes using a watchmaker's graver, or drawfiled with a clean flat file. Those are my favorite finishing tools and nothing on it was polished.
Of interest might be the engine room floor treatment. The base was a box frame built of a hardwood, mahogany IIRC, deeply rabbetted with a 3/4" plywood subfloor glued in. Laid in over the subfloor is a surface of "Corian" countertop material which was not glued or permanently fixed in place. The tile effect was achieved by routing the Corian with a thin slitting saw (maybe .020") in the mill to a depth of maybe .025". Since Corian "picks" badly at sharp edged cuts I had to mill carefully to prevent a ragged edge. I then made up a "grout" of "Plastic Aluminum" (much too light) and "Plastic Steel" (much too dark) mixed and thinned with acetone until I got just about the right consistency and color. The slits in the plastic were then grouted just as you would grout bathroom tile and the entire surface simply block sanded with 100gr paper. I treated the Corian base virtually like a metal and drilled and sometimes tapped it as required for all the mounting bolts. It's dimensionally stable enough not to cause shaft alignment problems, at least for this engine.
Painting was a real chore but I'll start first with the prep. Aside from the obvious which was to do all I could by hand to make things ready to receive a good paint job I also applied and worked down a coat of Sherwin-Williams Ultra-Fill automotive filling primer. I really had misgivings about this as I'd had a couple of very bad experiences with overly thick primers and fillers before but it turned out to be great stuff. I was not an experienced or good painter, and I'm still not, I just managed to survive this one and come out on the good side.
As for paint, some years ago I had a can of machine enamel made by a well-known industrial paint mfg which gave me beautiful results even when brushed. I originally wanted the engine to be a forest green and I went to same mfg to get a green mixed in the same paint but when I applied the paint (by automotive spray gun) it behaved completely differently. It simply never dried. After weeks. Or ever. It was a disaster and the entire engine had to be stripped to bare metal and finishing started all over again.
I ended up using a paint product called "Hobby-Poxy", a two-part epoxy made by Pettit Marine for the airplane guys, and their maroon was the only color I thought was appropriate for an old British beam engine. I don't think Hobby-Poxy is made any more but it was good stuff and hardened out well. I spent a fair amount of time masking areas to be left unpainted and then scraping errant bits of paint off places where something had to be metal on metal.
That's about all I can remember about the build, aside from using a 3-stone automotive brake cylinder hone to finish the cylinder bore. I've since had a number of people tell this will never work, it won't ever be "right", but it worked beautifully for me, then and now. All in all it just took time, and care, and a desire to do a good job.
It's unfortunate that I didn't do a better job of photographing it before it left my shop. The surviving photographs are marginal because they were made in poor lighting with a 35mm camera and subsequent scans and cleanups with such software as I have haven't improved them much. The color also is very badly off. Rather than being a bright red it was actually a deep red, almost a maroon.
Mechanically, as I said, it is pretty much stock and as I recall I didn't run into any design or dimension discrepancies in the basic model. I did however discover that if installed it as-drawn the governor flyballs would foul the flywheel rim at full twirl so I moved the governor stand away from the flywheel a bit. Most of the bright metal bits were finished either with a final lathe cut, sometimes using a watchmaker's graver, or drawfiled with a clean flat file. Those are my favorite finishing tools and nothing on it was polished.
Of interest might be the engine room floor treatment. The base was a box frame built of a hardwood, mahogany IIRC, deeply rabbetted with a 3/4" plywood subfloor glued in. Laid in over the subfloor is a surface of "Corian" countertop material which was not glued or permanently fixed in place. The tile effect was achieved by routing the Corian with a thin slitting saw (maybe .020") in the mill to a depth of maybe .025". Since Corian "picks" badly at sharp edged cuts I had to mill carefully to prevent a ragged edge. I then made up a "grout" of "Plastic Aluminum" (much too light) and "Plastic Steel" (much too dark) mixed and thinned with acetone until I got just about the right consistency and color. The slits in the plastic were then grouted just as you would grout bathroom tile and the entire surface simply block sanded with 100gr paper. I treated the Corian base virtually like a metal and drilled and sometimes tapped it as required for all the mounting bolts. It's dimensionally stable enough not to cause shaft alignment problems, at least for this engine.
Painting was a real chore but I'll start first with the prep. Aside from the obvious which was to do all I could by hand to make things ready to receive a good paint job I also applied and worked down a coat of Sherwin-Williams Ultra-Fill automotive filling primer. I really had misgivings about this as I'd had a couple of very bad experiences with overly thick primers and fillers before but it turned out to be great stuff. I was not an experienced or good painter, and I'm still not, I just managed to survive this one and come out on the good side.
As for paint, some years ago I had a can of machine enamel made by a well-known industrial paint mfg which gave me beautiful results even when brushed. I originally wanted the engine to be a forest green and I went to same mfg to get a green mixed in the same paint but when I applied the paint (by automotive spray gun) it behaved completely differently. It simply never dried. After weeks. Or ever. It was a disaster and the entire engine had to be stripped to bare metal and finishing started all over again.
I ended up using a paint product called "Hobby-Poxy", a two-part epoxy made by Pettit Marine for the airplane guys, and their maroon was the only color I thought was appropriate for an old British beam engine. I don't think Hobby-Poxy is made any more but it was good stuff and hardened out well. I spent a fair amount of time masking areas to be left unpainted and then scraping errant bits of paint off places where something had to be metal on metal.
That's about all I can remember about the build, aside from using a 3-stone automotive brake cylinder hone to finish the cylinder bore. I've since had a number of people tell this will never work, it won't ever be "right", but it worked beautifully for me, then and now. All in all it just took time, and care, and a desire to do a good job.
