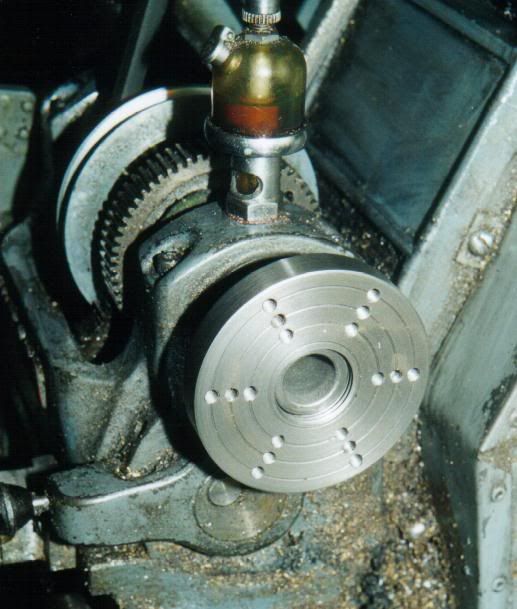
What's the best way to pose my noggin knockers?

Home Model Engine Machinist Forum

Help Support Home Model Engine Machinist Forum:

This site may earn a commission from merchant affiliate links, including eBay, Amazon, and others.
A couple of follow-up remarks...

The forces associated with the use of a rear-mounted cutoff tool will have a tendency to lift the cross-slide. Ensure that the gibs and hold-downs are properly adjusted to counteract this lift.

Aside: I'm a firm believer that a novice shouldn't learn to use a cutoff tool ON HIS FIRST ACTUAL PROJECT. Instead, set aside a weekend and a pile of scrap and practice cutoff technique on stuff that doesn't matter for a dozen or so hours until you develop an intuitive feel for what does and doesn't work. It's an aggravating operation to learn and you don't want to add to the aggravation by destroying hard-to-replace castings in the process.

If you elect to clamp your flywheel to the faceplate rather than the scrap piece I suggested, be sure to put a piece of scrap between the wheel and the faceplate. This will allow you to cut completely across the rim of the flywheel by cutting into the scrap. By finishing the rim completely during the first clamping you save yourself the hassle of trying to center accurately enough to match two cuts on the same surface and also provide a finished surface to use in the second clamping.

Actually, for a small flywheel like this, I don't think the faceplate is the right approach. It's just too difficult to get stuff centered on the faceplate. By clamping to scrap and then holding the scrap in the 4jaw the centering process is, IMO, considerably simplified. YMMV, of course.
 
mklotz said:
A couple of follow-up remarks...


Actually, for a small flywheel like this, I don't think the faceplate is the right approach. It's just too difficult to get stuff centered on the faceplate. By clamping to scrap and then holding the scrap in the 4jaw the centering process is, IMO, considerably simplified. YMMV, of course.

Your original idea is sound and far easier. I should of added that my preference towards face plates is more machine driven than practicality. Having to work within the my machines limits is perhaps generating habits not necessary on a more robust lathe. With only a 1/2 inch spindle shaft the farther away from the bearing axis the greater the likely hood of bending the spindle becomes. I have bent one already facing off a hunk of stock hanging out of a 3 jaw. Went inside and changed my pants as they say.

Working with a face plate is not generated by its ease of use, as you say it is not a smooth road to travel upon.
 
Good point! My lathe is a 12 x 36 with a 2.25" spindle so the notion of hanging the 8" 4jaw on there to hold a 3" diameter scrap to which is clamped a 2.5" flywheel doesn't faze me (though lifting that damn 4jaw certainly fazes my back).

I'm guilty as charged of suggesting techniques that may be difficult or impossible on the smaller equipment.

Regardless, the technique of through-spoke clamping of a flywheel to something and machining one side completely to achieve centricity and good reference surfaces for further machining is practical no matter how one accomplishes it on the machinery available.

Enough said. I think we're in violent agreement.
 
I noted that you have been told to center your cut off tool. but how?

Put in your tale stock center. Mount the cut off tool and run it up to the point on the tail stock center and adjust it's height. The tail stock center makes a handy reference.

One thing no one tels you because they don't remember what they didn't know is that machine tool work takes a lot of setup stuff. I design mechanical parts so I am used to hearing "It will cost X each plus Y for fixturing". that fixturing is the backing plate, or funny clamps, or plates under the part on the mill, or....

It is not like nice neat electronics or software. No mater what you want to do, you need to do something else first. That is part of the fun.

Frank
 
Mike, I have used your method and a faceplate before but instead of using a scrap to 'hold out' the flywheel from the faceplate, I used smaller pieces underneath the spokes themselves and then did the clamping. This supported the spokes and prevented them from being cracked due to overtightening the clamps and also spacing the part out from the faceplate.
 
mklotz said:
Enough said. I think we're in violent agreement.

That made me chuckle, I'm not beyond listening to the advice of others so I went out and attempted to follow the 4 jaw method. Think this is what was proposed.

flywheel-b.jpg


Like "zeeprogrammer" is experiencing castings can be challenging. Lacking the proper equipment (a simple DI has its limitations) it will be a while afore I take one on
 
I've preached long and hard here (and elsewhere) that the first two or three projects for a newbie should be simple oscillator engines built from bar stock. Alas, the lure of a "complete kit" of castings is overpowering and the poor newbies, unaware of the problems inherent with machining castings, gobble them up.

Few, if any, built-in reference surfaces.
Draft angles and cast shapes make clamping problematic.
Need to "average" cuts to keep pre-defined features in correct location.
Inadequate machining allowances in many (not all) castings.
Inconvenience and expense of replacing botched parts.

All these problems disappear if you work with bar stock and you can concentrate on honing your basic machining skills so that, when you attack your first castings, you won't have to solve two sets of problems simultaneously.

 
mklotz said:
Actually, for a small flywheel like this, I don't think the faceplate is the right approach. It's just too difficult to get stuff centered on the faceplate. By clamping to scrap and then holding the scrap in the 4jaw the centering process is, IMO, considerably simplified. YMMV, of course.

Well, I partly agree Marv, in the sense that faceplate work does take a degree of practice to get comfortable with.

For small work, I made this 3" mini faceplate, along with a few accessories it's one of the best things I've ever done. The 9" one whirling around in your face can be a bit daunting for a newcomer.

faceplate1.jpg
 
Re: parting

My lathe has a short crossfeed screw and a taper attachment, so the compound will extend only a very short distance past the spindle centerline. So no parting from the rear for me.

I have used the technique of setting the tool height via the live center point, but often I don't have it mounted in the tailstock. What I usually do is press a 6" steel rule against the work with the tip of the tool; if the rule is vertical then the tool is at the midpoint.
 
Good grief...what a set of responses!!

I'll look for the book.

I kind of think a faceplate shouldn't be necessary. The tape that came with the kit doesn't. The engine was made on a Sherline with nothing more than I have.

Absolutely want to turn the rim in one go.

Not sure what was meant by the electronics/software thing...I'm the discipline manager for software at work. It is indeed the same with everything. The softies at work know they have go through concept and design with peer reviews before they sit down to 'play' and type out code....otherwise you just end up rewriting it all. Having said that...I'm just as guilty....I want to play. And having said that...the software I create doesn't result in high underwear costs. I can afford to play.

Castings vs bar stock...a big reason why I went for this kit is that it came with a tape supposedly showing how to do it. That's what I was looking for. I have to say I was surprised. I thought it was a beginner's kit but the tape immediately started by saying...'this isn't for the beginner'. Still...I have no problem learning any way I can. My fear is developing bad habits. I had hoped the tape would help avoid some. It's one of the many reasons I joined this forum.

My 'parting' experience did not ruin any castings. I was parting some round stock for bushings. I didn't even have to part it...I could have used a hack saw or band saw to shorten close enough. I thought it would be good practice.

Well...I probably shouldn't be responding this way. I should have something more to contribute rather than justifying myself. I know I don't need to...you people are great.

Thanks again so much!


Bernd said:
I've added a couple of pics from my PM Research Coke Bottle Engine I'm working off and on, on. Unfortunately I never got any pics of holding the rough flywheel. I first cleaned up the casting using a Dremel tool to get rid of all the casting flash.
...
Bernd

Bernd - how about starting a build thread on the Coke bottle engine ?? I too have that kit and would love to follow your progress on your Sherline equipment !! :)

Mike
 
zeeprogrammer said:
Not sure what was meant by the electronics/software thing...I'm the discipline manager for software at work. It is indeed the same with everything.

Sorry about that. I should have assumed it was the same everyware, Software always looks so neat from where I am. Now I know better.

Frank
 
Software does look neat. It's just zeros and ones.
But when you start putting them together...one after another...it can get ugly fast.

No. No. I was just commenting that it's the same for anything...as much as I'd like to jump in and do...I have to first learn, prepare, plan...otherwise it just can't be as good as it could be.

Thanks.
 
Another flywheel suggestion.

Make a mandrel with a very slight taper, (0.0005"/1"), to the size of the bore and between centres, machine one side, turn it around and on the mandrel and machine the other side and outside.

NB - All cuts must be towards the thicker end of the taper or the flywheel will just come loose and flang around.

Hope this helps. ???

Best Regards
Bob
 
ChooChooMike said:
Bernd - how about starting a build thread on the Coke bottle engine ?? I too have that kit and would love to follow your progress on your Sherline equipment !! :)

Mike

I would but it's a go and stop type of thing. I forgot when I started it. I did the flywheels and then put it away for a while. Then I got ghung-ho and did a bit more. Now it's sitting on the shelf again for who knows how long.

I'm afraid it won't keep anybody's interest at the spurts I'm going at this. Besides I have many more projects going that need more attention at the moment than working on this engine.

I am documenting if I do anything now that I have a digital camera. If and when I ever get to spend more time on the engine and get it done I will defiantly post the build.

Bernd
 
Surely a mistake has been made.

This is embarrassing.

I just noticed I have two stars and am listed as 'Advanced Member'.

People...I have only started cutting any kind of metal less than 2 months ago. I don't even consider myself as high as a 'newbie' from the posting I've seen on this forum.

Other than questions...I have contributed nothing so far...and I have many waiting to be asked.

I've looked around but haven't found anything to explain this.

If this is just the result of my posting questions...then soon I will advance beyond most, if not all, of you.

:hDe:
 
Questions are valuable as they bring out varied answers from lots of other members and everybody learns from them. No matter how much experience any one has, any new or different way of doing things is of value.
Gail in NM,USA
 
No mistake zeeprogrammer.
It is based on them number of posts made.
After 25 posts it automatically lists you as an Advanced Member.
After 101 posts it will change to Senior Member. The rank is to
show a members activity on the forum.

As Gail already said, questions are why this forum exists.

Rick
 
zeeprogrammer, You had said (I think it was you) that you want to see videos of how things are done. I just ran across a link from Tin Falcon to old South Bend videos. I watched a couple, and they are great. I also learned why my last cut is often to big. (Spring)

here is the link http://www.wswells.com/video/index.html

Frank
 

Latest posts

Back
Top