The Hubbard 1912

Home Model Engine Machinist Forum

Help Support Home Model Engine Machinist Forum:

This site may earn a commission from merchant affiliate links, including eBay, Amazon, and others.

Lawijt

Well-Known Member
Joined
Dec 17, 2012
Messages
269
Reaction score
79
Hello,

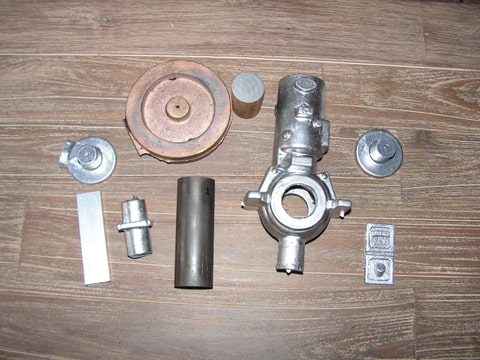
I buy a Hubbard 1912 casting kit. This will be my first IC engine.
I build before some very simple steam engines & a flame eater , but never worked on castings. Here is the link:
http://www.classic-motors.at/modellmotoren/modelengines.htm

Did somebody build that engine??? All tips & tricks that I can needed.....Please tell me.
The kit is on his way to me right now.

Thanks already

Barry
 
I haven't built one but it sure looks great
 
I built one several years ago. I got it almost finished and had it at a Cabin fever show and traded it for a jewelers rolling mill.

I dont recall any problems with the castings. They are aluminum and easy to work with. I cant say how it will run because I didnt get that far. I also didnt take any photos as I didnt have a digital camera then.

Sorry Im not much help.
 
Very strange that almost nobody in the world have builded this engine.
I found just on youtube a small movie from it , but there is nothing really to see. We will .........I keep updated.
 
Hello Blackert,

Thanks for the answer. I have a tool like that,but I have never used it. Do you have pictures from your engine?? What fuel do you use??
Heinz from the shop just email me that the castings are shipped. Now I have to wait for it.
Greetings from Belgium

Barry
 
Barry

All I can suggest when working with castings for the first time is to measure once, measure twice, measure three times and then do the cut. You will most probably find out that sometimes you will need to do compromises. Good luck and I will be following your adventure into castings.

Vince
 
I recieved the castings for that engine. But nothing is really straight. I have to find out what the best is for make the first cut on the lathe...But now I'am not very concentrated , because the doctors find cancer by my mother. So , updates will be later.

Foto-NXTZL6J3.jpg


Barry
 
Hi Barry.

Family always come's first so look after your mum.
Lumps of metal can wait.

Kind regards,

Ron.
 
This morning I worked on the flywheel. Very bad , a lot of wobbling there....Also the castings are not more bigger than that. 19mm on the plan is 19.5mm on the casting.
Also the aluminium is very weak!! I turned the bearing holder a little , but it is still grey & not shining. I need to make treads for the screws , but I think it will be a disaster.
While turning , I use WD40 like always , but nothing.
Now I go to visit my mother in the clinic.

See you later

Barry
 
Hello Lawijt
I have two engines from Mr Kornmuler foundry
/De Dion and Otto motor/ but i am satisfy with
his castings .
When you build an engine from castings you must
do some compromises in dimensions .
As Vucutajar say meassure 3-5 times
then cut.
Do not worry about threads it is easy work
casting material is not "sticky".

Kadora
 
Thanks Kadora.
Yesterday I have a good talk with Mr.Heinz & he told me that some required dimensions may vary. Also he told me that the engine casting is too thin to make treads to hold the bearing plates. So I have to make small brass cilinders that i can make a tread inside from M2.5.
One end have to be a flange and this will come on the inside. So everythin will be much stronger.
But now for the moment I have really no time to work on it & also my new milling machine with a weight of 350kg is still on the ground & I have to figure out how to rise it to put on the table. Also I have to find out to put the DRO on this machine..........

Barry
 
Barry

Sorry to hear of the bad news about your mother. I can imagine that your mind is now preoccupied with other things. As Kadora said there is no rush with doing the Hubbard. Instead you can try to install your new mill and also the DRO. I had a DRO for nearly a year before I installed it. After I installed it I wanted to kick myself for not doing it earlier.

Vince
 
Barry,
Hope all is well. I too have started on the Hubbard. Fly wheel, crank, rod, pump, head, supports and bushings pretty much done. Starting on the main casting next. Cleaned up and sized the liner today. When I get time again will layout the transfer port and exhaust for milling. So far no major problems other than finding time to work on it.
Look forward to follow your build.

Bob
 
Hello guys
Barry and Bob could you please send some pictures
from machining parts on Hubard.
I am thinking to buy this kit too.
What kind of tool is DRO?
Kadora
 
Please Bob , tell us more about the build of the Hubbard. En put a lot of pictures please.
Here a picture from the DRO.

Foto-HJ6FJGJJ.jpg


And a picture from the milling machine. It is a Chinese ,

Foto-XKRFVQT8.jpg


And a lot to learn for working with those machines.
 
good morning,
I will try and take a few pics of build so far. Time I learn how to pot pictures, yep I am new to all this.
I plan to layout cylinder liner today so will see what I can come up with.
Bet your anxious to get that new mill ready. Nice.

Bob
 
Barry, it seems that we have a similar setup and probably close to each other.

I've got a HBM 45 Profi with the same DRO that you show in the picture above.

En ik ben ook Nederlander.

Rob
 
Hi all,
Going to try a few images.
jpg.gif
IMG_0121.jpg
Finished sizing liner. Leaving inside diam. as is just ran brake cylinder hone thru to clean up a little.
I MG_0122.jpg
Milling on main casting. I started by filing one side of the lower end as best I could then mounted and checked to get as square as possible then let the chips fly.
jpg.gif
IMG_0123.jpg
Fly wheel ready to go
jpg.gif
IMG_0125.jpg
Lousy pic of crank and con rod, gotta improve my camera use.

jpg.gif
IMG_0126.jpg
Lower end half fit together.
Next chance I get I will probably start to cut out the transfer and exhaust
ports on the liner.

Well that's it for now, take care.
Barry, good luck with the new mill looks like a winner.

Bob

IMG_0121.jpg


IMG_0122.jpg


IMG_0123.jpg


IMG_0125.jpg


IMG_0126.jpg
 
Back
Top