Taper turning with Boring Head in lathe

Home Model Engine Machinist Forum

Help Support Home Model Engine Machinist Forum:

This site may earn a commission from merchant affiliate links, including eBay, Amazon, and others.

Brian Rupnow

Design Engineer
Project of the Month Winner
Joined
May 23, 2008
Messages
14,976
Reaction score
8,268
Location
Barrie, Ontario, Canada
I just read on another post how Marv Klotz suggested using a boring head mounted in the tailstock with a "dummy center" mounted in it to do taper turning in the lathe. --WITHOUT setting the tailstock over. (Because its always a bugger to get set back to zero!!!) I have heard about doing this before, but today I decided to try it myself. It works like a charm!!! Thanks Marv. I took a couple of quick pics so others could see the set-up. ----Brian
TAPERTURNING001.jpg

TAPERTURNING002.jpg
 
Brian, did you line up the work piece before offsetting it to create the taper? And what was the off set?

What is the degree of taper your creating, and what is the formula for calculating the offset. I need to learn this stuff!

Thanks

-MB

 
Brian,

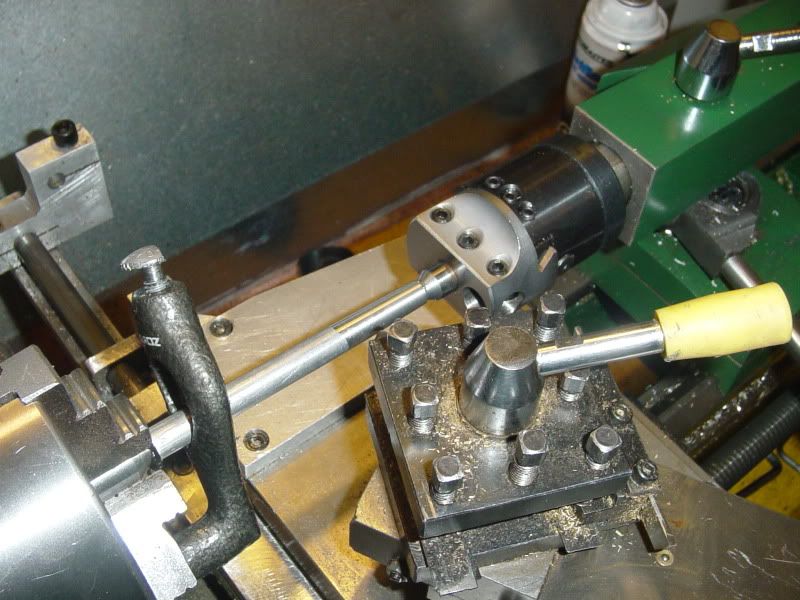
It is a very good system, and saves buying the plans for ones you can make yourself. Unfortunately, the one thing you must do when using this system is to ensure the boring head is totally level. Otherwise the centre point is liable to either raise or lower, depending which way it is tilted, and that will throw out where the tool tip sits on the job, and any problems that will arise, cutting a curve, bad surface finishes etc.
You must also take into account any rotation of the tailstock ram, that has to be taken out first by turning fully one way (usually towards you), and the ram locked up solid, then level the boring head. After levelling, the ram can be loosened for locating into the bar centre, but once into position, the ram must be turned to full one way again, and locked up.

An easy way to level it, if you have an engineers level, is to take the setting from across the lathe bed (just in case the bed isn't perfectly level), and two accurate bars mounted in the tool holes in the boring head, as far apart as possible, or preferably, a bar sticking out of the horizontal hole (if the head has one). Then with the level sitting on the bar/bars, turn the boring head until it has the same setting as the bed. You should then be spot on for use.

An easier method, rather than relying on the morse taper not moving, is to make a fitting that clamps around the tailstock nose, that your boring head screws onto.
The head is levelled by slackening and tightening the nose clamp.

That is one of my many tuit jobs to do.

Blogs
 
I just read an email from HSM magazine. It outlined that very same tip. Brilliant!

 
Metal Butcher said:
Brian, did you line up the work piece before offsetting it to create the taper? And what was the off set?

What is the degree of taper your creating, and what is the formula for calculating the offset. I need to learn this stuff!

Thanks

-MB

Wiser heads than mine can probably answer all your questions. I have no idea what the offset amount is, nor the taper. I was trying out the method, thats all. As Blogwitch pointed out, to maintain any degree of accuracy, the boring head would have to be kept level. If I wanted to set up for a specific taper per inch, I could calculate it, but this was just a quickt 'Try it and see how well it works" thing.---Brian
 
Metal Butcher said:
What is the degree of taper your creating, and what is the formula for calculating the offset. I need to learn this stuff!

Thanks

-MB

MB,

The mathematics relating the critical parameters are:

phi = taper half angle (half the included angle)
L = length of workpiece
os = offset dialed into boring head

tan(phi) = os/L
 
Seems the taper depends on which way you move the head; toward the tool means small end is at tailstock, away has large end at tailstock.
 
mklotz said:
MB,

The mathematics relating the critical parameters are:

phi = taper half angle (half the included angle)
L = length of workpiece
os = offset dialed into boring head

tan(phi) = os/L

Thanks Marv. With out a specific examples I don't know how to use the formula you provide. I don't have any math education other than plus, minus, and divide.
Taper half angle = 1/2 of an angle shown a print? What does "included" mean?
I add to work pieces for a later cut off. Would this effect the resulting angle?
Boring head offset. Wouldn't the length of the center and boring head have the same effect as above?
What is "tan" and what does it mean?
Try to put yourself in my shoes when you try to help out. I know you mean well.

Maybe every body else on this forum understands what the formula means, and knows how to use it, but I don't.

With a better explanation and a specific part or drawing used as an example the formula could probably be learned, and used by others like myself that don't understand it, but are willing to learn.

Thanks.

-MB


Metalbutcher---Thats why I didn't try to explain it to you. Tan is short for Tangent, which is a trigonometry function. You either have to have the math to even begin to understand the formula, or a damn good CAD system to draw it out and it will give you the answer. This is one of those situations where "Add and subtract" isn't going to be a lot of help. Included angle means the total angle of two diametrically opposed (straight across from each other) sides of the tapered piece. If you add to the length for "some extra" it does affect it. If ya don't understand trig, don't feel bad----Neither does the other 98% of the human race. It something from the realm of engineers, mathemeticians, and scientists. We all struggled though it in high school math, then immediately forgot everything we had learned as soon as we graduated----unless we happened to work in a field that required the knowledge and it got used every day for the next 20 or 30 years. Tangent, Sine, Cosine, ---all trig speak.
 
A 60 degree lathe center has a 60 degree included angle. If you wanted to turn a 60 degree center, you would turn your compound to 30 degrees, the taper half angle.

Often a print will specify the included angle. If it does, you must first find the half angle in order to calculate the required offset.

'tan' refers to the tangent function, one of the key functions of trigonometry. In a right triangle, the tangent of the angle is the ratio of the side opposite the angle to the side adjacent to the angle. While tables of tangents exist in most machinery handbooks, it's far simpler to buy a $10 scientific calculator at the local drug store, punch in the angle and then press the key marked 'tan' to get the required value.

Solving the equation for 'os', we have:

os = L * tan(phi)

(where the asterisk denotes multiplication). After calculating tan(phi) with your calculator, enter the value for 'L' and press the multiply key. The result will be the offset you need to dial into the boring head.
 
Thanks for all the help Brian and Marv.
I think I under stand for the most part. I'm still a little confused on the part where the length of the work piece dosen't matter. It seems to me that a 6" work piece offset .050 at the boring head would not end up with the same angle as a 12" piece offset the same .050" at the boring head. I can't picture it being the same angle in my mind.

I'll figure it out even if I have to go to the library and get a book on it.

Thanks guys. :)

-MB
 
MB

Just a second, I'll get my 14yr old in here. He should know how to figure it out. The home work he brings home for 8th grade, would give ya a headache for sure. The only thing I can help him with is his name at the top of the paper.. ???..............Sometimes I've been known to misspell that too.
 
1hand said:
MB

Just a second, I'll get my 14yr old in here. He should know how to figure it out. The home work he brings home for 8th grade, would give ya a headache for sure. The only thing I can help him with is his name at the top of the paper.. ???..............Sometimes I've been known to misspell that too.

LOL..... :big:

Ain't that the truth!

Good news! I got it all figured out! I think. ;D

A simple drawing would have been sufficient to explain to this old bugger how the formula works. L= length of work piece, this is where the problem started. Not the length of the tapered area!!! That why the length dosen't matter. The rest is simply to use the formula that Marv provided to get the offset needed to create the specified angle.

However I think I found a minor flaw in this set up using a boring head for the off set. I think you need to add the distance from the end of the work piece to the sliding area on the boring head, to the length of the work piece (L), for the formula to give an accurate off set to give a true angle.

Sorry Marv. ;D

Nice knowing you Matt. I might get the "boot" for this one.

-MB
 
Metal Butcher said:
I think I under stand for the most part. I'm still a little confused on the part where the length of the work piece dosen't matter. It seems to me that a 6" work piece offset .050 at the boring head would not end up with the same angle as a 12" piece offset the same .050" at the boring head. I can't picture it being the same angle in my mind.

I'll figure it out even if I have to go to the library and get a book on it.

Thanks guys. :)

-MB

MB,

You're right. The angles will be different...

tan(phi) = 0.05/6 = 0.00833... implies phi = 0.47745 deg

while

tan(phi) = 0.05/12 = 0.00417... implies phi = 0.23873 deg

The offset and the length work together to determine the angle of the taper. (The equation describes *how* they work together.)

If you're going to study any mathematics with the view to simplifying your shop work, some time spent learning elementary geometry and trigonometry will be time well spent, indeed. I encourage you to give it a try. Both of these subjects have the advantage of being very visual and simple to relate to the real world experience you already have. This makes them ideal for self study. If you get hung up, feel free to call on us to provide clarification.
 
Thanks Marv. Your very kind.

I appreciate all the time you spent helping me out.

And also your patience.

-MB
 
However I think I found a minor flaw in this set up using a boring head for the off set. I think you need to add the distance from the end of the work piece to the sliding area on the boring head, to the length of the work piece (L), for the formula to give an accurate off set to give a true angle.

Sorry Marv. Grin

L is the distance between the two *pivot points* of the workpiece. Any distance from the pivot point to the sliding part of the boring head doesn't enter into the calculation. Convince yourself of this by imagining making the boring head center twice as long with the same boring head offset. The taper turned would not change.

The real reason for using the boring head is to dispense with the annoyance of tweaking the tailstock and getting it back into line after making the part.

When I do this, I seldom bother with the calculation. Instead, I set up a sine bar (another trigonometry calculation) with the required angle on top of the compound, then adjust the boring head until the stock matches the sine bar angle.

Another nuance of this technique is to make a ball center to put in the boring head if the angle turned is appreciable. A conical center will not be a good match to a center hole with a large offset whereas a ball center will match nicely.
 
Just to make sure I'm tracking.

If I had a 8" long piece, and I wanted a 5 deg. taper. I would offset the tailstock/boring bar .70 ?

Matt
 
1hand said:
Just to make sure I'm tracking.

If I had a 8" long piece, and I wanted a 5 deg. taper. I would offset the tailstock/boring bar .70 ?

Matt

Yes, if 5 degrees is the "half angle". Otherwise .035 (half angle 2.5).
 
1hand said:
Just to make sure I'm tracking.

If I had a 8" long piece, and I wanted a 5 deg. taper. I would offset the tailstock/boring bar .70 ?

Matt

Hey Matt. With out the calculator that Marv suggests I can't tell you if your correct. I assume the 5 degree's you indicate is half the included angle (phi). I tried looking at the Machinery's Handbook to get the Tangent (tan) and found myself up against a brick wall (again). At the top of one of the pages and on the left is a large '5' degree, and on the top right is '174' degree. The fourth column shows Tangent's, and the first column (on the left, marked "M") is numbered from 0 to 60? The last column ("M") on the right is numbered from 60 to 0?

What does the "M" marking the column mean? I'm on page 184 of the 15th edition.
Its an old 1955 edition that "Honey" picked up for me at a garage sale. I finally took the time to take a good look at the content, and it looks like the basis for the entire Industrial Revolution! :big:

It should still be good since math doesn't change, just the amount of people that need to use it (or know how to use it). ::)

-MB
 
M would be Minutes of angle or 1/60th of a degree. degrees can be expressed as decimal degrees or in the Degree Minute second system.
Your scientific calculator should have a degree setting Usually radians , dd and ,dms there may also be a dd > dms dms>dd conversion keys.
Tin
 

Latest posts

Back
Top