Small Threading Tool

Home Model Engine Machinist Forum

Help Support Home Model Engine Machinist Forum:

This site may earn a commission from merchant affiliate links, including eBay, Amazon, and others.

rake60

Well-Known Member
Joined
Jul 8, 2007
Messages
4,756
Reaction score
124
It had been a while since I cut a thread on the lathe so I decided to play
a bit. On the way down to the shop I got to thinking about trying to
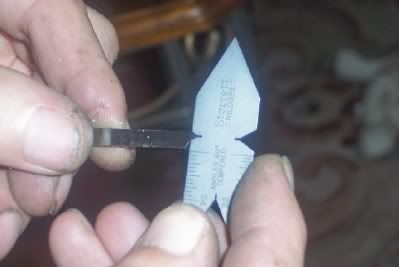
see how small a thread I might be able to cut. My threading tool was too
big for anything too small, so I ground a smaller tool.
ThreadingTool.jpg

I started with a 10-32 on brass. The tool cut fairly well on its first attempt.
ThreadingPractice.jpg

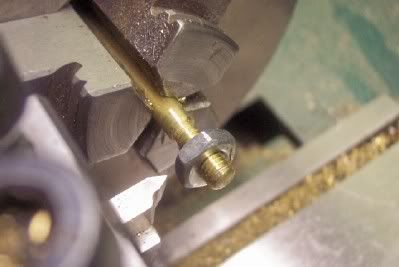
The fact that the 10-32 nut screwed on with very little slop was an encouragement.
I have a feeling this will keep me entertained for a while trying to see just
how small I can get it to go.
In my experience a cut thread is almost always cleaner than any die can make, but
speed that tool is moving toward the chuck on the small parts is a little unnerving.

Rick
 
Rick,
This seems to be a bit of a problem with the more modern lathes. They don't have slow enough spindle speeds.
They say that you can cut XYZ number of threads on a lathe, but you have to have the reactions of a s**thouse rat to be able to stop the cut in time because of the faster spindle speeds, or you end up with an excessive and out of scale runout groove.
This is the one time when slower is better.
I am looking at a new machine and am thinking of going for three phase with an inverter to run from household mains just because it will allow the much slower cuts to be made by being able to electronically control the lathe speed.
As you get older, your reaction times get slower, so thread cutting becomes a chore rather than an enjoyable pastime.
Keep going Rick, lets see how small you can get them.
I did a commission yesterday for a chap in Australia, entailed drilling and tapping sixteen 10BA holes in two small flanges 4mm (5/32") thick. I could hardly see the threads let alone being able to turn them, talk about being 'puckered' up waiting for the tap to break thru.

John
 
Hi Mike,
80 rpm is still a little too fast, my old lathe with backgear I think gets down to about 25 rpm which is ideal, plenty of thinking time.

John
 
I know some guys have made a hand crank for the back side of thier spindle. That seem a little bit dangerous unless you unplug the lathe or kill the power at the breaker box.
 
Mike,
Usually the spindle handles are used for turning back the lathe with the half nuts still engaged, this is usually done when cutting metric threads on an imperial lathe that doesn't have motor reverse.
Yes, you do have to be careful when running a lathe with one attached, but the lathe should only be running very slowly because you are thread cutting, but great care still has to be taken.

John
 
John we are truly from different schools in the threading department.
That's not a bad thing! What works best for the operator IS best!

When I try to cut a thread slowly I end up with torn or chattered threads.
I had the wife do a video of me cutting a standard 10-30 thread.
5 cuts in about 1 minute. Most of that time was waiting for the thread
dial to come to mark. 600RPM cutting brass in this video, but I run the
same 30 Feet Per Minute surface speed on steel.

Anyway it looks like this:
<embed src="http://www.rake60.com/photogallery/Threading.mpeg" autoplay="false" hidden="false" loop="false" type="application/mediaplayer" wmode="transparent" width="350" heigth="425"></embed>
or http://www.rake60.com/photogallery/Threading.mpeg

I tried to get her to bring the camera in closer for a better view, but she
declined.
scratchinghead-1.gif


Rick
 
Rake, that's impresive reflexes! It it were me, there would be some bent up equipment and less money in the bank :shock:

Seeing your video has brought up a question, though. An old machinist neighbor told me that setting the compound to 29 degrees and using the compound to advance the cutter was the way to go to cut threads. There is no doubt in my mind that he knows what he is talking about (he's been around since Henry Ford was in grade school), and there is is also as many different ways to skin the proverbial cat as there is people doing it. Rake's set up looked like the compound was at a 90 degree angle to the work in the video.

What I am wondering is what are the advantages in either set-up? The 90 degree has both side of the tool cutting, where the 29 degree angle has one side of the tool cutting and the other side "shaving" the piece. Does this come into play for different materials, is there some sort of witchcraft in one set-up versus the other, or is it just personal preference?
 
When I thread the compound is at 90 degrees and the cuts are straight in.
It works fine on a small thread.

Now at work I program the CNC machine to cut a thread and the
computer decides how to best do it.
What it does is feed down the 60 degree angle with each cut.
eg: for every .005 depth of cut it will shift the tool .0028 to relieve tool
the tool pressure so it's only actually cutting on one side of the tool.
That's a great advantage when cutting a 8 TPI thread, but when cutting
a fine thread it wouldn't make much of a difference...
 
one other thing

the last .001 or .002 is cut with cross feed to clean up both sides

There are charts that show how much to advance compound for a given depth of thread when it is set to 29 degrees

also there are two depths given if you are using a National Form Tool or a sharp V thead

Atlas ( Clausing ) still makes a good one

depth of threads is the same for each size IE 1/4-20 or 5"-20

George
 
Hi Rick,
You must have the reflexes of a s**thouse rat. I'd have to have a good caffeine fix before attempting doing it that fast.
I am from the old school where we run slow and easy and set the compound over by half the included angle, putting feed on the topslide. Cutting on the forward face only, and finishing off with a crossfeed input to clean up the back face.
As you said not every method suits every person and wouldn't the world be a boring place if everyone did the same thing.
Do it by what suits you, as long as you end up with the same results, who cares.
But it is nice to know that at a weekend when you can't get a critical thread die, at least you can still carry on by using the lathe to get the job done.
As far as I am concerned, knowing how to thread on your lathe is a 'must know how to do', and for all the beginners to machining it is a thing that should be tried and if possible, mastered.

John
 
I agree John!
I think every home machinist should at least try threading on their lathe.
The need will arise at some point. My own lathe has one short falling in
the threading area. For a metric thread to maintain the lead you can not
disengage the half nut. You have to stop the machine back the tool out
and run the chuck in reverse to move the tool back for another cut.
In that scenario I run it SLOW! :wink:

My very first threading job on my lathe was making a carburetor mixture
needle for a 1924 Jaeger Hit-N-Miss engine that I've been working on
forever. The thread was a 5/16-18. The finished needle ended up
looking like this.
First%20Thread.jpg

No I did not thread up to that knob. I made the needle then attached the
original knob to it.

BTW at work I still stand by my claim that I don't know how to thread
on a manual lathe. So, if any FEMCO personnel are reading this post, that
was my wife running the lathe. I was just observing her technique. :lol:

Rick
 
You can release the half nuts when cutting metric threads on an Imperial leadscrew lathe IF you move the carriage to the right a distance that is an integral multiple of both the (Imperial) leadscrew pitch AND the (metric) thread you're cutting. The STICK program on my page will calculate what that distance is. Sometimes it's a convenient distance and sometimes it isn't. When it is, this trick saves a lot of time.
 
Thanks Marv!
I'll be checking that out!

Rick
 
Here is a compound feed chart for UNC that I made up that may be of use to some of you, need to do a UNF as well.
Did not see how to post the MS Word file so this is just a copy/paste.


Guess I should add that I have not proved all of these so proceed with caution. :)

Ken


UNC Threads
COMPOUND set to 29.5 degrees

Cut Depth =.009 Compound In-Feed =10.4 – 1_64 UNC

Cut Depth =.011 Compound In-Feed =12.7 – 2_56 UNC

Cut Depth =.012 Compound In-Feed =13.9 – 3_48 UNC

Cut Depth =.015 Compound In-Feed =17.3 – 4_40 and 5_40 UNC

Cut Depth =.019 Compound In-Feed =21.9 – 6_32 UNC and 8_32 UNC

Cut Depth =.025 Compound In-Feed =28.9 – 10_24 UNC and 12_24 INC

Cut Depth =.030 Compound In-Feed =34.6 – 1/4_20 UNC

Cut Depth =.034 Compound In-Feed =39.3 – 5/16_18 UNC

Cut Depth =.038 Compound In-Feed =43.9 – 3/8_16 UNC

Cut Depth =.043 Compound In-Feed =49.7 – 7/16_14 UNC

Cut Depth =.047 Compound In-Feed =54.3 – 1/2_13 UNC

Cut Depth =.051 Compound In-Feed =58.9 – 9/16_12 UNC

Cut Depth =.055 Compound In-Feed =63.5 – 5/8_11 UNC

Cut Depth =.061 Compound In-Feed =70.4 – 3/4_10 UNC

Cut Depth =.068 Compound In-Feed =78.5 – 7/8_9 UNC

Cut Depth =.076 Compound In-Feed =87.8 – 1_8 UNC

Cut Depth =.087 Compound In-Feed =100.5 – 1 1/8 7 UNC and 1 1/47 UNC

Cut Depth =.102 Compound In-Feed =117.8 – 1 3/8_6 UNC and 1 1/2_6 UNC

Cut Depth =.122 Compound In-Feed =140.9 – 1 3/4_5 UNC

Cut Depth =.136 Compound In-Feed =157 - 2_4 1/2 and 2 1/4_4 1/2 UNC

Cut Depth =.153 Compound In-Feed =176.7 – All 2 1/2 to 4” 4 TPI UNC
 
This chart is not based upon a particular thread but upon desired depth using a sharp point V type threading tool.


BTW, is there a way to include a file ?

Ken


COMPOUND set to 29.5 degrees
Assumes DIRECT READING DIAL

Cut Depth =.001 Compound In-Feed =1.2
Cut Depth =.002 Compound In-Feed =2.3
Cut Depth =.003 Compound In-Feed =3.5
Cut Depth =.004 Compound In-Feed =4.6
Cut Depth =.005 Compound In-Feed =5.8
Cut Depth =.006 Compound In-Feed =6.9
Cut Depth =.007 Compound In-Feed =8.1
Cut Depth =.008 Compound In-Feed =9.2
Cut Depth =.009 Compound In-Feed =10.4
Cut Depth =.010 Compound In-Feed =11.5
Cut Depth =.011 Compound In-Feed =12.7
Cut Depth =.012 Compound In-Feed =13.9
Cut Depth =.013 Compound In-Feed =15.
Cut Depth =.014 Compound In-Feed =16.2
Cut Depth =.015 Compound In-Feed =17.3
Cut Depth =.016 Compound In-Feed =18.5
Cut Depth =.017 Compound In-Feed =19.6
Cut Depth =.018 Compound In-Feed =20.8
Cut Depth =.019 Compound In-Feed =21.9
Cut Depth =.020 Compound In-Feed =23.1
Cut Depth =.021 Compound In-Feed =24.2
Cut Depth =.022 Compound In-Feed =25.4
Cut Depth =.023 Compound In-Feed =26.6
Cut Depth =.024 Compound In-Feed =27.7
Cut Depth =.025 Compound In-Feed =28.9
Cut Depth =.026 Compound In-Feed =30.
Cut Depth =.027 Compound In-Feed =31.2
Cut Depth =.028 Compound In-Feed =32.3
Cut Depth =.029 Compound In-Feed =33.5
Cut Depth =.030 Compound In-Feed =34.6
Cut Depth =.031 Compound In-Feed =35.8
Cut Depth =.032 Compound In-Feed =37.
Cut Depth =.033 Compound In-Feed =38.1
Cut Depth =.034 Compound In-Feed =39.3
Cut Depth =.035 Compound In-Feed =40.4
Cut Depth =.036 Compound In-Feed =41.6
Cut Depth =.037 Compound In-Feed =42.7
Cut Depth =.038 Compound In-Feed =43.9
Cut Depth =.039 Compound In-Feed =45.
Cut Depth =.040 Compound In-Feed =46.2
Cut Depth =.041 Compound In-Feed =47.3
Cut Depth =.042 Compound In-Feed =48.5
Cut Depth =.043 Compound In-Feed =49.7
Cut Depth =.044 Compound In-Feed =50.8
Cut Depth =.045 Compound In-Feed =52.
Cut Depth =.046 Compound In-Feed =53.1
Cut Depth =.047 Compound In-Feed =54.3
Cut Depth =.048 Compound In-Feed =55.4
Cut Depth =.049 Compound In-Feed =56.6
Cut Depth =.050 Compound In-Feed =57.7
Cut Depth =.051 Compound In-Feed =58.9
Cut Depth =.052 Compound In-Feed =60.
Cut Depth =.053 Compound In-Feed =61.2
Cut Depth =.054 Compound In-Feed =62.4
Cut Depth =.055 Compound In-Feed =63.5
Cut Depth =.056 Compound In-Feed =64.7
Cut Depth =.057 Compound In-Feed =65.8
Cut Depth =.058 Compound In-Feed =67.
Cut Depth =.059 Compound In-Feed =68.1
Cut Depth =.060 Compound In-Feed =69.3
Cut Depth =.061 Compound In-Feed =70.4
Cut Depth =.062 Compound In-Feed =71.6
Cut Depth =.063 Compound In-Feed =72.7
Cut Depth =.064 Compound In-Feed =73.9
Cut Depth =.065 Compound In-Feed =75.1
Cut Depth =.066 Compound In-Feed =76.2
Cut Depth =.067 Compound In-Feed =77.4
Cut Depth =.068 Compound In-Feed =78.5
Cut Depth =.069 Compound In-Feed =79.7
Cut Depth =.070 Compound In-Feed =80.8
Cut Depth =.071 Compound In-Feed =82.
Cut Depth =.072 Compound In-Feed =83.1
Cut Depth =.073 Compound In-Feed =84.3
Cut Depth =.074 Compound In-Feed =85.5
Cut Depth =.075 Compound In-Feed =86.6
Cut Depth =.076 Compound In-Feed =87.8
Cut Depth =.077 Compound In-Feed =88.9
Cut Depth =.078 Compound In-Feed =90.1
Cut Depth =.079 Compound In-Feed =91.2
Cut Depth =.080 Compound In-Feed =92.4
Cut Depth =.081 Compound In-Feed =93.5
Cut Depth =.082 Compound In-Feed =94.7
Cut Depth =.083 Compound In-Feed =95.8
Cut Depth =.084 Compound In-Feed =97.
Cut Depth =.085 Compound In-Feed =98.2
Cut Depth =.086 Compound In-Feed =99.3
Cut Depth =.087 Compound In-Feed =100.5
Cut Depth =.088 Compound In-Feed =101.6
Cut Depth =.089 Compound In-Feed =102.8
Cut Depth =.090 Compound In-Feed =103.9
Cut Depth =.091 Compound In-Feed =105.1
Cut Depth =.092 Compound In-Feed =106.2
Cut Depth =.093 Compound In-Feed =107.4
Cut Depth =.094 Compound In-Feed =108.5
Cut Depth =.095 Compound In-Feed =109.7
Cut Depth =.096 Compound In-Feed =110.9
Cut Depth =.097 Compound In-Feed =112.
Cut Depth =.098 Compound In-Feed =113.2
Cut Depth =.099 Compound In-Feed =114.3
Cut Depth =.100 Compound In-Feed =115.5
Cut Depth =.101 Compound In-Feed =116.6
Cut Depth =.102 Compound In-Feed =117.8
Cut Depth =.103 Compound In-Feed =118.9
Cut Depth =.104 Compound In-Feed =120.1
Cut Depth =.105 Compound In-Feed =121.2
Cut Depth =.106 Compound In-Feed =122.4
Cut Depth =.107 Compound In-Feed =123.6
Cut Depth =.108 Compound In-Feed =124.7
Cut Depth =.109 Compound In-Feed =125.9
Cut Depth =.110 Compound In-Feed =127.
Cut Depth =.111 Compound In-Feed =128.2
Cut Depth =.112 Compound In-Feed =129.3
Cut Depth =.113 Compound In-Feed =130.5
Cut Depth =.114 Compound In-Feed =131.6
Cut Depth =.115 Compound In-Feed =132.8
Cut Depth =.116 Compound In-Feed =133.9
Cut Depth =.117 Compound In-Feed =135.1
Cut Depth =.118 Compound In-Feed =136.3
Cut Depth =.119 Compound In-Feed =137.4
Cut Depth =.120 Compound In-Feed =138.6
Cut Depth =.121 Compound In-Feed =139.7
Cut Depth =.122 Compound In-Feed =140.9
Cut Depth =.123 Compound In-Feed =142.
Cut Depth =.124 Compound In-Feed =143.2
Cut Depth =.125 Compound In-Feed =144.3
Cut Depth =.126 Compound In-Feed =145.5
Cut Depth =.127 Compound In-Feed =146.7
Cut Depth =.128 Compound In-Feed =147.8
Cut Depth =.129 Compound In-Feed =149.
Cut Depth =.130 Compound In-Feed =150.1
Cut Depth =.131 Compound In-Feed =151.3
Cut Depth =.132 Compound In-Feed =152.4
Cut Depth =.133 Compound In-Feed =153.6
Cut Depth =.134 Compound In-Feed =154.7
Cut Depth =.135 Compound In-Feed =155.9
Cut Depth =.136 Compound In-Feed =157.
Cut Depth =.137 Compound In-Feed =158.2
Cut Depth =.138 Compound In-Feed =159.4
Cut Depth =.139 Compound In-Feed =160.5
Cut Depth =.140 Compound In-Feed =161.7
Cut Depth =.141 Compound In-Feed =162.8
Cut Depth =.142 Compound In-Feed =164.
Cut Depth =.143 Compound In-Feed =165.1
Cut Depth =.144 Compound In-Feed =166.3
Cut Depth =.145 Compound In-Feed =167.4
Cut Depth =.146 Compound In-Feed =168.6
Cut Depth =.147 Compound In-Feed =169.7
Cut Depth =.148 Compound In-Feed =170.9
Cut Depth =.149 Compound In-Feed =172.1
Cut Depth =.150 Compound In-Feed =173.2
Cut Depth =.151 Compound In-Feed =174.4
Cut Depth =.152 Compound In-Feed =175.5
Cut Depth =.153 Compound In-Feed =176.7
Cut Depth =.154 Compound In-Feed =177.8
 
Ken , Is that for a "sharp V" tool or with the spect. flat tip?
I ask because the 16 tpi we do a lot of at the school about 40 is where
the nut fits .The tools have a small radius on the tip (not realy measured).
...lew...
 
Lew,
That is a good question that needs clarification, the answer which escapes me at this point in time, I wrote a small basic program some time ago to print this out and do not recall. It likely was (at the least, intended) for the sharp point threading tool since that is what I use, but now you make me wonder on my math. I will look into it and reply back.

Ken
 
Lew and others interested,
The chart above is for the sharp V type threading tools.

As with most any threading, when you are getting close to the final cut it is always good practice to check for fit with the nut to be used. You can have a perfectly formed thread and then find the nut is over/undersized, which is not all that uncommon.


Ken
 
Ken have you ever bought a nut or bolt that would not fit a standard
matching piece?
If you have please send it to me along with any information you can
provide about it's origin.

Thread standards has for the most part eliminated that.

My very first job out of tech school was in a dying factory known locally
as "The Screw Factory" The pay was low. The machines were
archaic and the employee safety factor was ZERO! But, the pride of the
workers was paramount. Every piece worked as it was intended EVERY
TIME!

To find an out of tolerance nut or bolt in even the cheapest of hardware
stores would be a rare occasion.

As I have already said the CNC machines I run are programmed to cut a
perfect thread. With all the perfection of a computer guided machine it's
not uncommon to have to off set a tool .020 deeper to achieve a class
4 fit on a thread.

The computer, program or calculator will tell you your wrong, but the
hardened steel gauges never to test the "Go / No Go" fit were made long
before the integrated circuit.

Rick
 

Latest posts

Back
Top