


I have a simple trick for getting decent accuracy with a three jaw chuck. There are some limitations with this trick, and I will outline those in the post as we go. I will also make the statement that this may not work for you, and I would verify the results before working on an actual part.
Fair warning: there are times and applications where a three jaw chuck will not suffice, so use the four jaw when needed. Accurately locating a part in a four jaw chuck is not a hard task, and I encourage anyone not proficient in this to practice it! You don't even have to make any chips as long as you have a perfectly round object.
Okay, if you are machining something in the three jaw chuck, and will have to remove the part for other operations before being placed back into the lathe, then this tip might safe some time and grief. I have been able to get repeatable results to within .002" TIR (total indicated run out). Your results might be better or worse depending on the chuck and other factors.
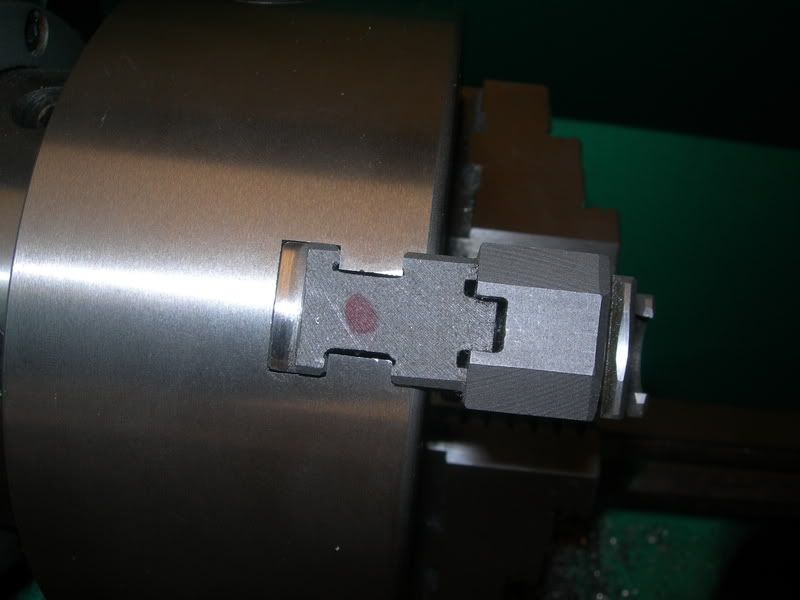
First, you will need to "key" your jaws in the three jaw. I have keyed only two in mine, one is blue and the other is red. A dab of paint would be the best option for this marking. In The picture below, note the red dot on the top of the jaw.
The next thing you will have to do prior to removing your workpiece form the chuck is to mark the work piece to correspond to the specific jaws in the chuck. I use a permanent ink marker (which is a misnomer; the ink is far from permanent unless it is on your walls or cloths) to mark the workpiece. Be aware that cutting oils or other fluids may remove the permanent ink, so use a suitable method of identifying your work piece. Below I have a fixture "keyed" to the jaw. Note the blue line next to the jaw.
Once your workpiece is "keyed", you can remove it from the three jaw and do what ever is needed outside of the lathe. Once you are ready, simply place the workpiece back into the lathe "keyed" to the corresponding jaw and your set to go again. The one thing that will throw this off is having dirty jaws. The jaws must be clean prior to
the first set up and any subsequent set ups.
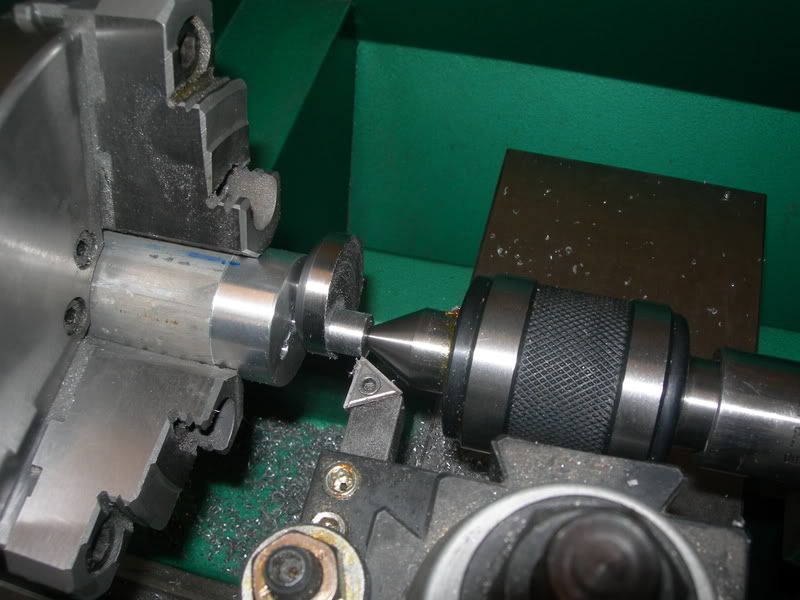
I have done several tests using this method with my lathe, and the repeatability is usually .001" TIR, but I have never seen it more than .002" TIR. If you are machining something that can that much error, then you are set as long as your equipment produces repeatability inside the tolerances allowed for your task. To test you three jaw for repeatability, take a piece of bar stock and turn it down so that you have a good round surface that is concentric with the center line of the lathe spindle. In other words, a simple clean up cut will suffice.
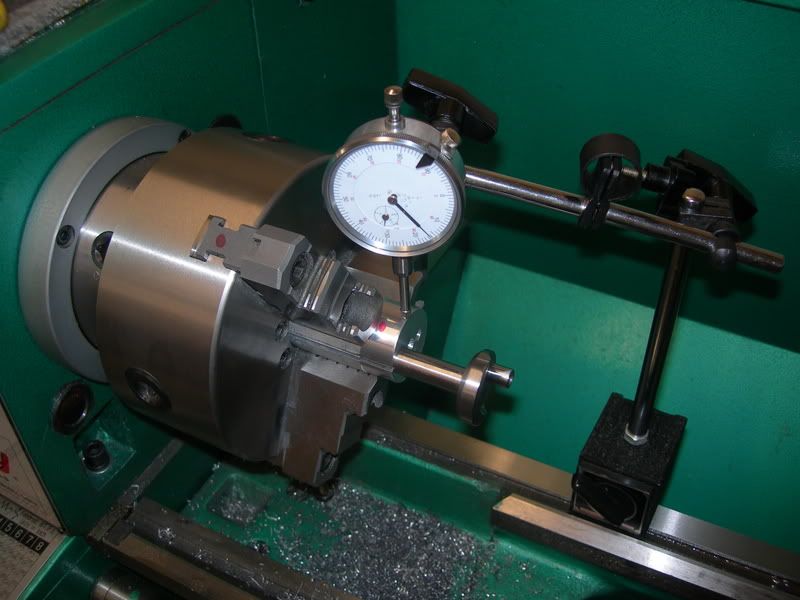
Take a dial indicator mounted to a stand (or other preferred method) and take a reading to see where you are at. You should be dead on, if not then take another cut and double check. If you can't get a dead on reading, then you may have another issue with the lathe that is outside the scope of this thread.
Once you have verified your reading, key your workpiece to the corresponding jaws and then remove it. To make an accurate assessment of the repeatability, I have taken another piece of material (different diameter) and clamped it into the three jaw, followed by removal. Te test piece is then placed back into the three jaw and is keyed to the corresponding jaws. Once it is clamped back into place, take a reading with the dial indicator and see what the TIR is. Do this procedure a few times making notes of your findings.
This will give you an idea of the repeatability that you can expect using this method. Again, I will warn anyone using this that it is not a substitute for taking the time to set up the work piece in the four jaw when accuracy has to be right on, but for the quick and easy tasks, this is an easy method of getting repeatable results in the three jaw. One area this will not work is when you have a work piece that needs to be located accurately, but hasn't been machined and keyed with the same chuck.
Hopefully this will save some time for those looser tolerance jobs. And I would be interested on the results from others.
Fair warning: there are times and applications where a three jaw chuck will not suffice, so use the four jaw when needed. Accurately locating a part in a four jaw chuck is not a hard task, and I encourage anyone not proficient in this to practice it! You don't even have to make any chips as long as you have a perfectly round object.
Okay, if you are machining something in the three jaw chuck, and will have to remove the part for other operations before being placed back into the lathe, then this tip might safe some time and grief. I have been able to get repeatable results to within .002" TIR (total indicated run out). Your results might be better or worse depending on the chuck and other factors.
First, you will need to "key" your jaws in the three jaw. I have keyed only two in mine, one is blue and the other is red. A dab of paint would be the best option for this marking. In The picture below, note the red dot on the top of the jaw.
The next thing you will have to do prior to removing your workpiece form the chuck is to mark the work piece to correspond to the specific jaws in the chuck. I use a permanent ink marker (which is a misnomer; the ink is far from permanent unless it is on your walls or cloths) to mark the workpiece. Be aware that cutting oils or other fluids may remove the permanent ink, so use a suitable method of identifying your work piece. Below I have a fixture "keyed" to the jaw. Note the blue line next to the jaw.
Once your workpiece is "keyed", you can remove it from the three jaw and do what ever is needed outside of the lathe. Once you are ready, simply place the workpiece back into the lathe "keyed" to the corresponding jaw and your set to go again. The one thing that will throw this off is having dirty jaws. The jaws must be clean prior to
the first set up and any subsequent set ups.
I have done several tests using this method with my lathe, and the repeatability is usually .001" TIR, but I have never seen it more than .002" TIR. If you are machining something that can that much error, then you are set as long as your equipment produces repeatability inside the tolerances allowed for your task. To test you three jaw for repeatability, take a piece of bar stock and turn it down so that you have a good round surface that is concentric with the center line of the lathe spindle. In other words, a simple clean up cut will suffice.
Take a dial indicator mounted to a stand (or other preferred method) and take a reading to see where you are at. You should be dead on, if not then take another cut and double check. If you can't get a dead on reading, then you may have another issue with the lathe that is outside the scope of this thread.
Once you have verified your reading, key your workpiece to the corresponding jaws and then remove it. To make an accurate assessment of the repeatability, I have taken another piece of material (different diameter) and clamped it into the three jaw, followed by removal. Te test piece is then placed back into the three jaw and is keyed to the corresponding jaws. Once it is clamped back into place, take a reading with the dial indicator and see what the TIR is. Do this procedure a few times making notes of your findings.
This will give you an idea of the repeatability that you can expect using this method. Again, I will warn anyone using this that it is not a substitute for taking the time to set up the work piece in the four jaw when accuracy has to be right on, but for the quick and easy tasks, this is an easy method of getting repeatable results in the three jaw. One area this will not work is when you have a work piece that needs to be located accurately, but hasn't been machined and keyed with the same chuck.
Hopefully this will save some time for those looser tolerance jobs. And I would be interested on the results from others.