PM Research Oscillating Steam Engine Kit

Home Model Engine Machinist Forum

Help Support Home Model Engine Machinist Forum:

This site may earn a commission from merchant affiliate links, including eBay, Amazon, and others.

user 1493

Well-Known Member
Joined
Jul 24, 2009
Messages
100
Reaction score
2
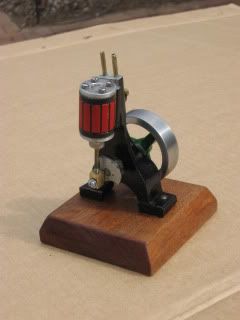
I bought this kit a few months ago before I found a local source for materials. The castings are some version of aluminum and the rest of the kit is made up of brass and steel. Here is the kit and contents.

PMResearchEngine002-1.jpg


Something that I did not expect was the need for taps and dies in sizes that are not readily available locally. I had to purchase 3-38 and 5-40 sets. Fortunately the big brown truck will drop them off a couple of days after I order supplies from Enco. I am amazed at their service.

I decided to deviate from the plans for the flywheel. They called for knurling the driveshaft and then pressing on the flywheel. I did not want to do that because if you do, it is not easy to take it apart to make any modifications. I decided to use a grub screw.

PMResearchEngine007.jpg


PMResearchEngine016.jpg


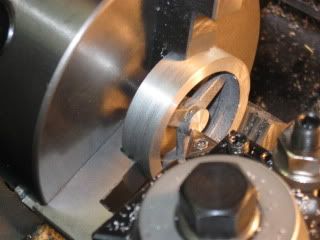
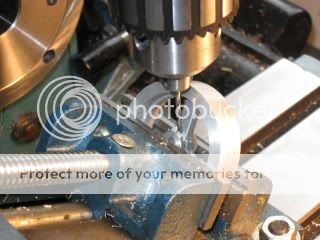
The metal that was used for the castings is quite soft and difficult to machine. It is very difficult to polish it. I used a progression of abrasive starting from 220 grit and finishing with crocus cloth. It still looks crappy.

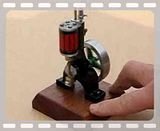
I have completed all of the machine work and have started to assemble the engine. Unfortunately I dropped the wave washer that furnishes the tension on the cylinder and it is someplace on the floor of my shop. I spent an hour crawling around yesterday to no avail and will resume my search today. I may have to modify the design to work around my lack of the part. I am beginning to appreciate the benefits of using a jewelers apron when assembling a project.


My next project will be a "Two Poster" that was designed by Bill Reichart. It is pretty and does not require any castings.

Thanks to all of the information that I have gleaned from this board.

Jack
 
Hello Jack, (I didn't want to say Hi for fear the FAA would arrest me ;D). I am sorry to hear about your disappointment of metal quality and the less than desirable finish. What was the last grit used before the crocus cloth? Getting aluminum to come up to a mirror shine should not be that difficult if finer and finer grades of abrasives are used down to say 600 wet and then a good clean followed by rouge and a buff and finally liquid polish by hand. Anyway, post up some pics of your engine when it is finally assembled and painted, we'd all love to see it. Videos are even better. th_wwp


BC1
Jim
 
Hi Jack;
Would be nice to see your machining pictures, too. Feel free to share here.

Dean
 
Hi Jim,

Thanks for your comments. I was a pilot for thirty-five years so I heard the Hi Jack quite a few times. Anyway, I used progressively finer grit down to 320 and then synthetic steel wool like the green scrubby that your wife uses in the kitchen before finally going to the crocus cloth. The wool is a product that I have used on pens that I make on my wood lathe. The aluminum is very soft and transfers to the paper with the slightest pressure. I'm not going to loose any sleep over it but I have gotten quite a nice finish on some tools that I have made using a harder aluminum that I picked up at one of the local scrap yards.

Thanks again,

Jack
 
Very good captain Jack, Tally HO!! (no wait, 'Roger That') Do post up some pics, we LOVE pics..... right guys/ (and gals a well) ............................. any in-betweeners :-X oh never mind. ;D

BC1
Jim
 
Try some fine grit Clover to polish that piece. Use 800 or 1200 grit, put a dab on a small piece of cloth, (like 3" square) and hold it against the piece while it's turning at a pretty good clip.
Don't forget to cover your lathe bed, and clean up well when you're done. Then hit it a good lick with some Mother's Aluminum/Mag polish.

Dean
 
Jack, would love to see pics as others have said already. If you can't find that washer, I bet if you calll PMR they will just drop one in the mail to you. They are nice folks to deal with. I do wish they would offer this kit in bronze like they once did though.

Bill
 
I completed this project last week. Here is a video of it operating and a still of it completed. I don't know what the next project will be although we have company coming next month so the honey-do list has to take priority and the bicycle season is starting so it may be a little while. My goal on the next project is to complete it without remaking any parts that are wrong because of a stupid mistake.

March29002.jpg


The flywheel does rotate faster than it appears but the camera can only record 30 FPS so the flywheel appears to be rotating backwards just like the stagecoach wheels did in the old westerns that we watched when we were kids.

Jack
 
Jack,

That is a fine looking/running engine. :bow:

You referred to movies where the stage coach wheels appeared to be rolling back wards.

Did these movies have sound?

Rof}

SAM
 
I like the color scheme, especially the highlighted flutes around the body of the cylinder. Nicely done.

BC1
Jim
 
Thanks for your comments. First I would like to apologize for the terrible description on the post. Let's try it over.

I completed this project last week. Attached is a photo of the completed engine and a video of the engine operating with air. I have not decided on my next project. We have company coming next month so I will have to devote some time to the honey-do list. Also, bicycling season is starting so it may be a while before I start playing in the shop again. My goal on the next project is to complete it without remaking any parts that are wrong due to stupid mistakes on my part.

Sam, there was sound although it was usually drowned out by the comments and cheers from the peanut gallery.

Jack
 
Jack,

Congratulations on a very nice engine :bow: :bow:

Best Regards
Bob
 
Nice looking engine, Jack.

capjak said:
My goal on the next project is to complete it without remaking any parts that are wrong because of a stupid mistake.

Lofty goal. I don't think that I have ever built an engine that I did not make at least one part over.

 
Congratulations Jack. Fine build.
I have a special place in my heart for that engine...it was my very first engine...about one year ago now.
 
That's a flat out good looking engine, Jack. I would never have thought that color scheme would work well, but this is very attractive. Sure runs nice, too. Congrats!

Regarding your comment about remaking parts, and mistakes; Don't set yourself up. Just have a look at the scrap pile at the local machine shop. Those guys are professionals. It's okay to goof!

Good job on your engine!

Dean
 
Congratulations Jack!
Nice runner! Thm:

Rick
 
Jack, that's nice. The colors worked out very well. I've got this kit sitting in a box awaiting the resurrection of my workshop. Would you be able to comment on any 'gotchas' with the machine work on this? Other than the soft alloy?
 
Thanks for all of the comments. A couple of the gotchas that come to mind are: I bored the cylinder with a 15/32" drill and then reamed it with a 1/2" reamer. I did not get a good finish but I decided to give it a try with what I had. It worked OK. The prints call for two grooves in the piston for teflon rings. I ground a tool to cut the grooves but broke it before I finished them. I made a new piston with no grooves or rings and it worked OK. When I was tapping the blind holes in the cylinder for the head, I did not clear the chips soon enough and the end of the tap broke as I was backing it out. Fortunately the broken piece was short enough that I could still use the hole.

Jack
 

Latest posts

Back
Top