Nose cone - ball turner (1st attempt)

Home Model Engine Machinist Forum

Help Support Home Model Engine Machinist Forum:

This site may earn a commission from merchant affiliate links, including eBay, Amazon, and others.
I downloaded the plans. So when I get my two wobblers done ::) I'm starting on some much needed tooling and a ball turner is on the list. Don't exactly know where on the list, but it's on there. ;D

Bernd

P.S. Ralph, that lathe looks simular to a Grizzly 9 X 20.
 
Thank you John, and yes if you got one use it ;)... it's probably my favorite piece of kit :D (that attaches to the lathe!)

Bernd,

Make it soon... you won't regret it ;D and yes my lathe is a 9x20 'Chester UK' variation. It has some of the faults known on these machines but it works and always seems to come through! (even if the tailstock lock just bust!! More work!! ::) )
 
Thanks Ralph, they say a picture is worth a thousand words- a video must be worth half a million!

Excellent & inspiring :)

 
Hi all
I built a ball turner over a year ago and have use it several times now. But only I seem to only be able to make is an ogive cant quite get a ball ??? maybe next week I will take it off the shelf and give it a nother try. Marv I would like to know what you have frogotten over the years. Ralph I'm with you on that one after 30+ years under the hood you forget the math because it makes your head hurt just like your back.
Excellent post in joyed every bit of it !!!!
Dave
 
d-m said:
Hi all
I built a ball turner over a year ago and have use it several times now. But only I seem to only be able to make is an ogive cant quite get a ball ??? maybe next week I will take it off the shelf and give it a nother try. Marv I would like to know what you have frogotten over the years. Ralph I'm with you on that one after 30+ years under the hood you forget the math because it makes your head hurt just like your back.
Excellent post in joyed every bit of it !!!!
Dave

Hell, I'd like to know what I've forgotten over the years. :) If you're having problems turning a true sphere, it's most likely because you haven't ensured that the axis of the ball turning tool is aligned with the lathe spin axis. The vertical axis of the tool must intersect the horizontal spin axis of the lathe.

When I made my ball turning tool, I arranged for the pivot to have a central hole on the axis of rotation into which I could fit a pointed rod. The tip of this rod is then aligned with the tip of a center mounted in the spindle, thus guaranteeing that the two axes are aligned. Then the pin and the lathe center are removed, the work mounted and turning begun.
 
OK guys I'm going to dive into this one head first and see what happens. Here is a pic of the turner I made when I first got my mill. As you can see by the handle it makes a nice Ogive ( I love nomenclature and spell check) I have most of the parts for a turner like the one Ralph has just haven't had the time to finish.This turner I found on the web somewere and thought it was a good project it is vary stout to say the least. My Sterling fan is killing my hobby time so I haven't gotten back to it . If I understand what Marv is saying its just a matter of getting the cutting tool at the right height? I also see the advantage of having a mandrel to put the work on. OK guys hit me with some help I will go to the shop and see if I can make it work better.
Dave

92205.jpg


98201.jpg
 
Hi Dave.

I can't see how you adjust the tool? if it is fixed then it will only turn one size of ball! what is the distance from the tool tip to the (imaginary) line of the centre of the main pivots ? this is the radius of the ball size it will cut... thats as far as I can make out?! I have never used this kind of tool but thats what I can see from ur pic's ???
feel free to tell me I'm speaking #@%* anyone... I certainly don't know it all ;D

Ralph.
 
yeah the incremental cut method works very well, so well that I've never gotten around to making a ball or radius cutting tool. Granted the radius cutting tool would be quicker and more accurate, but I've found this activity to be both infrequent and low precision (not mating parts) - knowing how to do it without the ball turn sure takes away a lot of the motivation to make one :D. For the unfamiliar, the curve is approximated with small steps, MNC instead or CNC (that's Manual Numeric Control). The steps are easily rounded with a smooth file followed by some emery. Its nice if you have a graduated leadscrew dial (another good project) however using the compound would also work.

The excel table i use is attached if you're interested - it gets used infrequently enough that i had to leave myself instructions so I'd know how to use it next time, hopefully it makes sense to you.

View attachment Mcgyver\'s ball turning calculations.xls
 
Mcgyver said:
For the unfamiliar, the curve is approximated with small steps, MNC instead or CNC (that's Manual Numeric Control). The steps are easily rounded with a smooth file followed by some emery. Its nice if you have a graduated leadscrew dial (another good project) however using the compound would also work.

That's the method Guy Lautard has in his Bedside Reader. I have his little book with tables in it to turn balls from 1/64" to 1" in 64th's increments. Also has instructions for concave turning, plus making machine handles. Very informative. Haven't used his method yet. Too lazy I guess. ;D

Bernd
 
Seems a bit of confusion about what I said. Let me try it another way...

To cut a true sphere, the axis about which the ball turning tool rotates must intersect the axis about which the work turns (this latter is the spindle axis if working on the lathe).

In Dave's (d-m) photo above, the former axis is the one to which the operating handle is attached.

As Ralph has pointed out the radius of the ball is determined by the distance between this axis and the tip of the cutting tool.

Like McGyver, I prefer to turn most balls using the incremental approach. My BALLCUT program will do all the math for you and produce a cutting schedule which you can print and carry to the shop. For me, it takes less time to do it incrementally than it takes to set up the ball turning tool.

Once you've made all the incremental cuts, slather the workpiece with Dykem (layout fluid for our British cousins). Then file until all the Dykem color disappears and you'll have a very nice sphere.

Incidentally, my incremental OGIVE program works the same way to produce a cutting schedule for ogives. Like spheres, ogives seldom require precision sizing (most are for appearance only) so the incremental approach is more than satisfactory and a lot quicker.

 
That's the method Guy Lautard has in his Bedside Reader.

yup, great books they are. I gave credit to Guy as the inspiration in the excel file :)

While on the subject of ball turning here is another really neat way to do so. This is better suited for wood or soft metals as it involves hand holding the tool. Absolutely perfect for making wooden ball handles....like I did on my UPT.

what you do is take a lenght of gauge plate, (tool steel, same as drill rod) maybe 1/8 thick and drill/bore a hole in it some amount less than the desired OD of the ball, maybe for a 1" ball make a 5/8 or 3/4 hole. You want a neat edge between and where the hole meets the flat surface of the plate - this is the cutting edge. removed sharp edges or better yet duct tape the end(s) thats the handle. No need to harden for use on wood. Rough out the blank of say hardwood and simply hold the hole in the gauge plate to the work and move it around. The edge of the hole will remove high spots until the work perfectly touches the gauge plate all around the edge of the hole - and when that happens you've made it a sphere!
 
Well I know that everyone is different and all of us will have our preferred methods of cutting both sphere's and ogives... But I like mine. :p :big:

I would really like to see someone make a sphere using the incremental method though... If anyone has the time to film and present it? Would also like to know the time taken to perform the task? ( maybe a knob/ball around 5/8 to 3/4"? )

Is anyone able to complete such a mammoth task!?!?! ;D


Ralph.
 
Ralph,

I don't have time to do a video but why don't you try it for yourself. Mount some 3/4" stock and a cutoff tool with a square tip. The cutting schedule for a 3/4" hemisphere is given below. Start with the left side of the tool against the (faced off) surface of the stock.

When you've completed the cuts, coat with Dykem and then file until all the Dykem disappears.

There are 17 cuts to make. Figure 15 seconds per cut and that's, rounding up, five minutes to make the cuts. Add another ten minutes for filing and you should be done in fifteen minutes or so.

For a more detailed discussion of the technique and the method for cutting full spheres, read the text file included in the BALLCUT archive.


===================================================

Incremental Sphere Turning Data
Sphere diameter = 0.7500 in
Stock diameter = 0.7500 in
Angular increment = 5.0000 deg

N = cut number
XF = axial (along lathe bed) position of tool
DX = increment in x from last cut
YF = depth of cut
DY = increment in y from last cut
WD = work diameter resulting from depth of cut YF

N XF DX YF DY WD

0 0.000 +0.000 0.375 +0.000 0.000
1 0.001 +0.001 0.342 -0.033 0.065
2 0.006 +0.004 0.310 -0.032 0.130
3 0.013 +0.007 0.278 -0.032 0.194
4 0.023 +0.010 0.247 -0.031 0.257
5 0.035 +0.013 0.217 -0.030 0.317
6 0.050 +0.015 0.187 -0.029 0.375
7 0.068 +0.018 0.160 -0.028 0.430
8 0.088 +0.020 0.134 -0.026 0.482
9 0.110 +0.022 0.110 -0.024 0.530
10 0.134 +0.024 0.088 -0.022 0.575
11 0.160 +0.026 0.068 -0.020 0.614
12 0.188 +0.028 0.050 -0.018 0.650
13 0.217 +0.029 0.035 -0.015 0.680
14 0.247 +0.030 0.023 -0.013 0.705
15 0.278 +0.031 0.013 -0.010 0.724
16 0.310 +0.032 0.006 -0.007 0.739
17 0.342 +0.032 0.001 -0.004 0.747
18 0.375 +0.033 0.000 -0.001 0.750
 
Ralph,

No-one is disagreeing with your ball turner at all, just showing that one isn't totally necessary. For repeatable jobs, a ball turner is great, but there are methods that have been used for centuries that give rather acceptable results. This is what the forum is for, showing how you do it, it would be unfair if other people couldn't show their way as well.

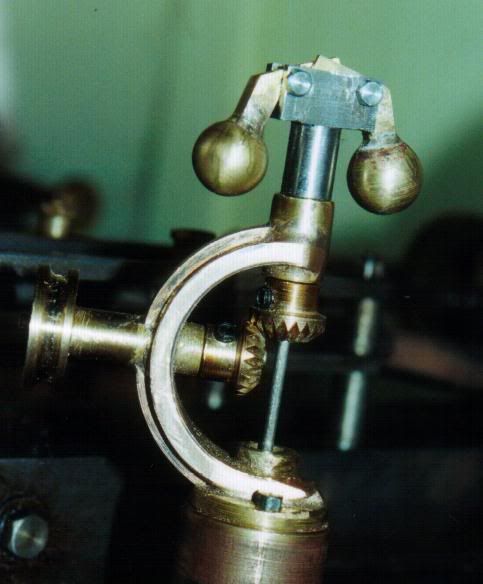
I have a ball turner that uses my milling boring head, but find, just like Marv I tend to do it freehand.

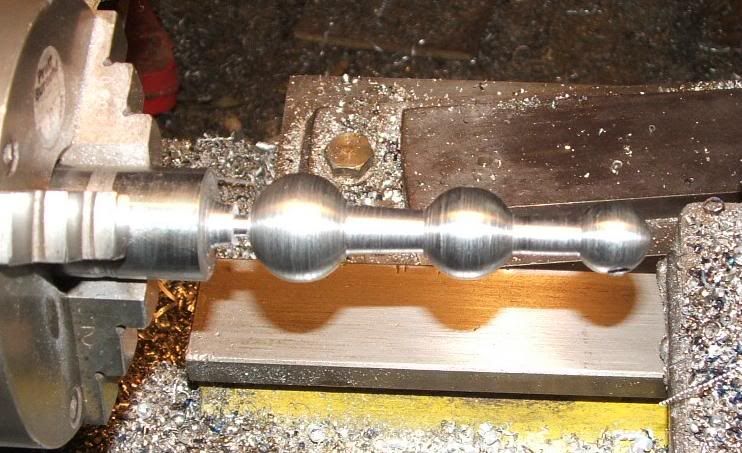
This set of pics is for a funnel cap I did recently on another site, not balls or ogives, but curves just the same. The only reason for the mandrel was because it was made out a left over lump, normally it would have the first parts done on the end of a piece of bar.

All that was used for making was the machine cutting tools, to give the basic shape, a second cut, half round file, an emery block and a good dose of polishing. About 3/4 of an hour to an hour total.

I do all my ogives this way, 2" or 3" would present no problems at all, 1/4" done in seconds.

funcap1.jpg


funcap2.jpg


funcap3.jpg


funcap4.jpg


funcap5.jpg


funcap6.jpg


funcap7.jpg


funcap8.jpg


funcap9.jpg


funcap10.jpg


Rather difficult to do with a ball turner.

John
 
This is a fun thread. Smooth flowing shapes really catch the eye.

Of course, this is the sort of thing CNC excels at too!

Cheers,

BW
 
Gents, please don't get me wrong... All that I write is intended with a touch of humour, hence the :p and :big:

I intended no ill feelings toward anyone of you or your methods, I am not saying anyone or any method is better or worse. You must know by now I am in awe of many of your talents. My point was that I would like to see a vid of this method being applied (curiosity... learn new stuff!).

I get this kind of response sometimes using text messages?! Sometimes they are read a bit differently and in a different frame of mind to that in which they were written... ?


I will have a few experiments at Marv's suggestion once my shop is erm shopshape!?
and I have cleared a little backlog of requested work.

I do like that piece John, Very smooth :D I like the expanding arbour holder device. That could be useful! Did you cut the inner shape in the same way or by eye?


Written by a happy guy.... (I am always happy when I am doing anything to do with machining).


Ralph. ;D

Oh and BW... If you get a chance with CNC that would be a fun vid/post too! ;D
 
At the risk of beating the subject to death, let me say that the incremental method closely approximates the way that CNC works. In fact, I call it HAM - Human Assisted Machining.

As such, it can be used for any shape including those that can't be generated via a simple mechanical motion imparted to the cutting tool.

In fact, I wrote a program, PROFILE, that allows one to describe a shape via a data file and the program will generate a cutting schedule (similar to those for BALLCUT and OGIVE). In addition to the standard straight line and arc descriptors it also has the ability to fit splines to a series of points to achieve a more artistic blending. I used this program to make the three ball handles on the PMR lathe model.

Nevertheless, I wish I had the sculptor's eye that John and others seem to have. I've turned some simple free-form shapes by hand with a graver and it's a lot easier if one has the dexterity for it. For larger shapes, I still rough it out incrementally because that gives me the basic shape that I want (and that my hand can't seem to generate). Then filing and sandpapering produce the final product.

Different strokes... My advice is to try all the different methods at least once or twice and decide what best suits your complement of skills and equipment.
 
Ralph,

Sorry if I upset you, I wasn't getting on at you at all.

Back to the funnel cap.

There is in fact a shot I never took, well I did, but is was too blurred, and that was showing me using a boring bar to get the inside shape to rough dimensions, as I did on the outside with a normal cutting tool. By using a caliper type of finger and thumb feel you should be able to tell whether it is close to the outside shape. Again my motto is, if it looks right, it is right. No measuring, except for the funnel fit.

Try it, it is so simple, but be very careful of the knuckle crunching chuck jaws, that is why I use my collet chuck for most work like this, it is a lot safer.

John

John
 
A variant of Mcgyver's scheme is to use wad punches to swizzle the roughly shaped lump into a ball - especially good for smaller ones, I use 'em all the time.
ball2.jpg


rvgov3.jpg
 

Latest posts

Back
Top