New camera review - the Canon SX10

Home Model Engine Machinist Forum

Help Support Home Model Engine Machinist Forum:

This site may earn a commission from merchant affiliate links, including eBay, Amazon, and others.

mklotz

Well-Known Member
Joined
Aug 29, 2007
Messages
3,047
Reaction score
27
Location
LA, CA, USA
Some time ago there was a bit of discussion on one of the threads about choosing a digital camera for photographing our work.

I recently bought a new camera and thought I'd make a brief report on it here for the benefit of others who are contemplating a camera purchase. Understand, I'm certainly no professional photographer but rather a moderately capable amateur, which, I suspect, includes me with many on this forum.

There's no doubt in my mind that a DSLR (Digital Single Lens Reflex) is the best choice for serious, skilled photographers. I had a (film) SLR for many years and was always very pleased with the way it performed. However, I did get very tired of lugging around the heavy camera and its equally heavy lenses. Also, changing lenses becomes something of a hassle when shooting varied subjects.

I'm convinced that the best cameras are made by the folks who make cameras and optics their primary business. My film camera was a Canon and my first digital camera was a Canon Powershot A630. I still have and use it because it's small, light and takes excellent pictures in AUTO mode without sacrificing the ability to manipulate shutter speed, aperture, etc. in its non-automatic modes. Thus it's great for off the cuff snapshots but can be adjusted nicely for good photos of subjects that are willing to sit still for a while - such as our engines.

Unfortunately, it does not have sufficient wide angle capability for me and, with only 3x optical zoom, not enough "reach" for the non-shop pictures I take. It's macro capabilities are reasonable but "more is better" in this regard for the small models I make.

Recently, Canon brought to market its Powershot SX10 IS and, when I saw it, I immediately thought, "this is the camera for me".

Some of its features include:

20X optical zoom (28 to 560 mm equivalent) f2.8-5.7
4x digital zoom
10 megapixel CCD
DIGIC IV image processor
variable angle LCD monitor
weight = 560 gm = 19.7 oz
dimensions = 124 x 88 x 87 mm
image stabilization via lens shift (essential for handheld shots at maximum zoom)
MSRP = $400 (can be found for less on the web)

While I've only had the camera for a few days and haven't yet worked completely through the 300 page instruction book, I'm extremely pleased with it and think it's going to overcome a lot of my objections to a DSLR (for me - I still believe that a DSLR is the best picture taking tool although not the best camera to satisfy all my personal requirements).

One of my personal requirements is detailed macro photographs. Both the A630 and the SX10 have excellent built-in macro capabilities but the SX10 has a super-macro mode with a minimum focus distance of zero cm - yes, that's right, it can focus on something touching the lens.

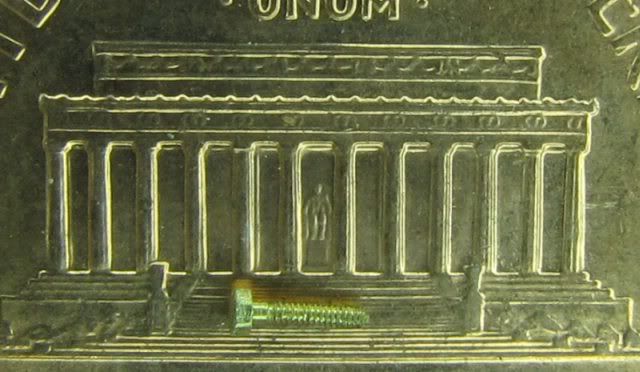
I used this mode to photograph a penny, then cropped the resulting pic and resized to 800 x 600 pixels

penny.jpg


Note that you can see the statue of Lincoln *inside* the Lincoln Memorial. (Most folks don't realize that this detail is part of the die used to strike the coin.)

Ok, enough for now. I'll spare you the other "evaluation" photos I took and simply mention that, if you're looking for a good general purpose camera and don't want the cost and weight of a DSLR, you might want to consider the SX10. (Insert standard disclaimer here.)

This has been a lengthy post and only marginally on topic but I hope that some of you may find the information useful.
 
Thanks Marv, I appreciate the quick but impressive review. I bought my first digitial camera, an Olympus, about a year ago. It's similar to your first Canon. I would like to get a little more capability in my next camera and your review is one I'll certainly keep on file.

Cheers,
Phil
 
Marv, I also just purchased a SX10. Got it last Thursday and have spent about 6 hours a day "figguring" it out. I LOVE it!!!! I have a friend who is a Pro photographer and he gave it the once over today. He classed it as well above the P & S cameras and about 2 notches below a good DSLR. It has everything and more than I would ever need or use. My only complaint is the lack of good continuous frame rates. 1.4 fps is pretty slow but I only would need that once or twice a year.(air shows and sports car races). You just can't find a zoom range and the features it has for under $400 anywhere. Yes I looked at the other major brands and the SX10 kept coming out on top. I would recommend it to anyone wanting a good digital camera for first time or upgrade. I upgraded from a Konika-Minolta Z2. One more great thing is the swivel LCD,,you don't have to get in those awkward positions anymore!!!
Julian
 
Marv thanks for that

i've been looking for a camera and after Bob's ( Maryak) posts, I made the call to get one rather than just use my phone camera

I did buy a cheapy ( dick smith ) online second hand for $30 delivered as a stop gap but after reading your post and doing some online research i think a SX 10 will be the one i get in the new year ( after tools and everything else i have my eye on) especially looking at the macro shot you took

cheers heaps for the tip

jack
 
Marv and Jack,

Thanks Marv, for my Canon and Jack they are great, as a point and click man I can't believe that I took the shot looking into my carby and seeing the jet hole and all pretty well focused
mgeye-popping.gif


A higher end camera would be wasted on this photoklutz, but I really appreciate the shot of the coin and the amazing detail.

Best Regards
Bob
 
Light-tents like that are great for studio product shots. Camera stores often carry a variety.

They're pretty easy to whip up ersatz versions of if you don't need one often-- the key is bright lights shining on the outside of the white cloth (or paper) tent to make the entire inside light up.
 
Now that is impressive resolution.

I had to put my heavy duty cheaters on to see that image between the columns
on a penny. I never knew that was there...
Someone hand carved that in a die at some point in time.
And we think we know what small work is?

Rick
 
wlindiii said:
I have had a Pentax K10D DSLR for over a year now because I had older lenses that would fit it. I find that adequate lighting has as much to do with picture quality as anything, and my skills need a lot of work in that area. I saw this the other day in a micromark catalogue which looked very interesting for model photography.
http://www.ares-server.com/Ares/Ares.asp?MerchantID=RET01229&Action=Catalog&Type=Product&ID=84248

Cut top off cardboard box. Cut 1 x 1' hole in each of three sides and cover with cheesecloth held in place with tape and, voila, light box. Illuminate all three holes with flood lamps and you're good to go. Use light colored papers for backdrops in box.
 
shred said:
Light-tents like that are great for studio product shots. Camera stores often carry a variety.

The idea is to present an even lighting with minimal shadowing.

When I still did studio work (before I decided I really hated studio work), I used a wide variety of lighting techniques to achieve that end. For small projects, I made a frame of 1/2" dowels (what I had on hand though a bit big) put together almost like oversized Tinkertoys with a thrift shop white sheet stretched over it. It wasn't an exact cube but was larger in back than in front which weighted the lighting angles more favorably.

With that, I had a variety of pieces of felt and velvet in different colors for contrast. These went under and behind the object being photograhed, either smooth or with a slight rumple dependent on which looked better. My cost was minimal due to using cheap materials and a bit of low peasant cunning. (The felt and velvet were roll ends from fabric shops. Sometimes if you smile sweetly and look lost & innocent, they even "find" a cut off or two that will do the trick.)

Granted this is WAY overkill for what most here would want to do, I just mentioned it to possibly give others some ideas. (By the way, I think a dark green velvet would be the best contrast against the unpainted metals used here but that's just a matter of personal taste.)

I'm not sure which way I'll go now. For model work, I'm thinking more in terms of soft bounce using the LED lights usually used to light the work area. I think I even have some velvet left over from another project for contrast.

BTW, Marv. I got introduced to Canon's EOS line a long time ago and fell in lust with their entire camera line since. I swear by them (and Graphlex but cut 4x5 is a bit out of the subject line with B&H for 16mm movie work ... also way off topic) and won't even look at anything else.

BEst regards,

Kludge
 
BTW, Marv. I got introduced to Canon's EOS line a long time ago and fell in lust with their entire camera line since. I swear by them (and Graphlex but cut 4x5 is a bit out of the subject line with B&H for 16mm movie work ... also way off topic) and won't even look at anything else.

I agree completely. I've used many cameras by other recognized makers and never yet found one that matched either the optical or mechanical performance of Canon. Their designers must spend a lot of time thinking about how the camera will actually be used and adapting their design to suit.
 
mklotz said:
I've used many cameras by other recognized makers and never yet found one that matched either the optical or mechanical performance of Canon.

My digital camera "junk box" has a small number of non-Canon cameras that may wind up riding the lathes with or in place of the webcams (WHY can't Canon make one of them too? :D) but that's because I don't care a whole lot what happens to them should something go adrift in a less than gentle way. My EOS 20D and ES8600 camcorder will come into play but only with the machines stopped or with them behind protective shields at some reasonable distance.

Their designers must spend a lot of time thinking about how the camera will actually be used and adapting their design to suit.

They pay attention to what users say they want then tune the cameras to fit those requirements while keeping up with (and developing) ever improving technology. They also put prototypes in the hands of photographers to play with and assess, then alter the designs as needed. It's a balancing act but one at which they excel. The only company close at the high end is Nikon and I've never developed a warm feeling toward them. Low end, though ... that's an open market but Canon is still the best bet around.

Best regards,

Kludge ... thinking about his "inside out" lighting again
 
I've been exploring the capabilities of the SX10 by making some evaluation photos to test the various capabilities of the camera.

Here's a shot of my version of PMR's small, overhead belt-driven model grinder. This was done in ordinary macro mode with the subject approximately six inches from the front lens element.

GRIND1.jpg


It's slightly blurred because old men with less than steady hands can't convince themselves to use the tripod.

And here is a close-up, done in super-macro mode, with the subject a scant one inch from the lens.

GRIND2.jpg


It too was handheld. Either I steadied up or the camera selected a faster shutter speed.

Both shots were made with an ordinary desk lamp, fitted with a CFL bulb, for illumination.
 
mklotz said:
GRIND1.jpg


It's slightly blurred because old men with less than steady hands can't convince themselves to use the tripod. 

It looks like the back feet of the base of the grinder are clear and un-blurred, I think what has happened is that the camera has focussed on the rear feet as they are in the centre of the image.

A handy hint for most digital camera's is to half press the shutter release button with the centre of the image on what you want to be in focus, that half-press will lock the focus and exposure (brightness of pic), then while keeping the shutter half-pressed re-compose the picture with composure that you desire and then fully press the shutter to take the pic.

This takes a little practice, but you will find that the quality of your pics may get better as you get the main part of your picture in focus even if it is not in the centre of the image frame.


Many of the newer digital camera's have built in face recognition which is pretty good at finding the faces and ensuring that they are in focus, only trouble is that they cant recognise all the many and varied parts that we want to photograph, and so when it can't find what it thinks is a face to focus on it assumes that the focus should be on what is dead centre in the image.

The way around this is to do as described above, centre image on what you want in focus, lock focus by half-pressing the shutter, keep the shutter half-pressed, re-compose as desired and then finally press all the way.

This trick works even on Dslr's too, but they have other tricks too to help/hinder you !!  :D :D

Hope this might help someone

Tim

edit. I forgot to say that if / when using a macro setting on your camera, the depth of field ( the depth of the image that is in focus ) is greatly reduced as can be seen in Marv's 2nd picture where the center of the grinder is in focus but the grinding wheel edges are out of focus.
 
Tim,

Yessir, you're right. I didn't give it enough time to focus. Let's try it again.

GRIND3.jpg
 
Marv,
You convinced me. I was just starting to look at new cameras when you did your review. The SX10 met all my demands to replace my aging digital camera so it did not take a lot of effort on your part to get me to buy myself an early Christmas present.

I received my new SX10 today so I have only had it a few hours. Still lots to learn about it, but I did shoot a sample shot similar to your introductory sample shot. I did put a 0.5 mm x 0.125mm hex head "bolt" on the penny however. It is one of a few I made for a project about about 8 years ago when I was still a youngster of 60 or so and could see such things. The head is 0.035 across the flats and the threads were single pointed. Slowly.

I made a few extras, but I had never been able to get a decent close up photo of them. I need to set up a better lighting system for the new camera. This photo was made using an eight watt microscope ring light. It is almost the right size to fit on the front of the camera and will work for now. The light distribution is not as good as I would like.

Thanks for making my decision easy.
Gail in NM,USA

IMG_0020.jpg

 
Gail,

I'm sure you're going to like the new camera. I like mine more and more with each use.

You probably know this already but I'll mention it anyway. Get some NiMH (Nickel Metal Hydride) batteries for it. Rechargeable alkalines just don't have sufficient power capacity.

[Aside: Where does one find *quality* NiMH batteries? I have several sets of cheap imports and their performance is spotty. Sometimes they'll last through a lot of photos, sometimes they'll go dead after only a few shots. Surprisingly, the most reliable ones so far have been the ones picked up at Harbor Freight. The display eats the most power so I programmed the programmable button (S button to left of viewfinder) to be a display switch so I can turn off the display easily without powering down the camera.]

I've found that the manual, while written in good English, is rather poorly organized in terms of functionality. (Or, perhaps, my mind doesn't yet grok their organizational pattern.) I'm solving this by creating my own 'meta-manual' organized to my functional pattern with pointers to relevant manual pages and brief reminders of how to perform functions that I know I'll want to use. Hopefully, as I use the camera more, the key items will become embedded in the cortex and I can discard the meta-manual.

I haven't hit on a good way to illuminate extreme closeups yet. I've thought about a microscope ring light but don't have one to try. I notice that, in your shot, the penny has a greenish cast. You might want to experiment with the white balance setting (pg. 139 in the manual) to find one that provides better color rendition with the ring light.
I'm not being critical. I haven't played with that feature yet either.

If you discover any hints or gotchas, I'd love to hear about them. My email addy is in my profile.

 
mklotz said:
I haven't hit on a good way to illuminate extreme closeups yet. I've thought about a microscope ring light but don't have one to try.

A little project that I have in mnd for my mini-mill may have a 2nd use when scaled down.

I want to create a donut shaped piece of Al about 6mm thick with an ID that will fit over my mini-mill quill, and an OD of roughly 150mm. Then I will drill about 5-10 rings of 5mm holes spaced around, ( depending on how rings many I can fit in ) into which I will fit probably about 100 or so white LED's powered by a little transformer.

If you cant see what I'm trying to describe, here's a pic of a product that gave me the idea of making my own.

sku_5253_1_small.jpg


Now imagine that but scaled down to fit over your camera lens and voila!! a simple ring macro light.

The best place I've found so far for the Led's is http://www.dealextreme.com/details.dx/sku.1108 and they also do a power supply ( http://www.dealextreme.com/details.dx/sku.13690 )that with a little calculation as to the series and parallel connecting of the leds and resistors (with the help of the online led calc found here http://led.linear1.org/led.wiz ) to get the required forward voltage.


Tim
 
Marv,
I have not kept up on the NiMH battery technology for the last few years. I used to use a lot of them for flying electric power radio control planes. Then I was mostly concerned with high current discharge and capacity. Of the consumer grade batteries, the Ray-O-Vac NiMH worked the best for me, but I was charging a short time before flying and using a high current delta voltage charge detection with high charge currents. For camera application I think I will try the SANYO eneloop series that are available at Walmart, Target, and similar stores as well as online at Amazon and many other places. They are rated at 2000 mAh capacity, but their main advantage is low self discharge current. The Ray-O-Vac hybrid battery uses the same basic chemistry. There are a lot of other NiMH with higher capacity, but when you get in the 2200 to 2900 mAh capacity the self discharge starts getting bad.

On the green tint. I am quite color blind, so until I decide on my light sources the color balances will be off. When I get the illumination the way I want it, I will get my daughter to come over and help me balance the colors. It all looks fine to me, but I really don't like to offend too many people.

The ring light I used for the test photo was a fluorescent microscope light that I had retired some time ago as it did not provide a very uniform light coverage. I replaced it with a LED ring light that has 144 LEDs and can be controlled with about 15 levels of light and each quadrant can be switched on or off independently. Made a great improvement in ease of use when working under the microscope. A little more on that in the next post.

It will take me a while to get used to this camera and like you I am making notes as to what will work for what I want.
Gail in NM,USA
 
Tim,
One thing to consider when making your ring light is the angle of illumination, sometimes specified as the viewing angle, of the LEDs. The LEDs you linked to do not specify what the angle is. Most common angles are 10 degrees and 40 degrees, although there are others. This angle is specified from the center line of the LED the point where the light level drops off to the half power point (as I recall) and the light output really drops off fast beyond that. If you assume that your LEDs are going to be on a 65mm radius from the center line of the quill and are mounted parallel to the quill axis, the distance from the LEDs to the work will need to be almost 300 mm if you have 10 degree LEDs and about 80 mm with 40 degree LEDs. Anything closer than this and the point directly under the tool will receive very little light, but the area around the tool will be well lit.

I suggest that you drill the holes in your plate at an angle so the LEDs point to a good average tool length distance for your setup. If you have a rotary table that you can tilt, or that you can mount at an angle, then it should be fairly easy. The angle you choose will be dependent on your own work setup. If you use narrow angle LED's the light will be more intense as it will be more concentrated but it will have a narrower range of working distance where it is optimum. The wider angle LEDs will not be as concentrated a light, but will be more forgiving as to tool length. Both will work.

The LED microscope light I discussed tin the previous post has three concentric rows of LEDs. Each row is tilted as a slightly different angle so the light is fairly uniform over a circle about 50 mm in diameter with my normal objectives on the microscope and stays fairly uniform as the working distance is changed with different objectives.

Gail in NM,USA
 

Latest posts

Back
Top