Needle valves/Homebuilt carburetors

Home Model Engine Machinist Forum

Help Support Home Model Engine Machinist Forum:

This site may earn a commission from merchant affiliate links, including eBay, Amazon, and others.

Brian Rupnow

Design Engineer
Project of the Month Winner
Joined
May 23, 2008
Messages
15,000
Reaction score
8,298
Location
Barrie, Ontario, Canada
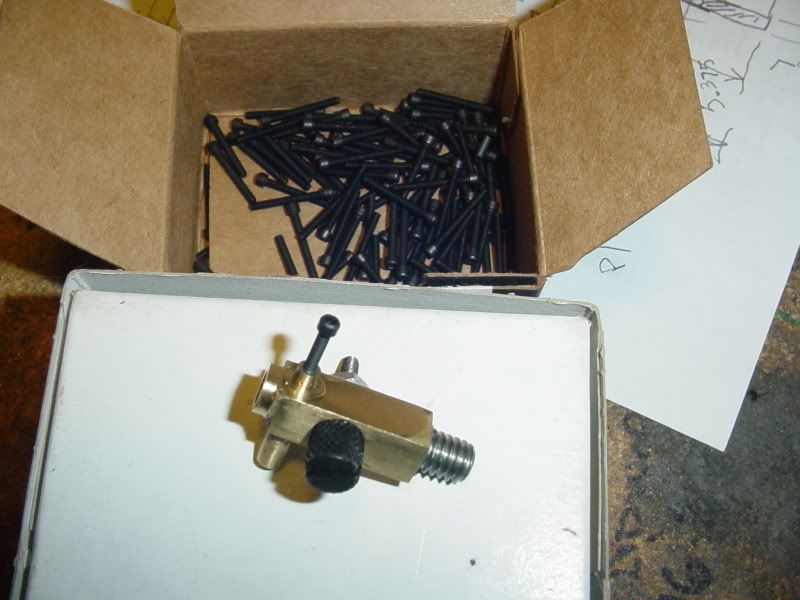
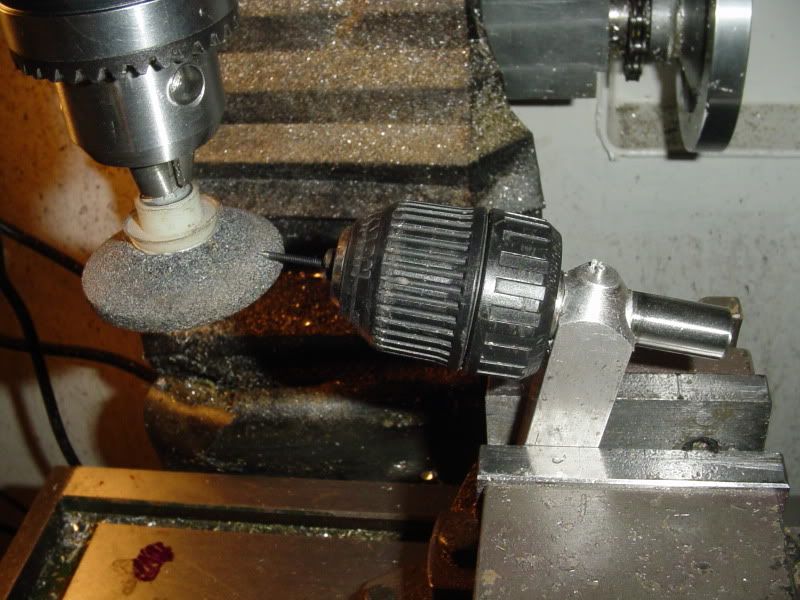
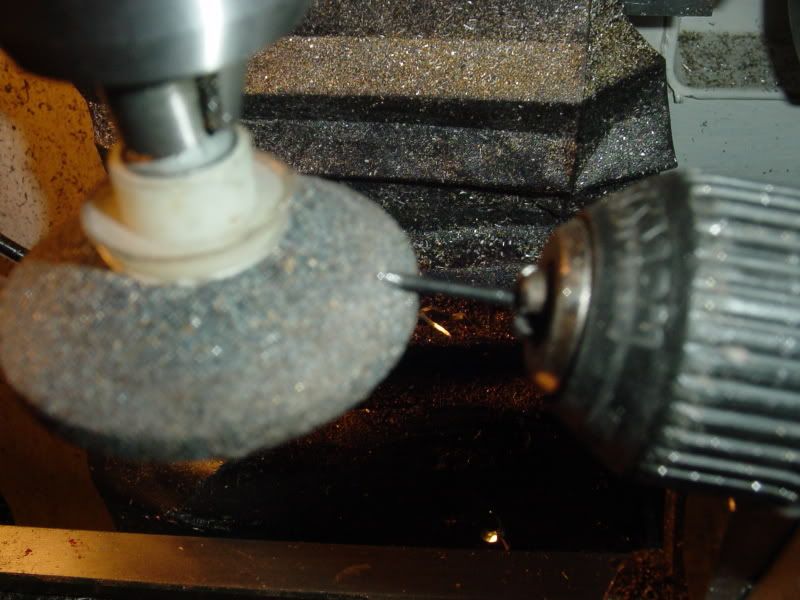
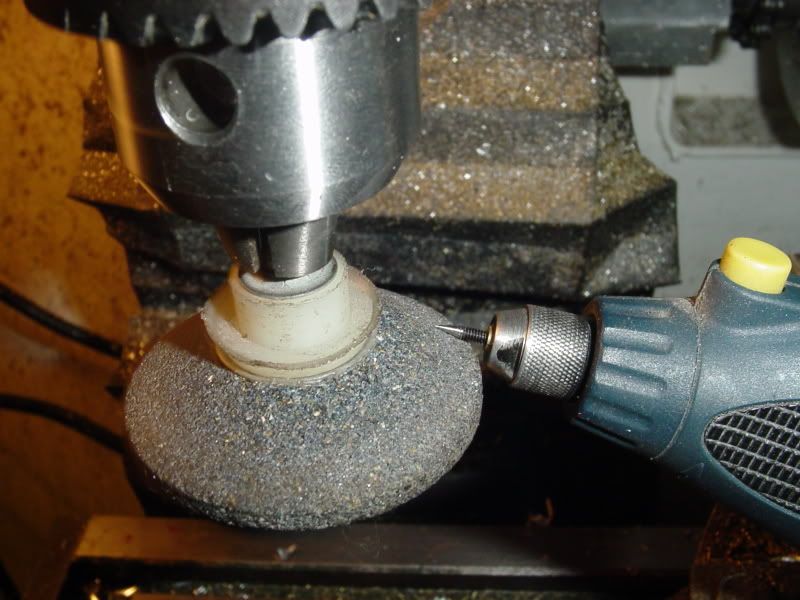
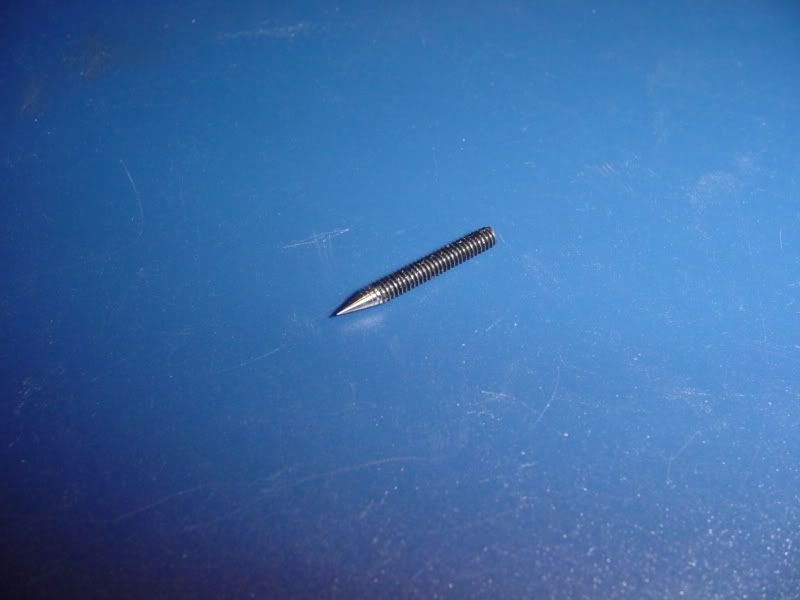
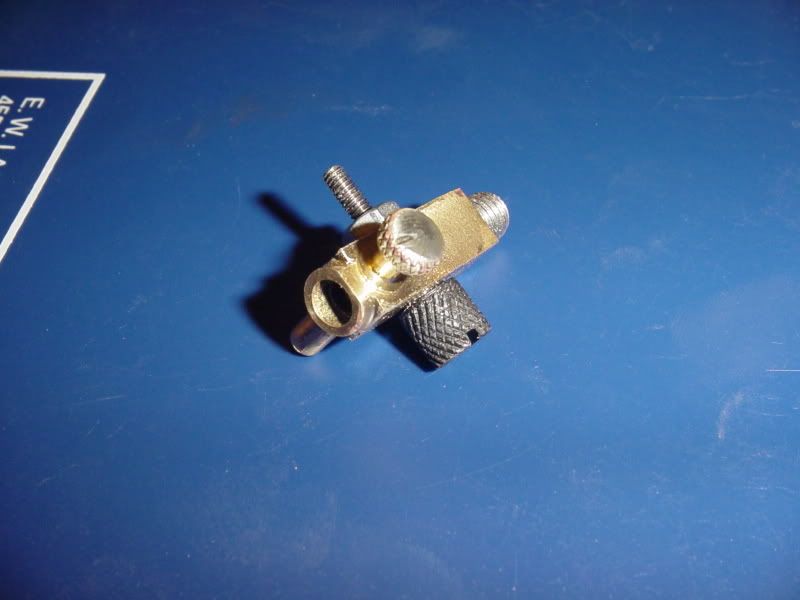
As you all probably know, I have been thrashing away for the last couple of months on an i.c. engine. I thought it would be very clever to "stretch" my machining capabilities and make my own carburetor and sparkplug as well. The sparkplug is a failure. It did work on the bench, and it did fire the engine a few times, but the Corian is so fragile that it fractures if you look at it hard. I won't build my own sparkplug again. I have however, had fair success with the carburetor, except for making the needle valve. My plan to drill through a #2-56 brass screw and insert a sewing needle has fallen by the wayside, due to the fact that #1---my machinery isn't up to this accurate of work, and #2----Neither am I. However---I HAVE A NEW PLAN!!! My new plan involves grinding a needle shaped end on a steel #2-56 screw. Again, my Chinese lathe isn't up to it, but this is the method I have come up with. The dark blue part is the spindle in my mill, with a chuck on the spindle, and a 4" "fine" emery wheel and stub shaft in the chuck. The passion pink part is a smaller chuck and partial arbor that I salvaged out of an old power drill with a #2-56 x 3/4" long steel shcs in the jaws (the head has been cut off). (I really like this second chuck, because the jaws will close enough to hold a 1/32" diameter drill). The green part is a peice of 1" x 1/2" aluminum bar with a hole in it bored to be a "good rotating fit" on the stub arbor.---It is held in the jaws of my millling vice which is not shown. Here's how I see it working---I set the angle I want by tilting the green peice in my vice to whatever angle I want the needle valve to be and lock the vice there. I rotate the stub arbor and chuck with my fingers, slowly, and I raise the quill of the mill to advance the drill chuck and grinding wheel vertically---I have a fine finger control knob to do this with on my mill. This SHOULD give me very fine control, and should allow me to turn a quite accurate and concentric needle end on the screw. I will then make a small brass finger wheel and solder it to the other end of the screw. I'll let you know how it works out. I should have lots of peices to practice on. Nobody in town had this size of screw, so I had to order a box of 100 to get one. Sure hope I have better luck with the carburetor than I did with the sparkplug!!!
ASSYTOGRINDNEEDLEVALVE.jpg
 
Hi Brian. I don't think you need to be overly concerned about making an absolutely perfect centered point on your needle valve. There will be enough 'play' in the threads to allow the point to all but completely seal the orifice. If the point is off center a tiny bit, and creates an opening that resembles a 'partial moon' type shape, it shouldn't matter. Metering the flow of fuel will still be accomplished. I'm not suggesting the use of sloppy workmanship in creating the tapered point, by all means do your very best. Make extra ones to get some practice in at making as close as possible to perfect tapered and concentric points. Good luck to you.

-MB
 
Brian,

Would it be easier to hold the screw which you want to taper in the spinning mill chuck and have a stone mounted to the table at the required angle? You could move the mill back and forth past the stone in X or Y axis and lower as needed for each pass.

Lee
 
That might work too, but I think that both the needle and the stone have to be revolving to get a consistent finish.
 
There was some discussion about needles on an RC site I follow. The one that stuck out is the Fox needle that instead of a conical point used a tapered flat for metering. It's essentially D shaped. This would seem to be the easiest to make but I haven't tried. Here's a borrowed photo.

FOX_Flat_tip_needle_valve_02.jpg
 
Brian,
I haven't found needle valves to be that critical. I blamed them for some of my past running problems, but that usually turned out not to be true. I have gotten very nice needle valves taking a file to threaded rod in the lathe, finishing with fine abrasive paper on the file. I have used all the methods of making them, but my filed ones have worked just as well.

I recommend that you start with making one of Bob Shores small carbs. They are simple and work well on small engines. Just keep the throat dia. small. Larger than .125" is too much. Smaller is even better. I have recently made one of Jerry Howell's two jet carbs. I am very impressed so far, and the throat dia. isn't as critical. I have used it as designed on both camp fuel and propane (with a demand regulator). With minor adjustments it works fine on both fuels. I think it is one of the best designed model carbs available. I have come to prefer propane fuel. It presents a few new issues, but eliminates a lot of others.

Jeff

 
Most rc needle valves are actually made in two parts.The needle itself is just a piece of rod ground to the required taper,and sometimes hardened.It is then pressed into it's retainer,which usually has an internal thread.
However,I see no reason why the thread could not be on the outside,allowing you to screw the needle into a threaded hole.That's how I would go about it,without trying to re-invent the wheel.In fact,a number of the older engines had a thread cut directly on the needle proper.
As for the taper,try to make it as shallow as possible.SuperTigre engines had a fairly sharp taper,which made them quite touchy to adjust.OS is much better in this respect,so copying an OS needle would be preferable.
Me,I'd just go out and buy an OS needle valve :-X
 
My box of 100 shcs arrived today.---Yep, had to buy a box of 100 to get one!!! Actually, I'm rather excited about this. Having never built a carburetor before, (Yes, thats it in the picture with a screw turned in full depth) I am anxious to make the needle valve to see if it works. I had no idea what to do with the other ninety nine #2-56 x 3/4" long shcs, but my friend Colin (The other model engine guy in Barrie) said he would buy half of them. Then I remembered that I borrowed a 1/4" brazed carbide boring tool from him and promptly managed to break it.---He will be GIFTED with half of them.
100screws001.jpg
 
Well, we have proof of theory at least. A very crude set-up, and I didn't cut the head of the screw first, so its not 100% concentric to the chuck, but I think when I have time to do a little more refined set-up work its going to do fine!!! (And yes, I know that grinding wheel is uglier than old sin, but this was just a quicky "try-out".
grindingneedlevalve001.jpg

grindingneedlevalve002.jpg
 
Well, based on this mornings results, I would say this was a complete success!! Tdkkart was correct----It took some RPM at the needle to really get things cooking properly. I clamped my Dremel in the vice, turned it on "mid range" speed and set the mill in reverse at high RPM. I slowly raised the quill so as not to burn the needle. it turned a very nice tapered point. I then took the dremel out of the chuck and dressed the turning needle against the side of a "fine" oilstone.
grindingneedlevalvewithdremel001.jpg

grindingneedlevalvewithdremel002.jpg

grindingneedlevalvewithdremel003.jpg
 
And of course, every self respecting needle valve needs its own knurled brass finger knob with a visible notch so I can see how many turns open it is. The End!!!!
needlevalveincarb001.jpg
 
I feel you'll find that needle to be far too sensitive during adjustment. Especially, if running gasoline or similar. I would try for a more shallow taper even if it means a blunt end.
 
Well, the carburetor works quite well, as evidenced by the running of my Kerzel engine. The throttle is rather useless, as I was warned it would be----It makes no real difference to engine RPM as it is slowly closed, right up untill it is totally closed, and then the engine just dies. The needle valve wants to unscrew itself and change settings while the engine is running due to vibration, but a bit of thread locker helped that. It still can be turned with fingers, but no longer adjusts itself. It seems to be quite sensitive, adjustment wise, but again, as I have no previous experience with buillding carburetors, I have nothing to compare it to.
 
I find I can easily turn socket head cap screws in the lathe using carbide tooling. Same with music wire. So no need for grinding and the associated hassle. Good collets, minimal workpiece extension from the collet, sharp tooling, well centered, and you're off to the races. For a needle valve, there is no need to make a sharp point. The point only has to be slightly smaller than the jet hole.
 
Since the throttle I had built into the carburetor didn't seem to have any positive effect on the way the engine ran, I decided that it was just an impediment to good airflow, so I removed it and made up a pair of brass plugs which I loctited into the sides of the carburetor body. Jury is still out on the net effect of this, but there are only really 3 things to be adjusted which influence the way this engine runs, now that the compression is good. ---Ignition timing, valve timing, and needle valve setting. By removing the throttle, I have eliminated a couple of places where the carb might have been sucking air around the throttle shaft.
throttleremoved001.jpg
 
Brian,to counter-act the needle unscrewing,you could fit a small spring between needle and housing.Alternatively,a spring loaded"arm"with a ridge running on the knurled "handle"might also help.And,as has been said already,your needle's taper could be much sharper.But at least you're well on the way to a smooth running engine.
 
G day Brian,
On the full size farm engines I have found that as suggested a small spring under the head of the needle will do 2 things that help in tuning an engine. The first is that the screw stays where you put it and the second is in the older worn engines the thread is worn and the needle has a tendency to jiggle in the thread making it hard to get it to settle and run nicely so the spring tension holds the needle firm against the thread and the needle is not affected so much by the stop start of the air flow.
Im not sure this will apply with a small model as I haven''t done it myself on a model but it may be something to think about.
Love your posts Brian,

Lance
 
Well acturly---I did the unthinkable, and dabbed a teensy bit of red thread locker on the threads. ---Worked like a charm!!! I was worried that maybe that would totally freeze things and bugger me up, but since the carb is easy to unmount from the engine, I figured a brief encounter with Mrs acetylene torch would fix things. Not to worry though---It firmed things up considerably, but it didn't freeze it solid. It doesn't vibrate loose now!!!
 
I think your needle looks quite blunt. The file idea for a long taper might work better. Like was mentioned by another builder I generally file a fairly long taper. The blunt ones like in your picture make the carb touchy to adjust. Mount the screw, rod, whatever, in your lathe, spin it and stroke it with a file for a needle looking taper then polish it with emery paper. The point doesn't have to be sharp but it does have to be fine enough to enter the spraybar. Good engine so far.
 
There seem to be two distinct schools of thought on the shape of the needle. One school is saying you don't need a iong taper, that a blunt needle will do. The other school is telling me it must be a long taper. Keep in mind gentlemen that this is for a "fixed speed" carburetor which was never intended to be throttled. I had added the throttle just to see what effect it would have, but basically, it had no effect so the throttle ws removed. I have my engine running reasonably well, but there is only one spot where the needle valve setting seems "just right" for this engine, and a tweak of 1/4 turn in either diretion will make the engine shudder and die. Today, because it is a relatively easy thing to do, I will turn a much longer tapered needle and try it, just to see if it does make any difference to the engine behaviour or not.----Brian
 

Latest posts

Back
Top