My First Build! - it's alive!

Home Model Engine Machinist Forum

Help Support Home Model Engine Machinist Forum:

This site may earn a commission from merchant affiliate links, including eBay, Amazon, and others.

wizardofwood

Active Member
Joined
Mar 25, 2010
Messages
25
Reaction score
0
Hi all
First post and first build all in one! I work as a machinist and in my spare time usually make wooden puzzles, hence the username.
I have decided to try my hand at a vacuum engine and having found some metric plans, have made a start. Hopefully posting here will keep the momentum up.
I won't go into a step by step of each piece, as I am sure you have all seen a lot of this before, but show you things that made the machining easier for me.
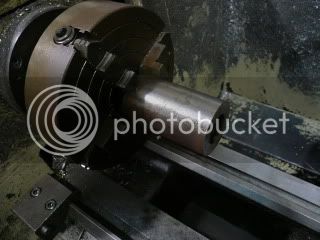
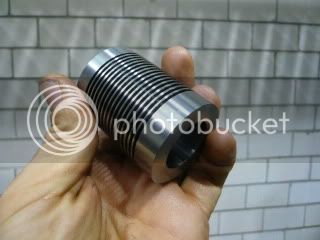
Onto the cylinder, Bore 26mm, OD 44mm, Length 58mm
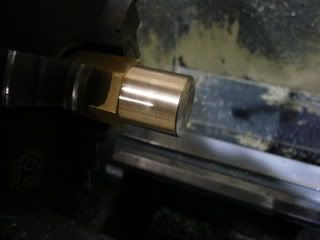
Setup in the 4 Jaw as this is more rigid than my 3 jaw chuck and drill to 25mm
P1020038.jpg

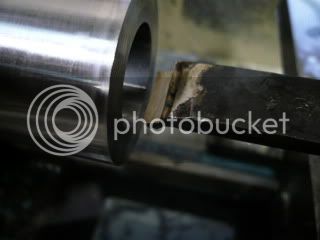
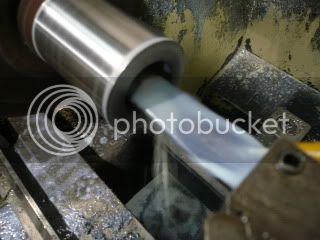
Rough bore and then finish with a HSS brazed bit with plenty of cutting fluid, I use a soluble oil and a finishing cut of 0.05mm.
P1020039.jpg

P1020040.jpg

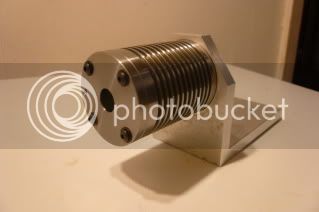
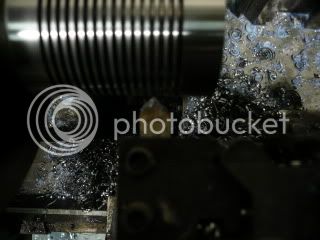
All the fins were cut using a 1.5mm wide parting blade, and the sharp edges taken off with a 90 degree pointed tool.
P1020041.jpg


Part off and the lathe work on the cylinder is finished!
P1020042.jpg

 
Good start,wiz!We just luuuuuv shiny things :big:
Looking forward to the rest of your build.
 
welcome WOW
nice job on the first piece! what is the material of the cylinder? aluminium?
 
Welcome to the forum Wizardofwood wEc1

That is a very neat cylinder you made there!

Regards, Arnold
 
Welcome to the forum!
You must have been lurking a little bit since it's apparent you know we love pics.
 
Nice starts Wizard...keep the pictures coming...and welcome to the forum too!!

Bill
 
Thanks everyone for the welcomes and comments.
Yes I have been lurking a bit, there are some incredible things people are doing.
Ariz, the cylinder is steel, the reflections give it a bit of an ali sheen
 
Welcome Wizardofwood.
Very nice looking cylinder you have there!
 
Onto the piston today.
Made from cast iron, the turning process is fairly basic, but because the wall thickness is only 0.8mm the order of operations is important to ensure a good surface finish on the OD.
First drill out bore to 23mmand rough out bore to a square bottom, rough OD to 27mm, finish OD to 26mm, then finish bore to 24.4mm. Drill and tap M4 through and part off.
To face the piston off I made a brass mandrel which the piston just slides onto. The last 2mm were made a very slight interference fit and the piston pushed on.
P1020046.jpg

P1020045.jpg

Once the piston is faced off it can be taken off the mandrel by screwing an M4 screw through the tapped hole and against the mandrel.
Thanks for looking!
 
It's been more than a week since I was able to find time to work on this, and then I forgot to take my camera to the workshop!
I managed to finish the cylinder, drilling and tapping 4 M3 holes in each end, and then made the end cap.
A scrap piece of heavy duty aluminium angle looked perfect for the baseplate and I made a start on that, cutting the profile and then drilling the cylinder mounting holes.
With these few bits lying there I couldn't resist and had to put them together to get a feel for it all, even though they are unfinished.
P1020071.jpg

P1020072.jpg

 
Well I sent in the archaeological team and they unearthed this from page three.
Flu and work don't mix well with trying to build an engine, no matter how simple it is.
Nothing very exciting to show, just the crank and cam
P1020073.jpg

The crank was built up using mild steel rod and brass, silver soldered together just for practice.
I think I need more practice though, the join is firm but seemed to take a lot of heat to melt the solder.
Hopefully tomorrow I can sneak out and start on the bearing standards.
 
Everything you've made so far looks very good. Nice work!

Dean
 
Wowd,

Very nice build coming together here. :bow:

Best Regards
Bob
 
First up apologies for a very poorly kept build log, trying to find time to build let alone photograph
has been very difficult.
Secondly and more importantly a big thankyou to everyone who contributes to and
helps run this site. It is such a wealth of information and an inspiration. Without HMEM this engine most
likely woudn't have been built, and if it had would have been relegated to acting as a paperweight
after I gave up trying to get it to run. Until I actually saw it, I wasn't aware just how critical the position
of the flame is.
Onto pictures!

Assmbled with the near flywheel removed to show the valve linkage.
P1020111.jpg


and some video, my wife is quite impressed with the "quacking"
[ame]http://www.youtube.com/watch?v=ef6ds3PdlM8[/ame]

No bling on this one, but it sure is nice to see it run.
Thanks for looking.
Byrne


Congratulations Bryne.
Always great to get an engine running.
It looks great. Do you know where the quacking is coming from?
 
Brian Rupnow said:
Very nice duck--I mean engine!!!
:big: :big: Nice engine! My first vacuum engine use to sound like that but what ever I did (dont know) it stopped the quacking and now pops at the end of its stroke. I suspect its the amount of pressure on the sliding valve.

Good job!
 
Well, I think your quacking engine is just great! That is kind of an entertaining sound, and it definitely runs! If you built something that impressed the Missus, you're at the top of the game!

Congrats!

Dean
 
Bogstandard said:
Very nice running engine you have there, congratulations.

It might come over as a little crude, but that sounds just like my wife walking around the house, after a heavy night on the beans.


Bogs

Bogs,

It was nice knowing you. :hDe:

I sure hope that your better half doesn't read your posts. :fan:

SAM
 

Latest posts

Back
Top