Model I.C. Carb with Throttle

Home Model Engine Machinist Forum

Help Support Home Model Engine Machinist Forum:

This site may earn a commission from merchant affiliate links, including eBay, Amazon, and others.
Before I try and run the Webster with my carburetor or Chucks carburetor on it, I thought it would be a good idea to start it up and make sure it ran okay with the Traxxas Pro-15 model airplane carb on it. Its a good thing I tried, because the ignition points on it had gotten damaged somehow. I replaced the points (You can see the box setting in the background beside my Power Box.) The movie kind of says it all------Brian.
 
  • Like
Reactions: gus
Brian,
Good luck with the new carbs. Fingers crossed

Cheers,
Phil
 
So--Here we go with the first run of what I'm going to call the Rupnow/Britnell carb. The engine runs. The throttle works. The needle valve is VERY touchy, and I'm going to have to put a spring around the outer body to bear against the needle adjusting screw because it rapidly screws itself in or out depending on the engine vibration. Right now I can't see that the air bleed screw makes much difference, but I haven't ran it long enough to make that judgement quite yet. I was afraid this morning when I assembled things for the final time that it might leak fuel at the bottom of the carb, because the of the needle valve going in from the bottom, but that doesn't seem to be the case. You will notice in the video that I have a small piece of cardboard setting directly below the carb to show up any fuel drips.--However, it doesn't appear to be dripping any. I have a few more things to do today, and then later today or possibly tomorrow I will put Chuck Fellows carb on and test it.---Brian
 
Brian,
Fantastic work and great videos. Thanks to you and Chuck. I agree, who could want better speed control than what you get from either yours or Chucks designs.

Are you using gasoline or Coleman fuel?

Cheers,
Phil
 
I use Coleman fuel. Gasoline stinks too much for me. By running about a 30:1 mix with 2-cycle engine oil you don't need a cylinder oiler either.
 
Great test, Brian! Needless to say, I'm pretty tickled with the results. While watching your progress on the Britnell carb, I've also been doing further testing with my original design, although I haven't posted anything.
I learned a couple of things.

First, the rotational position of the needle valve assembly is very touchy. The fuel aperture into the air passage should point directly at or slightly in front of (away from the engine) the throttle screw. This makes a considerable difference in the way the carb performs.

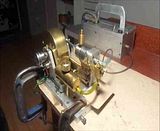
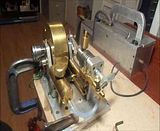
Second, it turns out the problem I was having wasn't the fault of the carburetor, it was the ignition I was using. As you recall, I was testing the carburetor on my vertical single and I hadn't really shaken all the bugs out of the engine itself. So, with a proper working ignition installed, the results I'm getting are much better. I built another carburetor for the vertical single, sticking to my original design, but I made the venturi 5/32" instead of the original 1/8". I also used a 10-32 throttle screw instead of the 8-32. This carburetor works quite well and I'm happy with it.

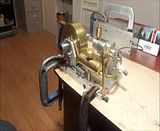
I'm still using my first carburetor with the 1/8" venturi on my plumbing parts engine and it runs flawlessly. It will idle down to a very slow speed and never miss a lick.

So, in summary, I was a bit quick on the trigger to abandon my original design and your test seems to confirm my later results. I think both your carb and mine will satisfy most needs for slow running model engines.
Thanks for all the work you put in on this, particularly in documenting your build and in running the comparative tests!

Chuck
 
Okay--Small things amuse small minds. (Nah, that isn't really true). We've got 6" of new snow here and its still snowing, so I decided to play indoors today. I wanted a throttle handle on Chucks carburetor, so today I built one. Now if you immediately ask "Why not just drill a cross hole through the head of the #8 shcs that acts as a throttle?", there is method in my madness. We don't really know what rotational position the head of the screw will be in at the desired low rpm. I wanted to put a stop pin in for the throttle lever to stop against, so I had to be able to adjust the position of the lever in relationship to the position of the #8 capscrew.
 
If you look close, you can see that I just had room to drill one corner of the carb body for a 1/16" diameter "stop pin" that I Loctited into place.
 
This is a view of the carb from the far side, which shows the "stop pin" for the throttle arm. I just had enough room to mount it in the corner of the carbs rectangular body. The throttle arm is in the "fully open" position in this picture, but when it swings up against the pin and stops, that is the idle position.
 
Hi Chuck and Brian,

OS Carbs cost an arm and a leg. Been looking for simple and effective DIY Carbs. Will build both carbs and put to into my inventory.
Both carbs were very effeccive and responsive.

Hi Brian, Trust the snow melt is not a problem yet.Meanwhile I am enjoying putt-putting your engine. No worry.Gus will fix the exhaust valve/piston collision when switching on H&M. I goofed on some TDC.
 

Latest posts

Back
Top