Michael Pershinsky's Associated Hired Man

Home Model Engine Machinist Forum

Help Support Home Model Engine Machinist Forum:

This site may earn a commission from merchant affiliate links, including eBay, Amazon, and others.
I plan on painting it most likely with Rustoleum. I dont have powder coating equipment. I already tore it all down and started cleaning up the castings.

Chads
 
Thanks for the second video chads...it looks and sounds even better!! Great hit and miss action too from the sound of it.

Regards,
Bill
 
Thanks for the replies. I am very proud of this accomplishment. I owe a lot to this forum and the people that gave me suggestions throughout the build.

So a big THANKS to everyone here !!!

Chads
 
Chad
Real nice build, congrad. My question is do you have the drawings or did you but it already cast? Again nice!!!!!!!!!!! :bow: :bow
Nelson Collar
 
This engine was built from a casting kit. The kit comes with the basic castings however some parts need to be fabricated. The blueprints are included. The casting quality was great.

Here is where I purchased the kit. Mike is great to deal with too.

The contact is:
Michael Pershinsky
P.O.Box 382
East Petersburg, PA. 17320

Email: [email protected]

The kit was $135.00. He also carries an air cooled version.

Chads
 
Great looking engine, you should be very proud of your work. I have recently bought a set of castings from Mike and they are sat on the shelf next to a set of Red Wing castings, all i need to do now is finish my Alyn Foundry RLE engine.
I think i will start the Associated before the Red Wing as it will look great next to my full size Associated or Amanco as we call them on this side of the water.

Paul.

amanco.jpg


Thats a Beauty Paul.

Thanks for sharing the photo.

Chads
 

Progress update: I just need to finish the skids and fuel tank.


IMG_20110225_071837.jpg
 
Chad,
A very nicely built and running engine. Congratulations.
Gail in NM
 
GailInNM said:
Chad,
A very nicely built and running engine. Congratulations.
Gail in NM

Me too :bow:

Best Regards
Bob
 
Great Job. Working on one of those now. In the video it looks like the flywheel is turning counter clockwise. Is it running counterclockwise or clockwise?
 

Its going clockwise. I never noticed that but your right, it looks like its reversed. Good luck on your build !!!
If you have any questions I would be glad to help...
 
Did you make the cam per plans? We are having trouble getting the valve timed.
 
Yes, my cam was made exactly as to the prints.

BTW I use a Buzz Coil to run mine & a micro switch to fire the coil. Seems to work well.


Chads
 
Hi Chads
Congrats mate on a lovely engine and great runner !! :bow:
Pete
 
I did not build the tank per the Breisch drawings. I did find that the tank position is very sensitive. I would imagine a check valve would help too...
Good luck with your build :)
Don
(Chads)
 
I do not have a constant level tank on my Breisch Hired Man. I built a flat rectangular brass box, instead. It works fine, though maybe a little mixture tweak is required here and there as the level drops.
 
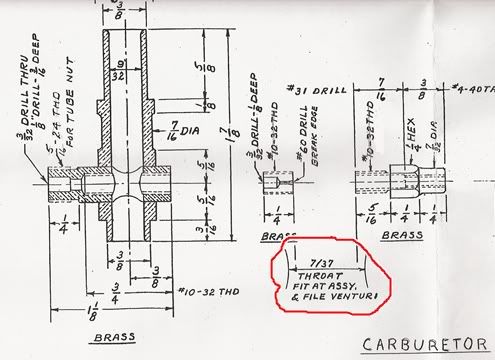
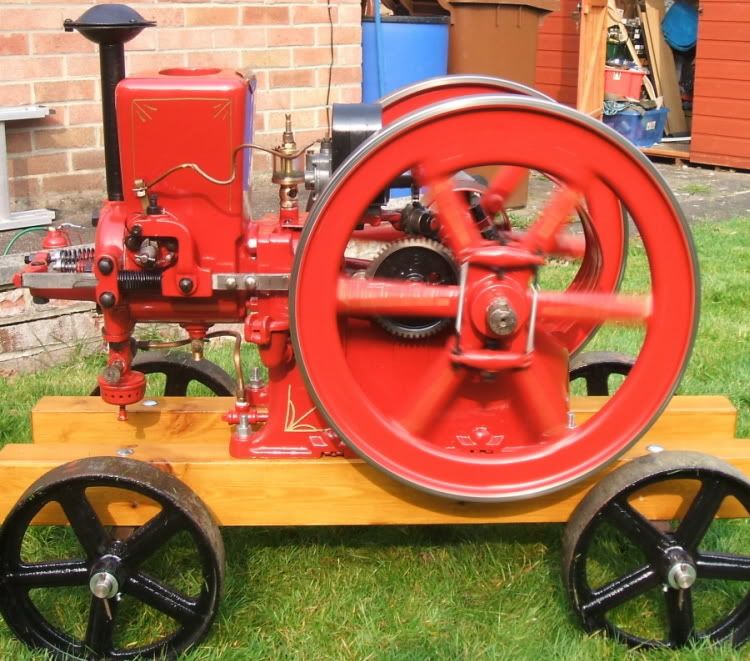
I used a standard fuel tank with a check valve in the pickup tube on my hired man and it runs just fine. I used a 3/32 hardened ball to indent the seat and then replaced the ball with a SS 3/32 ball for running. The top of the fuel tank is about an inch below the needle valve in the carb. Also don't forget the vent hole in the tank. I put mine in the cap. Oh, by the way, nice engine. Dave
 
I have just started on this engine, not touched the castings yet but started on the carburetor in my lunch time at work. Can anyone explain these notes on the drawing and what they are trying to tell me "THROAT FIT AT ASSY, & FILE VENTURI" along with the strange dimension 7/37.
I cant see any venturi, am i right in thinking that the jet and needle nut just screw in until they bottom out and this forms a venturi, what needs to filed?

Thanks Paul.

SCAN0020.jpg
 
Basically don't machine it as a separate part with the cross hole. Instead slip the part into the main body to locate the cross hole postition, take apart drill 7/32" cross hole and blend with a file until the edges of the 7/32" hole widen out to the main hole dia of 9/32"

That way the hole will be in line with the main passageway and you will get a smooth flow of air, if it were a bit off you would get a more turbulent flow.
 

Latest posts

Back
Top