Hit me - Miss me?

Home Model Engine Machinist Forum

Help Support Home Model Engine Machinist Forum:

This site may earn a commission from merchant affiliate links, including eBay, Amazon, and others.
Dave & Pete,

Thanks guys :bow: :bow:

After my problems with Firefox 4 and photobucket I finally uploaded a couple of piccys. :eek: :eek:

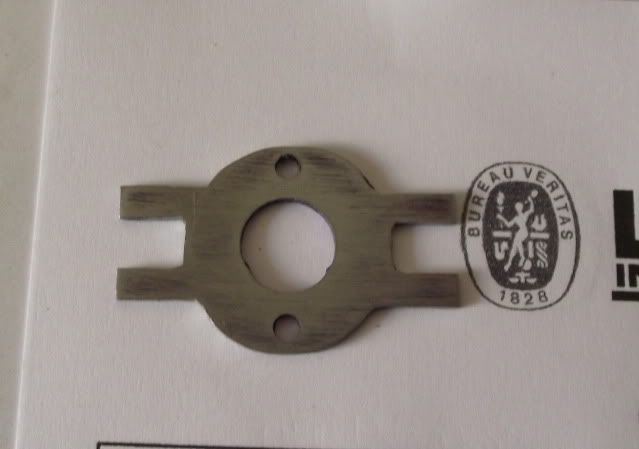
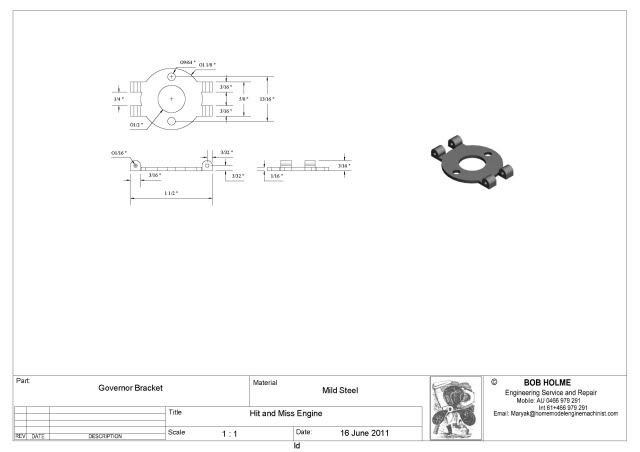
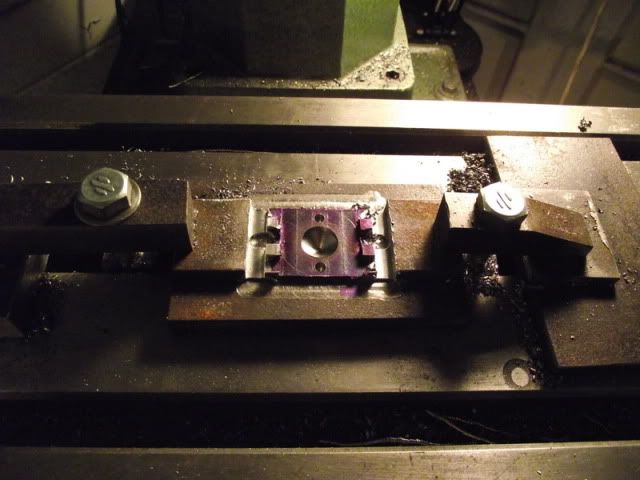
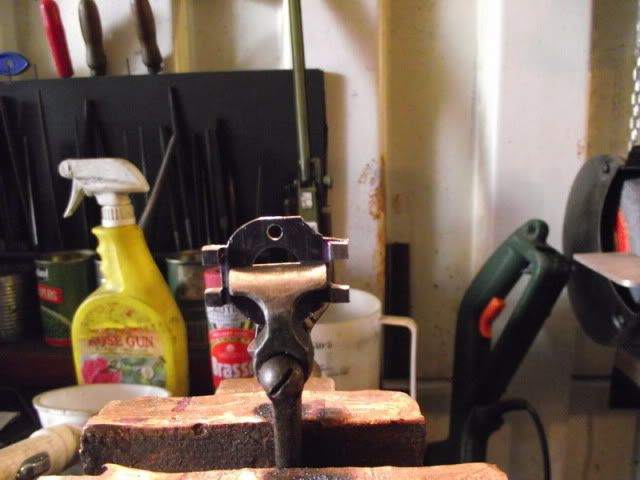
The governor bracket.

DSCF1067.jpg


DSCF1068.jpg


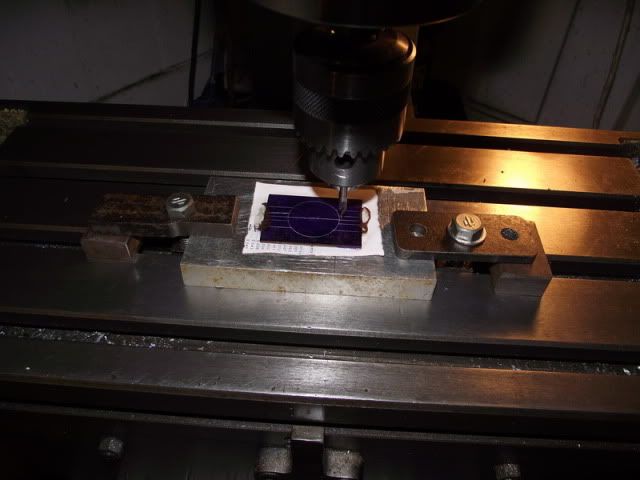
A couple of hacks and a bit of filing should see me ready to fold the arms to make the hinges for the weights and arms.

Best Regards
Bob
 
Just read this post from start to finish. Amazing build :bow:.Amazing man :bow: :bow: I am looking forward to seeing this go. Following with interest.
Brock
 
HI Bob
getting there now mate
what glue did u use on the thin plate mate?
Pete
 
Hi Bob
Is it customary to have a bbq christening when firing up a new engine ? I'll keep next weekend free ::)
 
Brock, Dave, Pete and Herbie

Thanks for the support guys :bow: :bow: :bow: :bow:

Pete, the glue is Aquadhere, (PVA wood glue).

One step forward..........two steps back. As I was quietly minding my own business and gently hack sawing away the waste on the governor arm bracket, some nameless waif burst into my reverie with one of those, "Got a minute mate," questions.

I should have known better and stopped the mind numbing sawing before answering. Now I know I'm male, because I proved beyond all doubt that I cannot do two things at once. ::) ::)

Cut into the bit I needed :mad: :mad: :mad:

Gentlemen we are now in the process of milling governor arm bracket NUMBER TWO

Best Regards
Bob
 
Blame it on the Waif!... ;D

Sorry to hear buddy...I know you can sort that though..

Dave
 
Maryak said:
One step forward..........two steps back. As I was quietly minding my own business and gently hack sawing away the waste on the governor arm bracket, some nameless waif burst into my reverie with one of those, "Got a minute mate," questions.

I take it that said waif is now singing with a very high pitched voice?

Rgds - Gavin
 
Dam shame, I consider it a win if I only have to do it twice, once for me is a stop and tell someone moment. You could hang it up as a reminder for next time a waif appears. Keep up the good work Bob.

Brock
 
Sorry to hear about the mishap Bob - we all know they happen!

:big: Helping some poor waif sometimes does compensate a bit though; it leaves a "I-helped-someone-now-I-feel-good" personal feeling; that is unless you fixed the neighbour's trumpet ::)

Kind regards, Arnold
 
Dave, Gavin, Brock and Arnold,

Thanks guys. :bow: :bow: :bow: :bow:

Carrier No2.

DSCF1069.jpg


I now have a week to figure out the best way to roll the 4 arms evenly so they can take 1/16" hinge pins. ::)

Best Regards
Bob
 
Hmmm can't picture that one Bob...but can't wait for pictures!

Nice Recovery!

Dave
 
Maryak said:
I now have a week to figure out the best way to roll the 4 arms evenly so they can take 1/16" hinge pins. ::)

Best Regards
Bob

Bob, good luck with the next step, it looks very fiddly. Luckily you have the Mk1 version of the plate to practice on (or did that end up embedded in the waif?)
 
I have had some success with wire edge forming for car panel resto work but not on a section that short. Getting the roll to start in the right spot was always the hardest bit. I ended up with a bead roller to get the majority of it done before inserting the wire and finish rolling it over with a hammer and ground up dolly. After the first few goes I started leaving extra on the length then cutting it to the correct length once it got up to 90 degrees. I am keen to see how you accomplish this.

Brock
 
Dave Gavin and Brock,

Thanks for the input guys. :bow: :bow: :bow:

Well it's shed day tomorrow so my thinking time is over. :eek:

I had a block clamped across, I had a block clamped along, I marked for 3 bends, (up, over and down). None of it seemed to give me any assurance that it would be successful so guess what ???

I am now about to make bracket 3 with a modified design viz:-

HMGovenor.jpg


This will be from solid and should give me a better chance of accuracy and balance for the governor weights.

Best Regards
Bob
 
Hi Guys,

Armed with my CAD drawing for the redesigned governor bracket, I sallied forth whilst it was still dark, hoping to hit the shop at first light.

Arriving as planned I was greeted with a fresh cup of tea............."Aha, what's up," I thought. You guessed it, I was needed to do some real work. There were four on hire surveys and two hydros.

By the time that lot was under the belt, it was time for the instructional phone call from SWMDBO listing the day's tasks to be performed before returning to the nest.

I did manage to find some 1/4" plate, clamp it to the mill table and mill most of the outline. Suddenly it was "Chore Time."

Photos...............who had time for photos?

Best Regards
Bob
 
Better approuch in my book buddy. Much more likely to get the holes aligned that way

Give it hell! ;D


Dave

 
Hey Bob, next week leave an hour earlier ;D
 
Dave and Herbie,

Thanks for stopping by.

The governor bracket is made ::) ::) ::)

The milling is complete

DSCF1070.jpg


Sometimes it pays to have more than one vice.

DSCF1071.jpg


Finally a bracket has landed.

DSCF1072.jpg


Best Regards
Bob
 
Way to go Bob! Machine that sucker into submission! ;D....I know Dean, that's your line, but if I use it in a sentence three times It's mine! ;D

Dave
 

Latest posts

Back
Top