fire eater won't run

Home Model Engine Machinist Forum

Help Support Home Model Engine Machinist Forum:

This site may earn a commission from merchant affiliate links, including eBay, Amazon, and others.

LyleM

Member
Joined
Jan 11, 2009
Messages
14
Reaction score
0
I just completed philip duclos's fire eater, and haven't had any luck getting it to run. at first i thought the cam was off so i adjusted that and thought i found the spot, i can see it sucking fire in but that's it. it doesn't even attempt to start. I did notice that there's so much compression that the valve sticks sometimes when it needs to open, could that cause it? any tips or tricks are greatly appreciated.

Thanks
 
First off no oil I found my engine wouldn't run very good until I got rid of all remnants of oil in the cylinder I put dry graphite powder in and another thing I had to do with mine the first few times I ran it was to preheat the cylinder. Now that it has been run a quite a few times it starts right up.

Good luck.
[ame]http://www.youtube.com/watch?v=wQjcpS8pmAw[/ame]
 
I built one a few years back. Mine started right up and has always ran fine with no adjustments. I'll try to talk you through where I have mine set.

Looking at the engine from the flywheel side (the cam is on the back side) my door into the cylinder is just closed when the arm with the counter weight is 45 Degrees to the right of straight up (the piston hasn't gotten to bottom dead center yet). This means that the nut in the slot in the cam is just about in the center of the slot.
The door to the cylinder just starts to open when the arm is 45 degrees to the left of straight down.

You shouldn't have any compression. When you turn the fly wheel by hand any time there would be any compression the little door should be pushed off it's seat and just let the air escape. As in the previous post no oil in the cylinder, just graphite.

Here is a video of mine, it only runs in the video for a few seconds because I had the flame too close and it blew the fire out and my longer videos are too big to upload.

If you still have trouble you can call me at 724 727 5828 tomorrow if you still have trouble

Jim


View attachment Flame Licker 1.MOV
 
Thanks for the replys, Engine Maker, i followed your advice and still to no avail. I think what it comes down to is that i didn't make the cam correctly. I wasn't real sure on how to go about it so i just did what i thought was right. What i dont know is like what diameter stock to start with, and whats the overall length it is when complete. Whats the best way to lay out the radius'. I know this is alot to ask but any help is greatly appreciated.
 
Looking at my drawings the diameter on the cam is a 15/32" Radius so that would be a 15/16" diameter when done. Overall thickness is .250".

Begin work on the Cam by turning the stock piece to the proper diameter. Drill and ream the shaft hole about 3/8" deep. Mount a cutoff tool in the lathe as if to part the disk at its proper thickness (.250"). However, merely run the cutter into the work about 1/4" deep, leaving the disk still attached to the stock. Now transfer the work to the mill and rotary table.
First, center the rotary true to the mill spindle. Then set the mill longitudinal table calibrated collar to zero for a table movement later on, to the right. Now lock the table. Set the calibrated collar on the cross slide to zero, for a table movement away from you ... of course, note the location of the cross slide, thus enabling you to bring it back to this exact position at will. Proceed to mount the work stock piece vertically in a small vise. Now move the cross slide from its zero setting exactly 9/16” away from you and lock it. Place the vise on the rotary table and, using a dial indicator in the spindle, shift the vise by hand until the work is centered true to the mill spindle. Then clamp the vise securely to the rotary.
For better visibility, it's best to position the end mill in front of the work, so move the cross slide farther away from you, and install either a 1/2" or 3/8" end mill. Lower it enough to mill the 1/4" wide rim of the cam. With the cutter in motion, advance the cross slide towards you until the cutter makes contact with the work. Then gradually feed inwards, using the rotary crank to mill an arc on the cam. When the high point of the arc reaches about 1/16" from the rim of the cam center hole, begin measuring across the middle of the arc to the opposite rim of the cam. Stop milling when this reading reaches .625". . The next step is to mill the cam adjusting bolt slot in the face of the cam; that means the work will have to be relocated true to the center of the rotary table. Return the mill cross slide back to its original zero setting and lock it. That should center the mill spindle with the center of the rotary. Install an indicator in the spindle. Loosen the clamps holding the vise and shift the vise by hand until the hole in the cam runs true to the spindle. Clamp down the vise, and install a 1/4" end mill. Unlock the longitudinal table travel, and move the table to the right .281" from its zero setting, then lock the table. With the aid of the rotary crank, gradually mill out the curved slot to the proper depth. Then install a 1/8"end mill, and gradually cut a narrow slot all the way through the cam. Return to the lathe, and part the cam from it’s stock piece. The sharp tips on the cam lobes are rounded by hand or with a disk sander.

If this doesn't work you can E mail at [email protected] for pics.

Jim
 
Thanks for the reply, I will probally trying to make a new one. Thanks for all the help.
 
I remade the cam, and it came out as perfect as i can get it. I re adjusted everything, and i still can't get it to run, not even a attempt. I just don't' get it. i've rechecked everything dozens of times. I've attached a few pictures and a video, maybe you can see something im not. Thanks again.

[youtube=425,350]<object width="425" height="344"><param name="movie" value="http://www.youtube.com/v/XB9DmcPhWL0&hl=en&fs=1&rel=0"></param><param name="allowFullScreen" value="true"></param><param name="allowscriptaccess" value="always"></param><embed src="http://www.youtube.com/v/XB9DmcPhWL0&hl=en&fs=1&rel=0" type="application/x-shockwave-flash" allowscriptaccess="always" allowfullscreen="true" width="425" height="344"></embed></object>[/youtube]

100_0945-w640-h480.jpg


100_0947-w640-h480.jpg
 
Mine is contrary at times too but, once started, runs like a banshee.

Some things to try...

Preheat the cylinder and most especially the valve so the hot gasses aren't "quenched" before they can be drawn into the cylinder.

Stop waving the alcohol lamp around.
Clamp it so it sits in a fixed position relative to the inlet port.
It should be far enough back from the port such that the hotter gases from the upper region of the flame are drawn in.

Clean out the cylinder and reassemble with some relatively heavy oil - motor oil is good.
Heavier oil will provide a better piston to cylinder seal and may get you started.

Instead of alcohol, try Coleman fuel or the liquid Sterno stuff used in serving table heaters.

Good luck. I hope you get it working. It's a fun engine.
 
Thanks for the reply, i was waving the burner around because where i had it mounted turned out to be to close. Ill give those tips a go. Thanks.
 
First, It looks like you have way too much drag. These engines don't make a lot of power. If I spin mine that hard it will spin 10+ revolutions before stopping. Looks like yours spins about 2. Try checking for drag at the crank, the slider rod, and at the slider door. Then check to see that your return spring is not too strong. It needs to be just strong enough to return the roller to the cam - no more. If you look closely at my previous video you'll notice after the fire goes out that the engine spins about 5 - 8 revolutions before it stops.

I'll try to post a video of mine spinning without the fire to give you an idea of how mine spins so check back in a couple of minutes.

As for the cam in your 3rd picture, compared to mine with the cam where it is, my connecting rod is about 1/8" farther clockwise.

Jim
 
Thanks for the vids, i think my problem with drag is the valve so i loosend it to where it spun pretty good, but no change. Im at a lost. If i loosen it anymore its way too loose, and if i tighen more its just back to being draggy. I guess ill just keeping messing with it untill something happens. Thanks alot for the help.
 
Have you tried rubbing graphite on the underside of the valve and the mating part of the cylinder?

Jim
 
Keep at it LyleM. You'll get it going and will be one happy person. Very happy.
Frustrating I know...but lot's of help here.
Good luck.
 
Yeah actually i did rub some of that on there, forgot to mention. did seem to help a bit. i will keep at it. may take a breather from it and come back to it fresh. thanks for all the help. you guys are awesome.
 
i went through the hole engine and got rid of any drag, the only real drag is the compression and vacum. You can watch it pull the flame in, and you can hear the valve let the compression out so it all seems in good worknig order. I've tried different springs, and adjusting the valve tension and nothing works. am at a loss.
 
Did you make the flywheel of the material recommended in the plans?

If not, you may have too little or too much inertia. If so, perhaps you want to try flywheels with varying inertia.
 

I don't quite understand where your getting the compression and vacuum? You say that the only drag is the compression and vacuum. First, with no fire, there should be no vacuum! Anytime the piston is going toward the bottom of the stroke, ( away from the fire inlet ), the sliding door should be fully open. The door should close at the bottom. Then as the piston moves up in the cylinder, (towards the inlet ), any compression should unseat the sliding door ( which should be just barley seating against the cylinder ), and let the pressure escape with little almost nil back pressure, so no compression. Can you explain further?

Jim
 
If it is any consolation, I have two Stirling type engines and one fire eater sitting at the back of my bench that have never run or never run the way they should. Every once in a while I will pull one back to the front of the bench and spend some more time on it. Eventually, they will all run (if I live long enough).
 
1 Friction has to be very very low. It should go around quite a few times with a hard flip. But you should not need a hard flip to get it going.

2. No oil at all in the cylinder. Zero. Not even spray off the connecting rod. Even the condensation of water on the valve while it warms up will cause it to not run at all. You have to preheat the intake until no water droplets are left. You can cheat and wipe it with a paper towel and then put the heat back on to speed up the process.

3 Use a q-tip to put lots of graphite inside the cylinder. And wipe it on the piston too. Use a tiny bit of Tri-flow on a small paint brush to lube everything else. Any oil on the graphite in the cylinder = take it apart and try again.

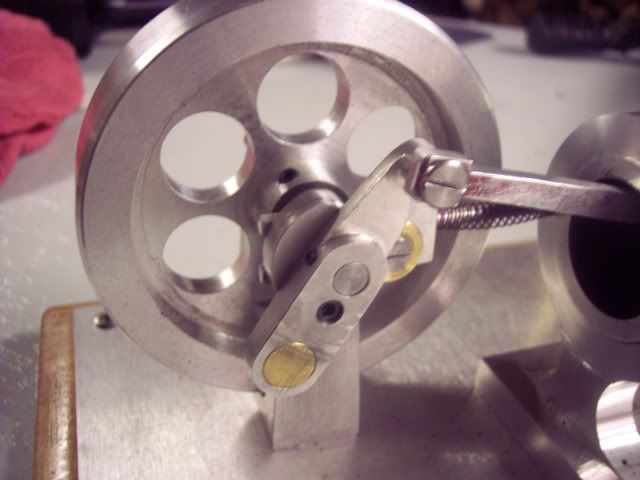
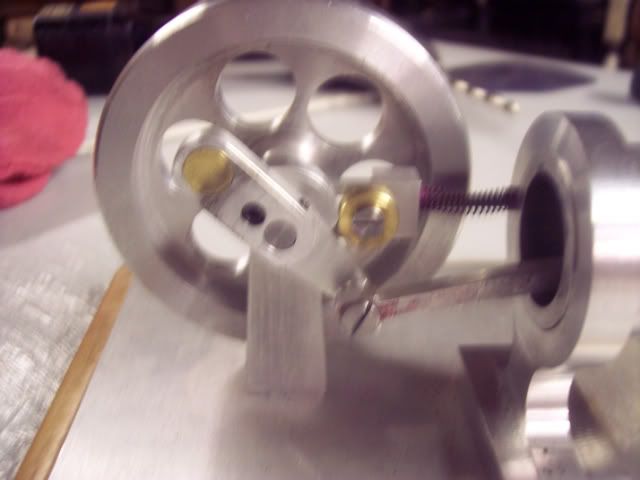
4. The cam is made with a 43 degree offset. The valve closes the port completely on ours at about 50 degrees before bottom dead center. It starts to open the port at about 35 degrees before top dead center. (So I guess you'd say we have "Advanced our timing" beyond the 43 degree design spec..) You can adjust that with the rod that holds the valve. This is a very important adjustment, and tweaking it, makes a big difference in performance, or can even make it not run at all! Our valve does not go past full open in the port at all, in fact, I don't think it quite gets to full open at all, and falls about .005" shy of that right now, so it is only fully open at bottom dead center for an instant. Ours tachs at 25-2700 rpm every time we check it, unless it gets dry on lube and graphite. I think further tweaking of the valve timing might get even more out of it. Which is not bragging, just stating how important that timing adjustment really is. In fact, we probably won't tweak ours further until someone else comes close to the 2700 RPM mark, then we'll get out the timing wheels, and grandpa's secret rocket fuel... :big:


5 We had a few cocktails at a friends house and decided to use butane, acetone, and a few other things, in lieu of a lack of denatured alcohol. It made a gummy black mess of it, and we wont be doing that again. ::) Use alcohol, or it gums it up very fast, and it will lose 40% of it's speed in no time.

Ours is recently posted in the video section if you want to watch it run. Ah, forget that... here...

[ame]http://www.youtube.com/watch?v=Dj_yD-Kvgrw[/ame]

My timing numbers are eyeball estimates here, not exact. But I will post pix at the opening and closing points if need be, for you.

T
 
Back
Top