Elmer's Grasshopper #37 Engine

Home Model Engine Machinist Forum

Help Support Home Model Engine Machinist Forum:

This site may earn a commission from merchant affiliate links, including eBay, Amazon, and others.

Inky Engines

Project of the Month Winner!!!
Project of the Month Winner
Joined
Apr 26, 2012
Messages
93
Reaction score
46
As promised, I've put together a video of the latest Elmer Verburg engine from the Inky Engines stable. It joins the wobblers and beam engine, videos of which were attached to my recent Newbie posting.

Please excuse my attempt to show pressure on the gauges ..... an expensive computer, excellent eyesight and quick reactions on the pause are probably necessary to read the dials on the video .... for anybody interested at slow tickover the engine is running on 1.5 psi at 166 rpm whilst on 7.5 psi it runs at 722 rpm ... full scale deflection on the left hand gauge is 15 psi and that on the right 60 psi ... I bought the 15 psi gauge upon realising that with the Elmer's engines I was building the needle barely moved on the 60 psi gauge. The grasshopper will of course run faster, but this is not imho appropriate for a beam engine!
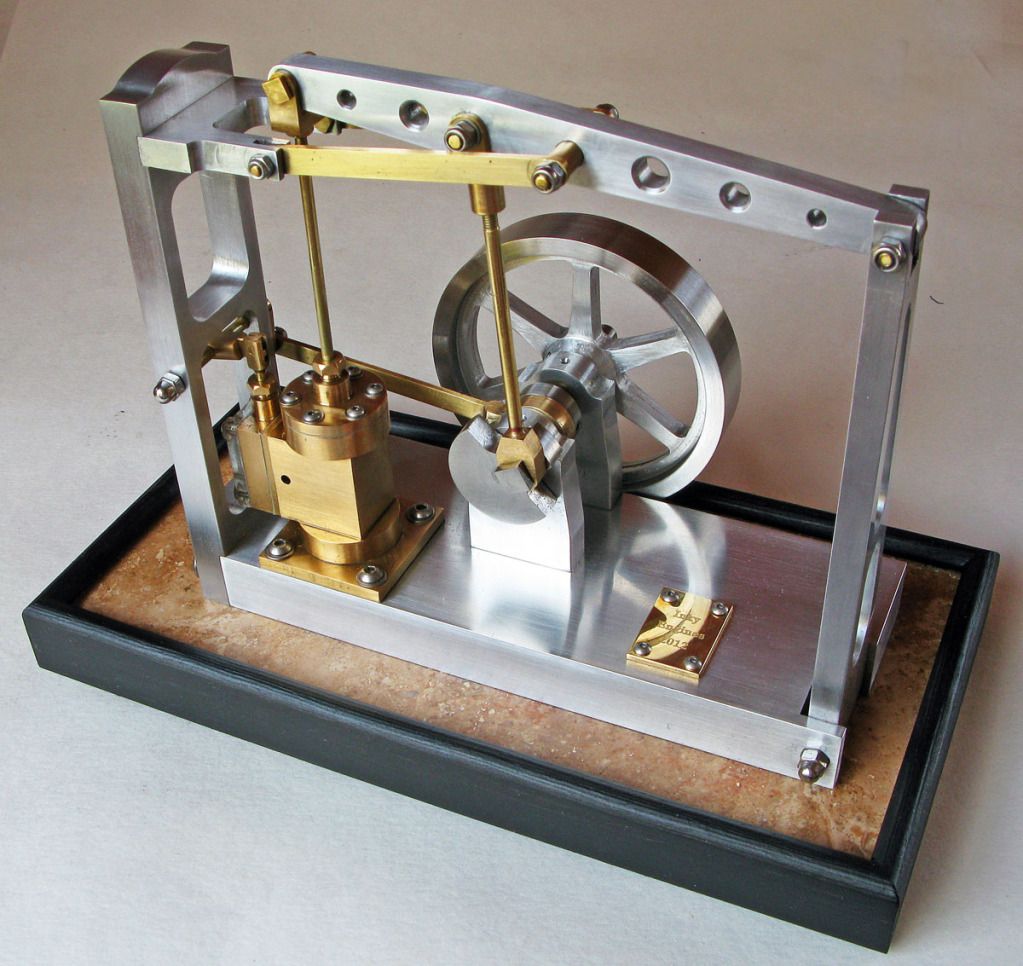

ElmersGrasshopperEngine.jpg


[ame]http://www.youtube.com/watch?v=htVeQUjhWqU[/ame]


Now the grasshopper is consigned to the mantlepiece I will concentrate on completing Elmer's #33 Mill and #41 Factory Engines. I'm building these as a pair and may let them run together as a quasi twin cylinder slide valve set up ... not exactly realistic, but fun!

Kind regards

Geoff at Inky Engines
 
Well done, indeed. A beautiful model.

I must agree with you. Beam engines are not meant to be run fast. Stately and elegant, not frenetic, is the way to go.
 
Beautifully done Geoff!! It obviously runs well and the finish is superb!! Well done...already looking forward to your next ones :bow:

Bill
 
Another great engine Geoff!!!!

Runes beautifully, especially at the slowest speed!!
Those engines look grand when they are able to just tick over!

Fit, finish and presentation are amazing!!

Congratulations!!

Andrew
 
First class. Should look real nice up there on the mantle.
 
Geoff,

Very well done. The video presentation is one of the best I've seen with the transitions from the plans, to the raw stock, machined parts, assembly and running of the engine. Very nicely done.

Bob
 
Beautiful execution. Great runner. The Grasshopper was my 2d engine and one of my favorite builds.
Very nice base.
Best
Stan
 
A very nice build of the Grasshopper indeed :bow:

I like your use of the nylock nuts on the pivot pins Thm:

Kind regards, Arnold
 
Gentlemen .....

Thank you for your encouraging comment ... it is very much appreciated. Noted in particular that both Stan and Arnold have built the same engine.

I’m pleased, but not surprised to hear that you take most pleasure from seeing beam engines such as this run slowly. Notwithstanding, it is perhaps necessary to run the models at both slow and high speeds to assure oneself of the quality of build ... I’ve had engines running well at slow speed, but presenting problems at high, and vica versa.

Arnold ....

... the Nylock nuts on pivot pins! I agonized over these for some time ... they are not exactly authentic. Elmer Verburg does however use a lot of these small pins secured by even smaller pins which are not only a pain to make, but moreover can be fiddly when dismantling and reassembling the engine .... hence my change of approach to M2 and M2.5 threaded pins and Nylock nuts ... I remanufactured such pins for Elmer’s Beam Engine #24 which is about half the size of the Grasshopper, and they look fine.

As an aside, I note that on your Tall Vertical Open Column build you dismiss use of cheese-head screws on the finished engine .... I think most would agree, no slotted screws (although Darren uses them on his very nice virtual engine!). Leads then to the question as to what fixing finds general favor? I have tended to use button head socket screws, more from habit than any logic. I’ve considered cap head socket screws, and noted that size for size they use a larger socket key than the button head screws ... less likelihood of damage to the socket and key perhaps, but maybe more of a tendency to strip aluminum threads? Studs and hexagon nuts seen to be the other option ... on some models they look superb, on others less so ... maybe I’ll try these next, but for now its another Elmer 3” spoked flywheel for the Factory Engine.

Kind regards

Geoff at Inky Engines
 
Hi Geoff

I think the question of which fasteners to use is very much a personal preference kind of thing, what one have available and how authentic-looking you want your model to be. I'm in a sort of remote location, and these very small fasteners are extremely rare locally, so I tend to make up my own. For the Tall Vertical, it's more of the same. I do like studs and nuts - it looks more authentic on most steam engines. In fact, I think the Grasshopper would look stunning with square nuts and studs for all the fasteners - many beam engines used square nuts way back.

I'm not totally against using slotted screws; on my Kimble engine, I used exclusively slotted screws. I only had slotted head countersunk screws available for the engine cover plates, and as these were so prominent, I changed all other fasteners over to slotted head screws as well - just for the sake of consistency - but once again, that's a personal kind of preference. The only non-slotted screws on that engine is the grub screws.

While I share your dislike in the pins with cross-holes and soft wire assembly method that Elmer use, I think he might have done this on purpose. His engines were designed for beginners to build, and fiddling around with small threads and nuts can be daunting and time-consuming for newcomers to the hobby. I distinctly recall complaining on my first successful engine build that the single M3 screw used on the engine was a pain... Now, 3 years later and after using M2 quite a bit, that M3 screw seems huge, M2 is "normal" and I'm looking for smaller taps and dies...

Kind regards, Arnold
 
Hi Geoff, that is one neat and nicely engineered engine, and I must agree with Arnold on the use of nylock nuts, those pivot pins on my beam engine were a pia to make and even more of a pain when stripping and reassembling. I do like your video, very very professional.

Regards Les :bow: :bow:
 
Hi Geoff.
Hope you don't mind yet another model here. ( look familiar?) :)
I'm glad you like my others.
Keep up the good work.

01.jpg


02.jpg
 
Darren

I don't mind at all your virtual grasshopper model appearing in the thread - I'm delighted you took the time to do so. I note that you even included Nylock nuts on the pivot pins!

Kind regards

Geoff at Inky Engines
 
Geoff:

Beautiful Elmer Grasshopper. Mine's almost finished. I really need to know how you get that beautiful satin finish on it!? I'd like to do the same on mine. Thanks. Comber Bob
 
Bob

I was surprised when asked before about the 'satin' finish on the aluminium parts. I'ts nothing more than a quick rub down with 1200 grade wet and dry, after removing any serious blemishes with 280 and 400 grade. I prefer running the engines to polishing them! The finish does go a little milky over time as the metal oxidises - I've been thinking about having a go at anodising.

I hope you will post pictures of your Grasshopper when its finished.

Kind regards

Geoff at Inky Engines
 
Geoff:
Somehow I must have missed your first reply. Sometimes I have troubles navigating this site. My fault no doubt. Thanks Geof. Well, while my stuff is never as pretty as yours, I will publish pics when ready. Should be soon. I wanted to share something I did. The plans call for a separate valve plate under the steam chest, just like the Elmer 29. This time I added the thickness of that plate to the steam chest and machined it as one piece. It really simplifies assembly and eliminates yet another place for leaks. Not hard at all, but then you'd know that. Swifty , Bob
 
IMG_0491.jpg

IMG_0494.jpg

IMG_0499.jpg

Geoff:

You asked for pics of the Grasshopper once finished. Here you go. LMK if you got ok. Nothing like yours but I'm happy. I used tiny brass knurled nuts for most of the screws. I tried to get your beautiful satin finish but didn't bother to go out for the really fine grit. Will do later when the wife's projects are all finished. It will be a while. Complete remodeling of the master bath. LOL. She runs great both fast and slow and will go on low pressure of about 10 PSI. I've included a few pics of the one piece steam chest. What do you think? Wish I could make a spoked wheel. Bit too much for me. Don't have a good rotary table. Take care. Swift752 Bob
 

Attachments

  • IMG_0498.jpg
    IMG_0498.jpg
    43.7 KB · Views: 370
Back
Top