Drilling HSS with Cheap Carbide Bit

Home Model Engine Machinist Forum

Help Support Home Model Engine Machinist Forum:

This site may earn a commission from merchant affiliate links, including eBay, Amazon, and others.

Captain Jerry

Project of the Month Winner!!!
Project of the Month Winner
Joined
Dec 2, 2008
Messages
971
Reaction score
8
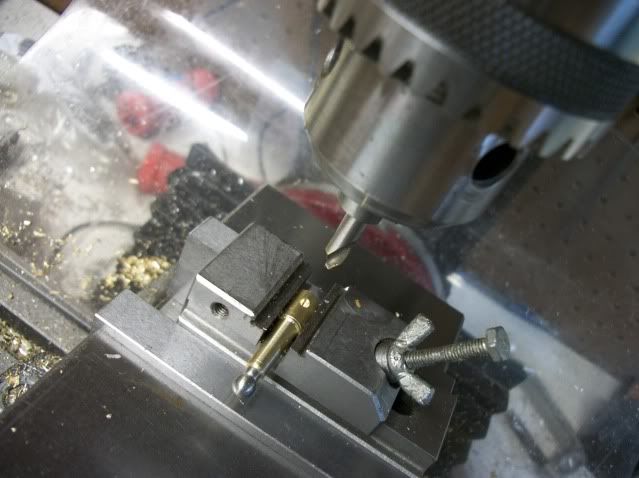
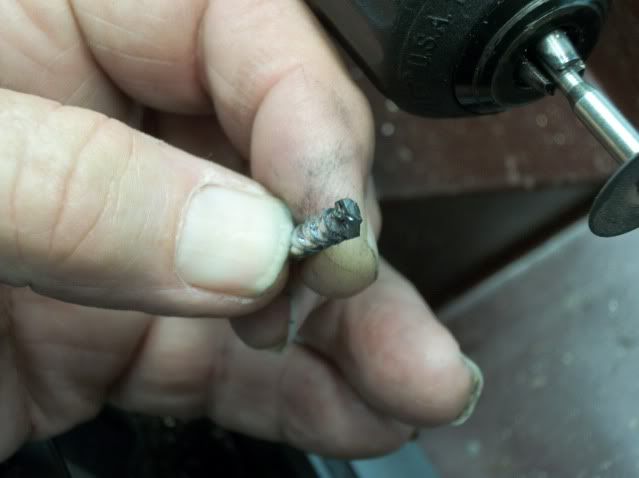
I had a piece of 1/4" round HSS, 2" long that needed a 3/16" hole drilled in the end of it. After a lot of thinking and doubt, I decided to go at it with a cheap (less than $5) carbide tipped masonry bit. The bit needed a little modification. The hole only needs to be about 1/4" deep so I cut the length of the bit to about 2" to reduce flex. A masonry bit is designed to work with impact and abrasion an does'nt really have a cutting edge. Cheap diamond wheel took care of that. Working by eye, I shaped the little brazed tip to look like a drill bit. The chip is just a flat piece of carbide with no flutes and is covered with aluminum paint to cover up the brazing. First I ground the two angled faces to a slightly steeper angle and added relief angles which gave pretty good cutting edges. The flat tip where the relief faces met was to big for penetration so I did my best to approximate a split point. The final step was to provide relief angles to the sides of the chip.

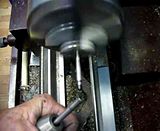
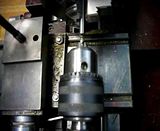
With the bit in the tail stock chuck extending only about 1/2", HSS blank in the 3 Jaw, lathe at high speed which is about 2000 RPM on the 9x20, and a dose of cutting oil, the job starts. A lot of force was needed to get penetration and a good brown chip. The force was applied for just a few seconds at a time to keep heat off. More cutting oil would have been better but the results were better than I had hoped. Hear are video of the job.


balljoint3004.jpg


If anyone wants to know why I need a hole in the end of a high speed steel bit, just ask.

Jerry
 
hitandmissman said:
OK, I am a dummy I guess. Why do you need a hole in the end??

It wasn't a trick question. I just wanted to make sure I wasn't the only one who was interested before I went into the full explanation. The short answer is, its now a form tool. The full answer with pics and vid will have to wait while I get the grass mowed and the garden turned over.

Jerry
 
I have used that trick of grindiing a masonry bit many times over the years.
You are right about keeping the heat down - it can build up very rapidly and melt the silver solder holding the carbide into the shank.

And of course I know this because.......

Ken
 
Ken I said:
I have used that trick of grindiing a masonry bit many times over the years.
You are right about keeping the heat down - it can build up very rapidly and melt the silver solder holding the carbide into the shank.

And of course I know this because.......

Ken

Ken

I guess I hadn't really thought about heat causing the brazing to fail. I was worried about drawing the temper on the HSS bit and making it unsuitable for use as a form tool. I really don't have any experience in heat treating. If I did, I might have used drill rod and hardened it after drilling the hole. I thought that if I could make the tool with HSS, I would have a useful tool without the voodoo of heat treatment. I actually had to do this twice. The first time, I kept the cut on just a little to long and tip of the HSS went brown and then blue before I could stop. It took a few minutes on the grinder to remove the burnt end of the rod and the a do over with more care.

Jerry
 
I doubt you softened the HSS by turning it blue. It's a lot more difficult to anneal HSS than carbon steel.
 
Thanks for the information, Mainer. I thought that the blue was an indicator that the tool had been softened. For this tool to work, the cutting edge must be verry hard and stay sharp under less than ideal conditions. the cutting edge is the inside edge of the hole in the end of the bit. The cutting edge geometry is strange but it actually makes a shearing cut and turns a very fine curly chip.

Hear it is in action. The material is 303 stainless steel, 3/16" diameter. Spindle speed is about 600 RPM. A groove is turned to a diameter of 1/8" leaving a full 3/16" diameter for a length of 3/16" on the end of the rod. This is coated with MagicMarker. I am holding the tool bit in a manual "egg beater" drill so that I can rotate it slowly. Its not absolutely necessary that it be rotated but I think it helps clear the swarf and produces a finer finish. A battery powered variable speed drill would work also. The tool is pushed against the work at an angle of about 45 degrees and begins to cut. It is kept in contact with the work and rotated slowly. In the video, you can see the marking ink narrow to a thin line and finally disappear.

At the moment that the line disappears, the ball on the end of the work piece is a near perfect sphere. If the cut is kept on, the diameter of the sphere is reduced but the spherical shape is retained.


To get the best results, I found that the round hole in the cutting tool should be slightly less than the desired final diameter of the ball. To do that required reducing the diameter of the carbide tip of the tool making tool.

Using this method, I find that I can produce balls within .0005" and perfectly spherical within my ability to measure. For the intended purpose, the shape is far more important than the size. The size can be handled by final adjustment of the ball joint retainer, but if the there is not a good approximation of a true sphere, there will be unnecessary friction, binding and possible failure of the joint.

If the ball is not near perfect, adjusting the retainer too tightly will cause it to lock up, and if the retainer is left loose enough to rotate freely, the end-play or backlash becomes a problem.

Any questions?

Jerry
 
As Mainer said HSS is different exhibiting good "hot hardness" - turning it blue, whilst not desireable, is unlikely to harm it.

As regards starting with annealed HSS - the heat treatment is typically too specialised and requires specialst facilities - all the toolrooms I use send HSS to specialist heat treatment firms.

On top of that you pretty much have to finish it off by grinding.

FYI

Ken
 
Thanks for info Cap'n; who'd a thunk it was possible to drill HSS in the home shop! ;D

I had a similar need for a tool that couldn't easily be ground from HSS so I made it in the mill from O-1 drill rod. When it was finished, I just heated it up red hot & dunked it in ATF. I then honed it sharp with a diamond lap. Didn't bother to temper it, just used it as is and it worked great! Easy-peasy.
 
Well this certainly is interesting. I might be looking at making small spheres for a spherical bushing. I was hoping to have a CNC lathe going by then, but this would work. Thanks!
 
Just a thought - wouldn't it be easier to drill a hole in ball bearing (you'll need to make a holding fixture) if you're trying to make a ball joint - its got to be easier than drilling HSS.

Ken
 
DICKEYBIRD said:
Thanks for info Cap'n; who'd a thunk it was possible to drill HSS in the home shop! ;D

It surprised me too. Who'd a thunk, indeed.

dieselpilot said:
Well this certainly is interesting. I might be looking at making small spheres for a spherical bushing. I was hoping to have a CNC lathe going by then, but this would work. Thanks!

Glad you found it useful. I have gained almost all of my machining knowledge thru this forum and all of the really useful information that is shared here. You don't have to make a mistake to learn a lesson. But you have to not be afraid to make a mistake or you won't do anything.

Ken I said:
Just a thought - wouldn't it be easier to drill a hole in ball bearing (you'll need to make a holding fixture) if you're trying to make a ball joint - its got to be easier than drilling HSS.

Ken

I have never drilled a hole in a ball bearing but I have drilled a hole in HSS and it's dead easy.

Jerry
 
Ken

The other advantage of turning the ball rather than drilling a bearing is that you wind up with a ball securely attached to a rod without brazing or adhesive. The rod end can be threaded or pressed into an assembly very easily. I have been using loctite and a press fit to complete the job. In the pic below, the ball and rod were set in the brass rod for further development. By doing it this way, dimensions from the center of the ball to other features can be accurately established.

balljointsII013.jpg


Jerry
 
I got that Jerry, I meant for an application like a "rose" bush like Dieselpilot might be contemplating.

I've never tried to machine hardened HSS - I simply presumed it wasn't possible - can't wait for an excuse to give it a go.

Ken
 
I'll consider the bearing ball. I thought they are pretty hard as well.
 
A ball bearing might be a better solution for a spherical bushing when you consider the size issue. I don't know how well my drilled form tool method would work at larger scale. I checked the Enco catalog and round HSS bits up to 1" can be had so you could possibly drill it to as much as 3/4" but that might be too much to expect from a re shaped masonry bit in a small lathe. And then you still have to drill the ball and polish the bore if it is going to be used as a bushing. Might as well start with a polished ball like a bearing. I don't know how I would go about forming the spherical seat. Its an interesting problem with lots to consider; size, rotational speeds, and alignment angles and many others, I am sure. You said it was a future project but let us know how it turns out when you get to it.

Jerry
 
The bearing ball looks to be a good option. It seems like they can be annealed, machined, hardened, and repolished. It might even be possible to drill without annealing using a carbide die drill. The spherical bearing is actually going to be small at 5 or 6 mm. I'm currently planning on making a split seat on the CNC mill. This is probably the most practical method.
 
Greg,
If they are hard enough you can get carbon steel balls at very low cost. Alloy 1020 case hardens easy enough if you do need something harder. As an intermediate hardness you can get 316 stainless steel also. I drilled a bunch of them, 1/4 inch ball with 1/18 hole through for an adjustable joint. A little tough - would eat up a HSS drill in about 100 parts.

Lots of sources. Here is a link to McMaster's selection of 1020.
http://www.mcmaster.com/#chrome-steel-balls/=bv3q26
Gail in NM

PS: Good thread Jerry.
 
I'm leaning toward the bearing. Gail, is a 5C collet with a stop a good workholding arrangement? I need to put flats on the ball as well.
 

Latest posts

Back
Top