


DICKEYBIRD
Well-Known Member
- Joined
- Sep 27, 2007
- Messages
- 653
- Reaction score
- 46
Big changes at my "real job" recently has me doing more work with less pay and more time spent there....sign of the times I guess.  Bottom line: less time and money for doing the things I enjoy in the workshop at home.
That said; I did get a couple inexpensive things done that I thought I'd share. I'm working on a tool grinder project that needs a couple steel plate gusset/bracket thingies to support a collet fixture. (More details later on the project if it works.) Anyhoo, the parts needed 3 slots accurately placed with a couple holes that needed to be in the right place as well. I took the time to sketch the overall project in TurboCAD since the angles and relationships of the parts need to be accurately worked out before committing metal surgery.
I printed out just the gusset portion of the CAD drawing on my trusty ol' shop inkjet printer and cut it out with scissors. I drilled, countersunk and tapped 2 pieces of 3/16 plate and screwed them together with 10-24 c/sunk screws outside of the parts outer perimeter which left a flat lower surface for clamping on the mill table with a couple 1-2-3 blocks underneath for clearance. I glued the drawing to the plate with super glue and was able to easily cut the slots and drill the holes very accurately in the mill. Beats the heck out of trying to lay out and mark everything with a ruler and a scribe.

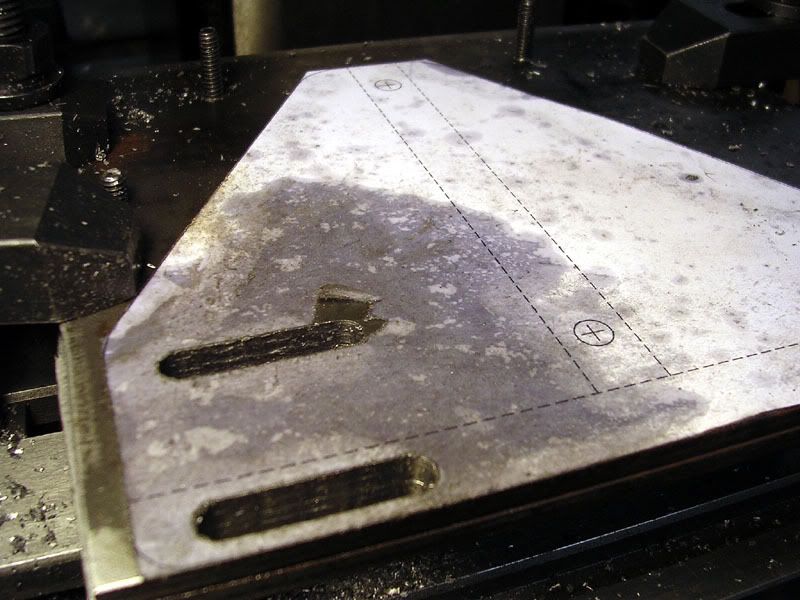
(The dark stuff in the 2nd pic is from the cutting oil after it soaked into the paper.)
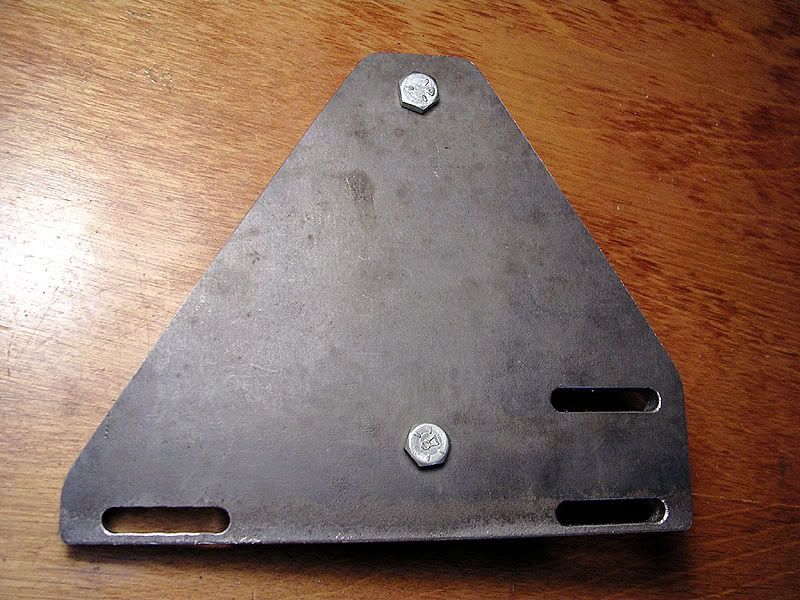
Once the slots were finished and the 2 holes drilled & reamed, I put 2 bolts and nuts into the holes so the outside shape could be cut out on the bandsaw and the edges finished on the disc sander. The finished parts will fit well and are identical since they were cut out at the same time.
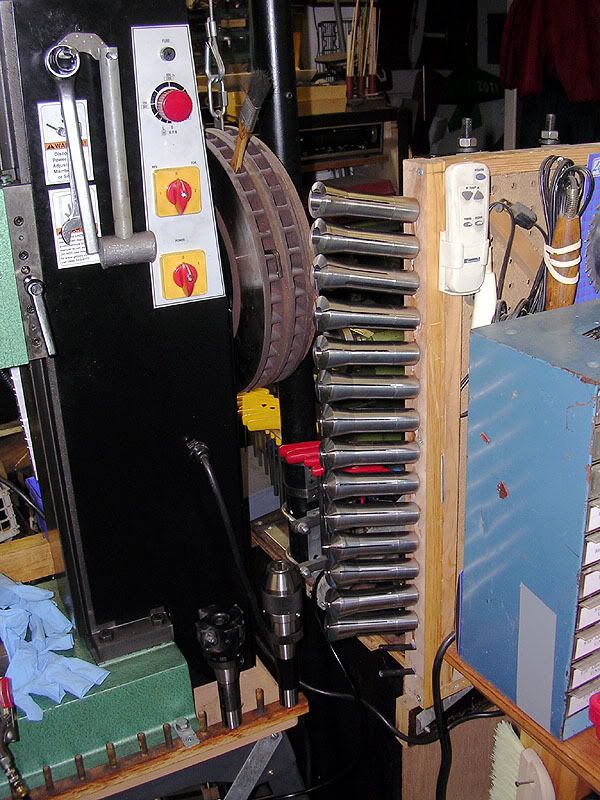
Mini-project #2 was the construction of a new collet rack to go alongside the mill. The original one was too close to the cutting zone and I was constantly having to clean chips from the collets. The new one was made from a scrap piece of maple and short pieces cut from busted carbon arrow shafts an archer/hunter friend gave me. The spacing was worked out in CAD and I made a drill jig with a piece of tubing glued in it to hold the drill at the angle and spacing Id drawn up. It works a treat!
Bottom line: less time and money for doing the things I enjoy in the workshop at home.That said; I did get a couple inexpensive things done that I thought I'd share. I'm working on a tool grinder project that needs a couple steel plate gusset/bracket thingies to support a collet fixture. (More details later on the project if it works.) Anyhoo, the parts needed 3 slots accurately placed with a couple holes that needed to be in the right place as well. I took the time to sketch the overall project in TurboCAD since the angles and relationships of the parts need to be accurately worked out before committing metal surgery.
I printed out just the gusset portion of the CAD drawing on my trusty ol' shop inkjet printer and cut it out with scissors. I drilled, countersunk and tapped 2 pieces of 3/16 plate and screwed them together with 10-24 c/sunk screws outside of the parts outer perimeter which left a flat lower surface for clamping on the mill table with a couple 1-2-3 blocks underneath for clearance. I glued the drawing to the plate with super glue and was able to easily cut the slots and drill the holes very accurately in the mill. Beats the heck out of trying to lay out and mark everything with a ruler and a scribe.
(The dark stuff in the 2nd pic is from the cutting oil after it soaked into the paper.)
Once the slots were finished and the 2 holes drilled & reamed, I put 2 bolts and nuts into the holes so the outside shape could be cut out on the bandsaw and the edges finished on the disc sander. The finished parts will fit well and are identical since they were cut out at the same time.
Mini-project #2 was the construction of a new collet rack to go alongside the mill. The original one was too close to the cutting zone and I was constantly having to clean chips from the collets. The new one was made from a scrap piece of maple and short pieces cut from busted carbon arrow shafts an archer/hunter friend gave me. The spacing was worked out in CAD and I made a drill jig with a piece of tubing glued in it to hold the drill at the angle and spacing Id drawn up. It works a treat!