Spindle preload/end play question

Home Model Engine Machinist Forum

Help Support Home Model Engine Machinist Forum:

This site may earn a commission from merchant affiliate links, including eBay, Amazon, and others.

Mbusha

Crotchety member
Joined
May 4, 2012
Messages
65
Reaction score
13
Just finished putting bearings in my Grizzly SX3 mill spindle. The originals went bad after a short time and did not have a chance as the quill was full of grit. Grizzy sent replacement bearings promptly.

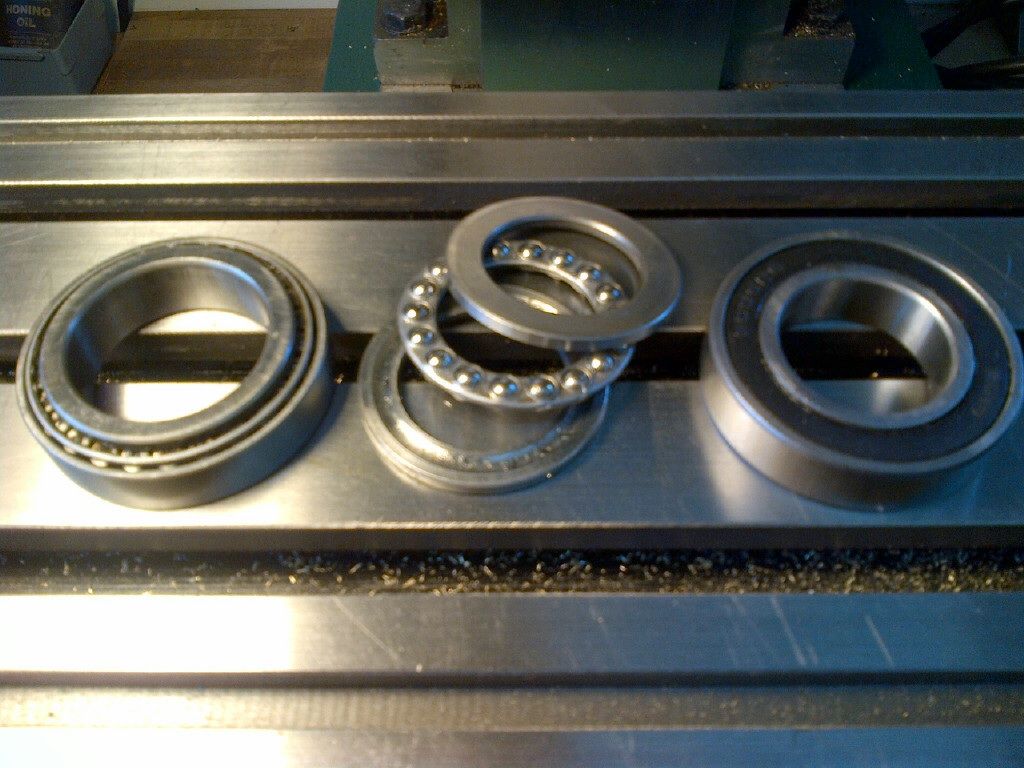
Following the guide I downloaded from the Arc Eurotrade web site, diassembly and bearing replacement was simple enough, except for one point; bearing adjustment (they are silent on this). Searching the forum and Internet produces few hits and differing opinions. Most seem related to industrial (Bridgeport) machines with two tapered bearings. The SX3 has one tapered, one thrust and one roller bearing.

The spindle was cleaned and reassembled with Kluber nub 15. Using a .0001" indicator I adjusted the spanner nuts to just remove any end play. Back in the machine I began the breakin as suggested in the Grizzly manual. 600rpm for ten minutes and everything seemed ok. 1000rpm for an other ten, ok, warm to touch. 1800 and the spindle slowly became noisy and warming too fast. Stopped and it was hard to turn.

Disassembled, cleaned and repeated the process, this time with .0005" end play. the spindle runs ever so slightly warm, after the complete breakin cycle. 10 minutes each a 600, 1000, 1800 rpm and reverse at 1800. the end play and it's .0006".

I actually have a fair amount of experience with machine tools, but only with American made industrial equipment. Home hobby machines are new to me, so I am not so sure what the limits are. The machine as it now sits will, most likely, serve my purpose but as it's a hobby, I don't mind taking it apart for further adjustment. Actually, it comes apart quite easy, and I am getting good at it.

Anyway, sorry for the over long post. Anyone have an opinion? Too tight, too loose?
 
I am puzzled by your description of the bearings. One Tapered, one thrust one roller.

A Bridgeport has two back to back Angular contact Ball bearings, and a standard ball bearing. No roller bearings are used.

Does the Grizzly use roller bearings or the more likely Angular Contact ball bearings. Angular contact bearings can be identified by looking at the outer race, one side is more open than the other, and the word Thrust is often engraved on the one side, and they have balls, no rollers.

photos always help
 
image_zps1f752475.jpg


My mistake in wording. Taper, thrust and sealed ball.

The thrust bearing is 18, 5.5mm balls, not too big, and I don't think can carry any preload. I am "guessing" some small end play is necessary.
 
Something doesn't sound right there pre load is usually to take up end float , on some cars that I have replaced bearing on the pre load is quite high , then back off and just nip up .
 
Hi Mbusha

Sorry to hear of your problems with Spindle bearings on your mill however you are well on the way to fix it.

The spindle bearings in an SX3 mill will require a Preload not with side play. Aim for between .05 and .15 mm preload.

One method Quick and dirty is to divide the thread pitch by preload in mm SAY 1.5 mm pitch by AVERAGE preload = 1.5 pitch / .1 = 15

Divide the adjustment nut into 15 divisions and mark with a prick punch. Screw the nut on finger tight only rotate the spindle by hand a few times and check for finger tight again.

Spanner it up ONE division marked on the nut and lock it down. Then go through your run in procedure again.

With preload bearings it is normal to run hot until they are run in.

If you need to re adjust then do it Cold.

Eric
 
For a bearing setup with the roller bearing and thrust bearing captured by a nut on the spindle. A small preload would be needed, as the spindle will expand a bit more than the quill due to the mass difference and heat rejection of the quill, compared to the spindle which will be hotter when running.

Does the spindle insert into the bottom or top of the quill. Could you show the stack up of the parts and the quill.
 
Hi to all following this thread
This site will give access to lots of useful information on SX3 mills.

http://www.arceurotrade.co.uk/Catalogue/Machines-Accessories/Milling-Machines/Model-Super-X3-Mills

hope this helps.

Added this with an Edit of Posting

Information found "32907J2 32907-J2 Taper Roller Bearing (SX3 #4) 35x55x14 - Koyo Japan" from arceurotrade

Or Taper roller bearing is 30 x 55 x 17 mm the ball bearing is 30 x 55 x 15 mm

Spent more time studying the exploded diagrams and this occurred to me if you omitted the THRUST Bearing completely.

Then fitted a taper roller bearing in stead of the ball bearing at the top of the spindle this May be a better setup.

Sure there is a difference in the info I have on sizes.

Eric
 
Last edited:
I thought I would make a final post on this thread in case anyone searches in the future.

As Eric mentions above the documentation from ArcEuroTrade is excellent. If you own one of the Sieg mills listed, download the PDF, even if not changing bearings. If you are in the UK, might not hurt to have them install the bearings if needed, I am sure they have a better system then I do.

The mill itself disassembles and reassembles quite easily. The only real problem is the topic of this thread.

The first issue seems to be the unknown preload settings (0.05 to 0.15mm is a pretty large range). The second is actually getting it set, once you decide on what it should be. The method above is good in theory, it's the execution that is the challenge.

The thread on the spanner nuts is 1.5mm, a little course for fine work. However the real problem is the fit of the threads themselves. Very loose. You can set the nut with a couple of thousands preload, not too difficult, however when you tighten the locking spanner, several thousands more preload is added. This happened with my first assembley.

My solution was to allow for a couple tenths endplay with the locking nut in place. Then unlock, advance the spanner the required amount (about .0015") and tighten the locking nut. Sort of playing the windage as it were.

This final method, while a bit of a pain, worked out well and the mill is running fine.

The Sieg mill seems to be a good little machine and not a bad design. It's the factory assembly which seems a bit crude. However, it's easy to work on and now mine operates much smoother than delivered. Not perfect, as there is a tight spot in the saddle, so as long as I have the Arc manual I might as well tackle that next. :eek:

Eric, thanks for your help and ideas.
 

Latest posts

Back
Top