


Hello all;
This write up deals with spindle removal and bearing replacement for Atlas 618
plain sleeve bearing lathes. It may come in handy for someone needing new
bearings, but the same procedure, (minus the bearing replacement) has to be
done if you simply need to replace the drive belt on the lathe, or if you need to
replace the thrust bearing, or step pulley bushings.
After getting my new/old lathe torn down, cleaned up, and put back together, I
made some test cuts to get a feel for the general health of the machine. It cuts
well, but when parting off, I can actually see lateral movement in the work piece,
and watching closely, I can pretty much tell it's from the old bearings.
I've had the spindle out of the lathe a few times already, and from looking in the
head stock bore with the spindle removed, I could see some scuffs on the front
sleeve bearing. I ordered new bearings from Clausing, and they showed up a few
days ago. They only took about a week to get here, counting a weekend. They
shipped the same day I ordered. Good service.
Today was a good day to get them put in so I can start seriously setting up this lathe.
I took pictures when I removed the spindle and put the new sleeve bearings in.
Some were taken when I first got the lathe, and it's pretty dirty. Some were taken
after everything had been washed in solvent. I had completely disassembled the
lathe, with the exception of the micro dials, which gave me a good idea of the shape
of things.
I figured some pictures and words might come in handy for other folks that may have this lathe.
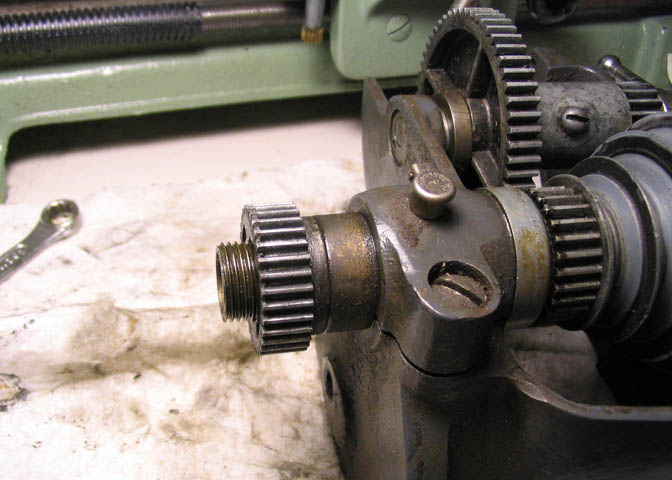
To start with, pull the power cord on the lathe. Remove the lock collar on the
back end of the spindle. In the shot above, it's already been removed. It has a
single set screw in it, so back it off a turn, and remove the collar. The collar is
round, and has no flats or anything to put a wrench on. I'm not going to tell you
to put pliers on it to remove it.. Go your own way on that. Some primate had
used a hard hammer on the back end of this spindle in the past, so the collar was
hard to remove. It is a right hand thread.
There is a soft BB in the bottom of the hole for the set screw so the screw doesn't
bur the threads on the end of the spindle. Don't loose it.
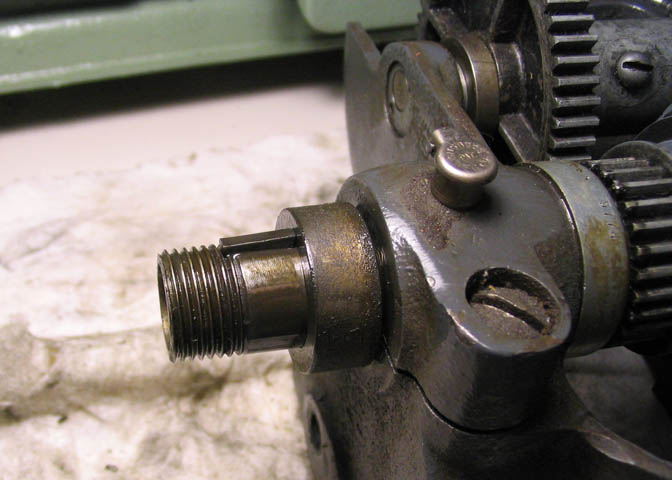
Then pull off the main spindle gear, and remove the Woodruff key.

After that, you can pull of this thrust collar.
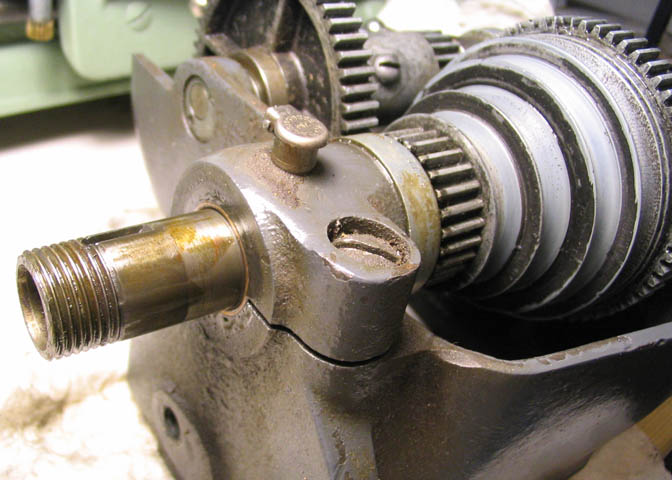
It should look like this when you have the pieces on the back end removed.
Now would be a good time to slack off the two big screws in the bearing caps.
You can see one of them in the picture above, and there is one on the chuck end
of the spindle, too. Back them off until they are loose, then just barely snug them
down. The idea is to get the spindle out without the bearings following it at the
same time.
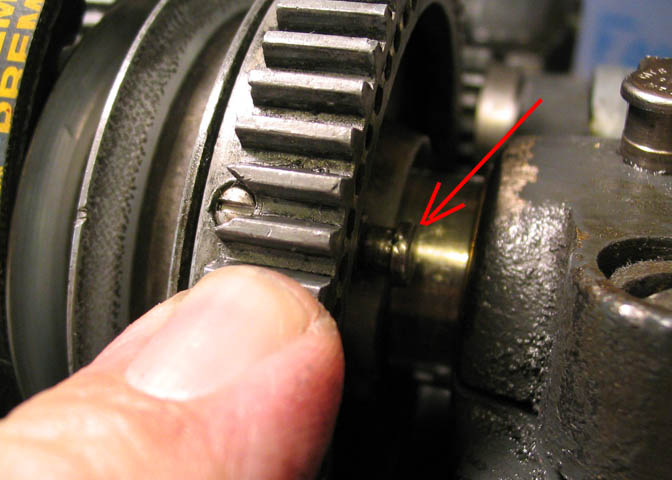
Now, get a look at the bull gear lock pin. Finding it is the easiest way to locate the
the lock screw for the bull gear. There is a screw at the edge of the bull gear in this
shot. That is for oil. Rotate the bull gear 180 degrees, and you will see another hole
opposite the oil hole just mentioned.
When you find the second bull gear hole, reach way down to the bottom of it with
a 5/64" allen wrench and loosen the set screw a couple of turns. That set screw is
only there to keep the bull gear from sliding along the spindle, but has to be loose to
get the spindle out.

Now, unless there are other problems, (I'll save that for later), you should be able
to slide the spindle toward the tail stock. At this point, you only want to pull it out
of the nose end of the head stock about 3/8", until you can see the Woodruff key,
as in the picture above.
Take that key out, but don't pull the spindle any farther toward the tail stock end of
the lathe yet!
When the key is out, check very carefully at the corners and ends of the Woodruff
keyway. Use a fine file to gently remove any burs that you see. Then gently turn
the spindle 180 degrees and look for the place where the set screw in the bull gear
pinched on the spindle shaft. File that spot down too. These two places do not run
in the spindle bearings, so filing them won't hurt anything in that respect. The bull
gear sits over the top of both of these spots, and is always in the same relationship
to them, so there is no danger of the filing job doing any harm to it, either.
If you should just yard the spindle out of the head stock without doing the above, and
there are burs at these points, you'll score the bearings. I'm replacing the bearings right
now, but what if I just needed a belt? You have to take the spindle out to get a new belt
on too. You don't want to ruin your bearings just to replace a belt, so check these two
points carefully.
Once those burs are dressed down, reach in with a tissue and clean off any filings, and then
you can pull the spindle out slowly.
As you pull the spindle out, catch the thrust bearing. At about this point, the spindle
diameter will change at the nose end of the head stock. It gets smaller, so don't let
the spindle drop onto the bearing.
Note the small screw in the second pulley groove. That is for oil. Nothing else. It
lubes the step pulley bushings. (It's supposed to be oiled each day that you will use
the back gear.)
Keep pulling the spindle out, first grabbing the step pulley, then the bull gear, so they
don't fall down into the head stock cavity.
Now, I actually did have trouble with this one. The bushing you see on the
spindle in the shot above is supposed to stay in the step pulley. I had to tap
the spindle out with a piece of wood because the small bushing was stuck
on the spindle. There are two of those bushings, and they should both be
pressed into the step pulley. They allow the pulley to spin on the spindle
independant of the bull gear when you have the back gear engaged.
I soaked this for a while in solvent, and the bushing came off pretty easy. It was
pressed back into the step pulley, and all is well.
In this shot you can see what I'm talking about. That bushing on the spindle was
supposed to stay in the pulley.
With the spindle nice and clean, I tried the new sleeve bearings to make sure
they were the right size, before I take out the old bearings. In this picture, the
tiny circle near the larger bearing is where the bull gear set screw has raised a
mark that I was talking about earlier, and this is one of the things that had to be
filed down before pulling the spindle through the bearings.
To get the old bearings out, make sure the bearing cap screws are loose, and
use a piece of wood or plastic to tap them toward the inside of the head stock.
Both the front (big) and rear (small) bearings would move a little by hard pressure
with my thumb, but I couldn't press far enough into the hole to get them all the
way out. So, tap, tap, with something soft.
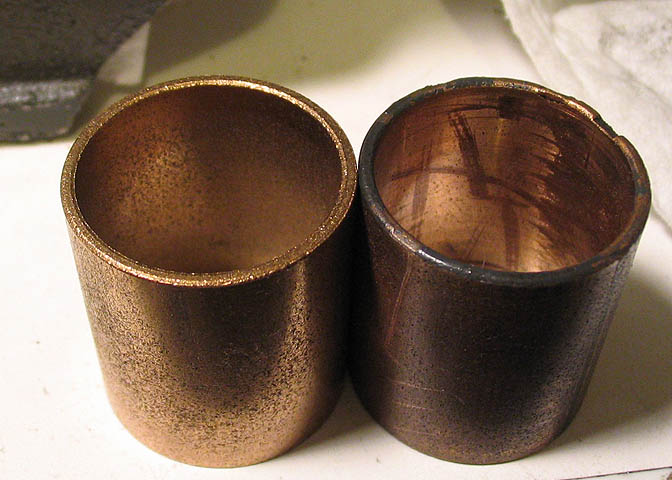
Guess which one is the old bearing?")
The old one, (ok, on the right!) still has factory paint on it, so it's been in there
a long time. You can see that it's taken a beating a few times too, by the marks
left from someone whacking on the end of the spindle without removing the
Woodruff key. I expect it's 50-60 years old. Reading on lathes/uk, it says there
were no more plain bearing lathes after around 1957-59, if I recall. So, it's done
it's job for a long time.
There are some straight marks in there that are no doubt from previous spindle removal,
but there is also a rather large spot of radial scuffing on the far right, which looks similar
to what you see sometimes in crank bearing shells in car engines. Many miles.
Putting the new bearings back in is just a matter of cleaning out the head stock, oiling the
outside of the bearings, and pushing them back in. If they seem a little tight, make sure
the bearing cap screw are loose first, then try again. If they are still too tight, try this, but
only if you really can't get them started straight without doing so;
Screw down the bearing cap screws until you feel them just barely start to get tight.
I'm talking about the point where you feel them touch the top of the hole as they
thread in, where if you screwed them in any further, they would start to squeeze the
bearing caps. (Don't screw them down hard. You'll break the caps.) Then back out
the screw just a touch, so it is free, like 1/20 of a turn. Use a thin wedge of wood, and
tap it into the parting line of the bearing cap to spread them just a thou or two. Be careful.
Don't hit the head stock casting with anything metal. Use a tiny plastic headed hammer
to tap in the wedge, and then just a little bit. This will spread the cap enough to let you
get the bearing started in the bore straight. Then you should be able to put a small piece
of wood on the end of the bearing and push it in with the palm of your hand. I had to
bump it in with the ball of my palm to get the big one in all the way. The small one went
easier. Then pull the wedge(s) out and make sure the cap screws are loose again.
Oil up the spindle with light oil, and put it back in the head stock to see that it fits without
any of the other gears/pulleys and other things. It should spin freely. Take it back out
and start putting all the parts on it as you feed it through the bearings, taking care not to
knock it on the bearings as you do so. Don't forget the Woodruff key that goes in the
bull gear.

After you get it put back in, if you are me, you will immeadiatly take it back out
and put the belt on. If you are not me, you will put the belt on first!! I'm getting
pretty good at removing it, by now.
Put the belt on before you put on the thrust bearing...
When you have the spindle in, through the bull gear, step pulley, and thrust bearing,
replace the thrust collar on the back end, (the small end of the spindle), then the
main spindle gear and its' key, then screw on the lock collar.
Atlas says to run the collar up to the face of the spindle gear, then tighten it the space
of 1-2 teeth of the gear, rotating the spindle as you do so. They say it should have
some resistance, so when the spindle warms up it will not have any end play. Tighten
the lock screw on the collar, (make sure that the thread protecting BB is still in the hole).
Last step is to tighten the bull gear lock screw. Put the bull gear right up against
the step pulley, but not riding hard against it. The bull gear and the step pulley have
to be able to turn independently without rubbing against each other Tighten down
the bearing caps snug, but don't put all your might into it. Check to see that the
spindle still turns after tightening them.
To determine how tight to make these, I put a chuck on the spindle with a piece of
1 1/2" round stock sticking out about 2". Then put a DI on the back side of the round
stock, and pulled the stock toward the front of the lathe and then toward the back of
it and watched the readings. I tightened down the bearing caps until I had what I
wanted, which, for now, was about one thou at one inch from the chuck face. How
much you cinch down the caps is up to you, but I would say if you had to use all the
strength in one had on a screwdriver to get what you want, it may be too much. The
bearings caps are a pretty sturdy part of the casting, but they will only take so much!
I will say now, that this is just a guess derived from prior practical mechanical experience.
I'm no engineer. I couldn't find any solid info in the Atlas material available, and Clausing
didn't have a firm number for me as to torque when I called them for parts.
Sometimes, a practical test is the best indicator of how things are working. The oil
cups were filled with oil, set the lathe to one of its higher speeds, and let it run for a
half hour to get the bearings and spindle warmed up, keeping an eye on the oil cups
to make sure that they were oiling a bit. Also, every five minutes or so, I put a finger
on the bearing caps and the spindle nose, (lathe off!) to see if there was any undue
heating. They never got much over what I would call mildly warm, so the preload and
cap tension is probably good.
After warm up, I checked the spindle with the DI again, then tried a parting cut. The
tool was only run in about .050", but if it will do that without any chatter, I'll call it good.
Parting cuts are about the hardest thing on a lathe, outside of knurling, maybe, and if it
will part off without chatter, it should do fine.
Once the bearings have run in with a few hours of working time on them, I'll check the
run out again with the lathe warmed up, and make any adjustments I think it needs.
It's not likely I'll have to do this again in my lifetime, though if I'm lucky, I'll get to replace
a belt or two.
If you got through all this, thanks for having a look!
Dean
This write up deals with spindle removal and bearing replacement for Atlas 618
plain sleeve bearing lathes. It may come in handy for someone needing new
bearings, but the same procedure, (minus the bearing replacement) has to be
done if you simply need to replace the drive belt on the lathe, or if you need to
replace the thrust bearing, or step pulley bushings.
After getting my new/old lathe torn down, cleaned up, and put back together, I
made some test cuts to get a feel for the general health of the machine. It cuts
well, but when parting off, I can actually see lateral movement in the work piece,
and watching closely, I can pretty much tell it's from the old bearings.
I've had the spindle out of the lathe a few times already, and from looking in the
head stock bore with the spindle removed, I could see some scuffs on the front
sleeve bearing. I ordered new bearings from Clausing, and they showed up a few
days ago. They only took about a week to get here, counting a weekend. They
shipped the same day I ordered. Good service.
Today was a good day to get them put in so I can start seriously setting up this lathe.
I took pictures when I removed the spindle and put the new sleeve bearings in.
Some were taken when I first got the lathe, and it's pretty dirty. Some were taken
after everything had been washed in solvent. I had completely disassembled the
lathe, with the exception of the micro dials, which gave me a good idea of the shape
of things.
I figured some pictures and words might come in handy for other folks that may have this lathe.
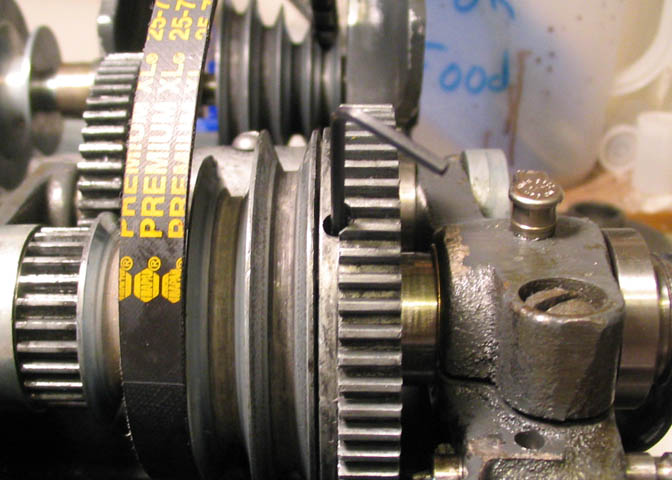
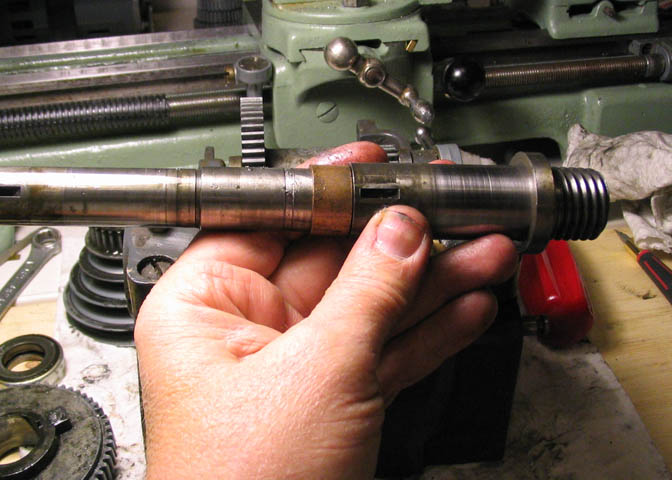
To start with, pull the power cord on the lathe. Remove the lock collar on the
back end of the spindle. In the shot above, it's already been removed. It has a
single set screw in it, so back it off a turn, and remove the collar. The collar is
round, and has no flats or anything to put a wrench on. I'm not going to tell you
to put pliers on it to remove it.. Go your own way on that. Some primate had
used a hard hammer on the back end of this spindle in the past, so the collar was
hard to remove. It is a right hand thread.
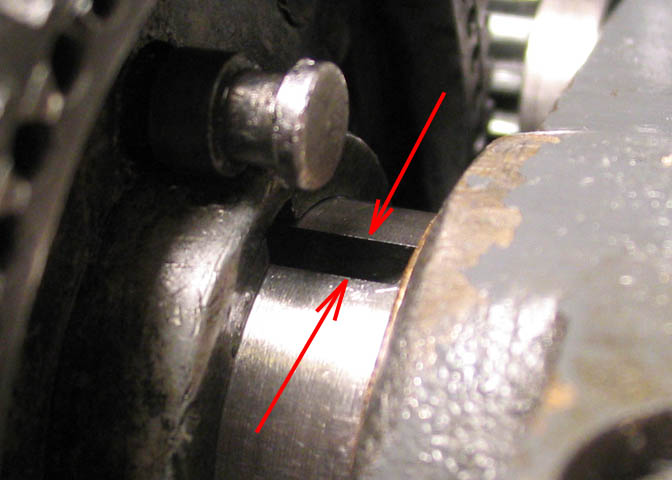
There is a soft BB in the bottom of the hole for the set screw so the screw doesn't
bur the threads on the end of the spindle. Don't loose it.
Then pull off the main spindle gear, and remove the Woodruff key.
After that, you can pull of this thrust collar.
It should look like this when you have the pieces on the back end removed.
Now would be a good time to slack off the two big screws in the bearing caps.
You can see one of them in the picture above, and there is one on the chuck end
of the spindle, too. Back them off until they are loose, then just barely snug them
down. The idea is to get the spindle out without the bearings following it at the
same time.
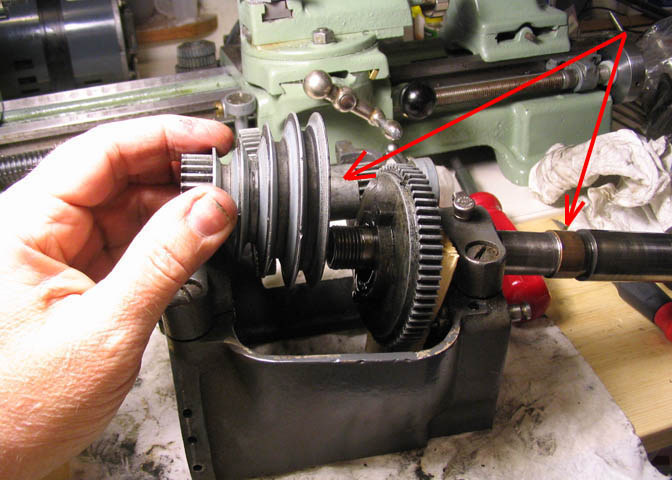
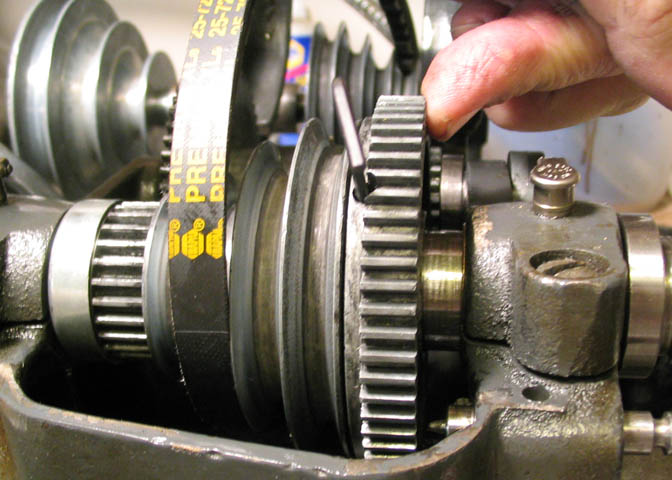
Now, get a look at the bull gear lock pin. Finding it is the easiest way to locate the
the lock screw for the bull gear. There is a screw at the edge of the bull gear in this
shot. That is for oil. Rotate the bull gear 180 degrees, and you will see another hole
opposite the oil hole just mentioned.
When you find the second bull gear hole, reach way down to the bottom of it with
a 5/64" allen wrench and loosen the set screw a couple of turns. That set screw is
only there to keep the bull gear from sliding along the spindle, but has to be loose to
get the spindle out.
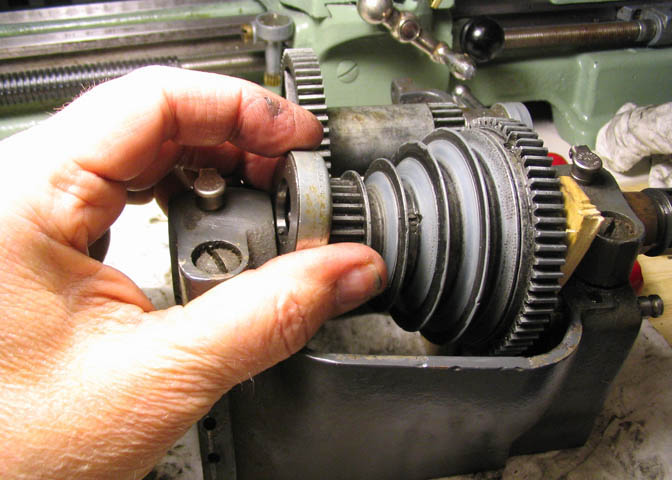
Now, unless there are other problems, (I'll save that for later), you should be able
to slide the spindle toward the tail stock. At this point, you only want to pull it out
of the nose end of the head stock about 3/8", until you can see the Woodruff key,
as in the picture above.
Take that key out, but don't pull the spindle any farther toward the tail stock end of
the lathe yet!
When the key is out, check very carefully at the corners and ends of the Woodruff
keyway. Use a fine file to gently remove any burs that you see. Then gently turn
the spindle 180 degrees and look for the place where the set screw in the bull gear
pinched on the spindle shaft. File that spot down too. These two places do not run
in the spindle bearings, so filing them won't hurt anything in that respect. The bull
gear sits over the top of both of these spots, and is always in the same relationship
to them, so there is no danger of the filing job doing any harm to it, either.
If you should just yard the spindle out of the head stock without doing the above, and
there are burs at these points, you'll score the bearings. I'm replacing the bearings right
now, but what if I just needed a belt? You have to take the spindle out to get a new belt
on too. You don't want to ruin your bearings just to replace a belt, so check these two
points carefully.
Once those burs are dressed down, reach in with a tissue and clean off any filings, and then
you can pull the spindle out slowly.
As you pull the spindle out, catch the thrust bearing. At about this point, the spindle
diameter will change at the nose end of the head stock. It gets smaller, so don't let
the spindle drop onto the bearing.
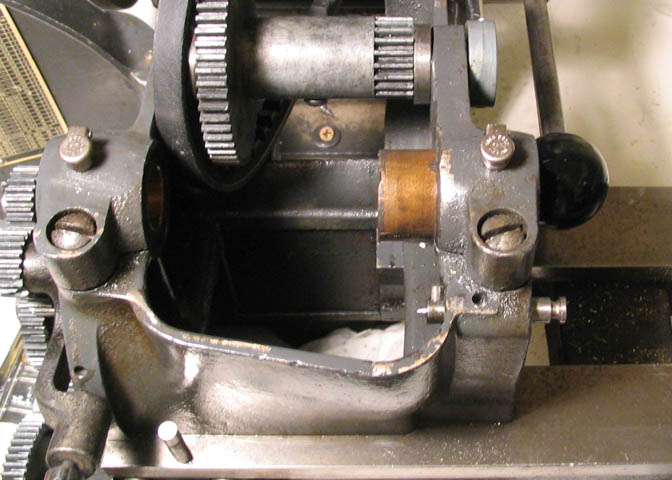
Note the small screw in the second pulley groove. That is for oil. Nothing else. It
lubes the step pulley bushings. (It's supposed to be oiled each day that you will use
the back gear.)
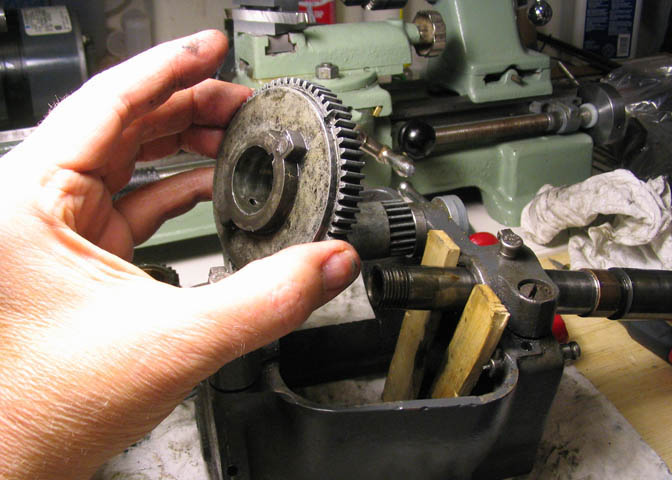
Keep pulling the spindle out, first grabbing the step pulley, then the bull gear, so they
don't fall down into the head stock cavity.
Now, I actually did have trouble with this one. The bushing you see on the
spindle in the shot above is supposed to stay in the step pulley. I had to tap
the spindle out with a piece of wood because the small bushing was stuck
on the spindle. There are two of those bushings, and they should both be
pressed into the step pulley. They allow the pulley to spin on the spindle
independant of the bull gear when you have the back gear engaged.
I soaked this for a while in solvent, and the bushing came off pretty easy. It was
pressed back into the step pulley, and all is well.
In this shot you can see what I'm talking about. That bushing on the spindle was
supposed to stay in the pulley.
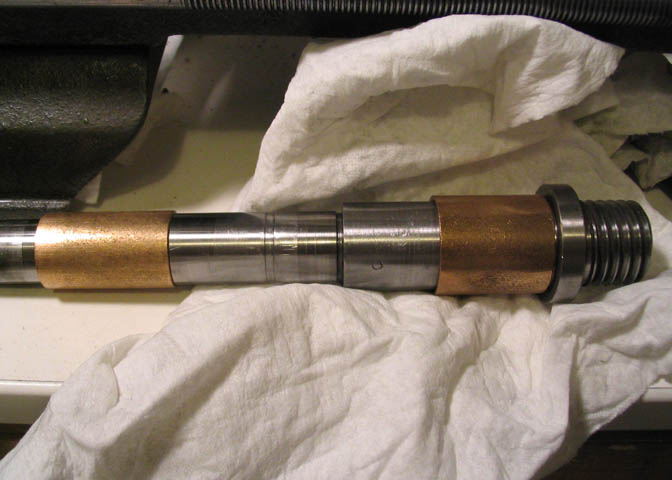
With the spindle nice and clean, I tried the new sleeve bearings to make sure
they were the right size, before I take out the old bearings. In this picture, the
tiny circle near the larger bearing is where the bull gear set screw has raised a
mark that I was talking about earlier, and this is one of the things that had to be
filed down before pulling the spindle through the bearings.
To get the old bearings out, make sure the bearing cap screws are loose, and
use a piece of wood or plastic to tap them toward the inside of the head stock.
Both the front (big) and rear (small) bearings would move a little by hard pressure
with my thumb, but I couldn't press far enough into the hole to get them all the
way out. So, tap, tap, with something soft.
Guess which one is the old bearing?
The old one, (ok, on the right!) still has factory paint on it, so it's been in there
a long time. You can see that it's taken a beating a few times too, by the marks
left from someone whacking on the end of the spindle without removing the
Woodruff key. I expect it's 50-60 years old. Reading on lathes/uk, it says there
were no more plain bearing lathes after around 1957-59, if I recall. So, it's done
it's job for a long time.
There are some straight marks in there that are no doubt from previous spindle removal,
but there is also a rather large spot of radial scuffing on the far right, which looks similar
to what you see sometimes in crank bearing shells in car engines. Many miles.
Putting the new bearings back in is just a matter of cleaning out the head stock, oiling the
outside of the bearings, and pushing them back in. If they seem a little tight, make sure
the bearing cap screw are loose first, then try again. If they are still too tight, try this, but
only if you really can't get them started straight without doing so;
Screw down the bearing cap screws until you feel them just barely start to get tight.
I'm talking about the point where you feel them touch the top of the hole as they
thread in, where if you screwed them in any further, they would start to squeeze the
bearing caps. (Don't screw them down hard. You'll break the caps.) Then back out
the screw just a touch, so it is free, like 1/20 of a turn. Use a thin wedge of wood, and
tap it into the parting line of the bearing cap to spread them just a thou or two. Be careful.
Don't hit the head stock casting with anything metal. Use a tiny plastic headed hammer
to tap in the wedge, and then just a little bit. This will spread the cap enough to let you
get the bearing started in the bore straight. Then you should be able to put a small piece
of wood on the end of the bearing and push it in with the palm of your hand. I had to
bump it in with the ball of my palm to get the big one in all the way. The small one went
easier. Then pull the wedge(s) out and make sure the cap screws are loose again.
Oil up the spindle with light oil, and put it back in the head stock to see that it fits without
any of the other gears/pulleys and other things. It should spin freely. Take it back out
and start putting all the parts on it as you feed it through the bearings, taking care not to
knock it on the bearings as you do so. Don't forget the Woodruff key that goes in the
bull gear.
After you get it put back in, if you are me, you will immeadiatly take it back out
and put the belt on. If you are not me, you will put the belt on first!! I'm getting
pretty good at removing it, by now.
Put the belt on before you put on the thrust bearing...
When you have the spindle in, through the bull gear, step pulley, and thrust bearing,
replace the thrust collar on the back end, (the small end of the spindle), then the
main spindle gear and its' key, then screw on the lock collar.
Atlas says to run the collar up to the face of the spindle gear, then tighten it the space
of 1-2 teeth of the gear, rotating the spindle as you do so. They say it should have
some resistance, so when the spindle warms up it will not have any end play. Tighten
the lock screw on the collar, (make sure that the thread protecting BB is still in the hole).
Last step is to tighten the bull gear lock screw. Put the bull gear right up against
the step pulley, but not riding hard against it. The bull gear and the step pulley have
to be able to turn independently without rubbing against each other Tighten down
the bearing caps snug, but don't put all your might into it. Check to see that the
spindle still turns after tightening them.
To determine how tight to make these, I put a chuck on the spindle with a piece of
1 1/2" round stock sticking out about 2". Then put a DI on the back side of the round
stock, and pulled the stock toward the front of the lathe and then toward the back of
it and watched the readings. I tightened down the bearing caps until I had what I
wanted, which, for now, was about one thou at one inch from the chuck face. How
much you cinch down the caps is up to you, but I would say if you had to use all the
strength in one had on a screwdriver to get what you want, it may be too much. The
bearings caps are a pretty sturdy part of the casting, but they will only take so much!
I will say now, that this is just a guess derived from prior practical mechanical experience.
I'm no engineer. I couldn't find any solid info in the Atlas material available, and Clausing
didn't have a firm number for me as to torque when I called them for parts.
Sometimes, a practical test is the best indicator of how things are working. The oil
cups were filled with oil, set the lathe to one of its higher speeds, and let it run for a
half hour to get the bearings and spindle warmed up, keeping an eye on the oil cups
to make sure that they were oiling a bit. Also, every five minutes or so, I put a finger
on the bearing caps and the spindle nose, (lathe off!) to see if there was any undue
heating. They never got much over what I would call mildly warm, so the preload and
cap tension is probably good.
After warm up, I checked the spindle with the DI again, then tried a parting cut. The
tool was only run in about .050", but if it will do that without any chatter, I'll call it good.
Parting cuts are about the hardest thing on a lathe, outside of knurling, maybe, and if it
will part off without chatter, it should do fine.
Once the bearings have run in with a few hours of working time on them, I'll check the
run out again with the lathe warmed up, and make any adjustments I think it needs.
It's not likely I'll have to do this again in my lifetime, though if I'm lucky, I'll get to replace
a belt or two.
If you got through all this, thanks for having a look!
Dean