Cedge
Well-Known Member
- Joined
- Jul 12, 2007
- Messages
- 1,730
- Reaction score
- 29
Here are a few tips on soldering that came to me the hard way.
#1... Never melt the solder under the flame. Heat the metal until the solder will melt when it touches it. This is when the solder will flow evenly into the joint. Melting it under the flame only makes nice ugly lumps you'll have to file away later.
#2... Flux... it's not just a cleaning agent. Flux being liquid, transfers heat to the solder and allows it to melt more quickly. It also acts to wick the solder into the joint.
#3... carbon... Solder dosen't like it and won't stick to it. After you've prepped your solder joint and fitted it, take an old cigarette lighter (think Zippo) or your handy dandy acetelyne tourch and smoke it up a bit, using the open flame with no oxygen added to the mix. Solder overflow and off target contacts don't stick and clean up is a breeze.
#4... Tinning is a great way to almost avoid that clumsy solder roll altogether. When two pieces need to be held togther where you don't want an obvious solder joint, apply a bit of solder to both surfaces before fitting them together. You want a nice thin even coating of solder here. You can always file a bit of it off if you get too much on a surface. Less is more in this trick.
Now put a bit of flux on one surface and fit them together. Use tip #3 as a precaution and heat the work until the solder melts in place. If more solder is required, the existing solder will wick it easlily into the joint.
#5... is an alternate to the last tip. hammer the solder out flat so that it becomes a very thin ribbon. Place small pieces of the thinned solder strips into the joint and proceed as in tip #4.
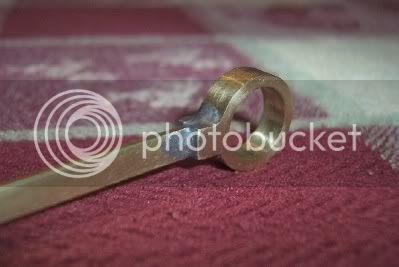
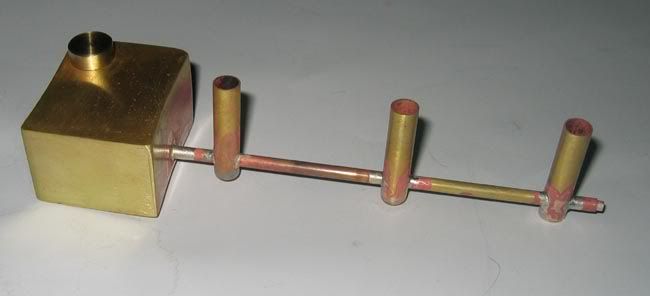
#6... When possible, fitting pieces as male and female makes for nice clean joints that look like one piece of metal. I needed to fit steam chest onto a set of cylinders and didn't want an obvious joint. I cut a notch in the outer cylinder wall that fit the steam chest quite closely. I then tinned the two pieces, and heated until the solder melted. The results looked like a single piece of metal. It was clean enough to cause a 30 year professional machinist to ask me how I managed to make such a complex cut on my chinese iron.
#7... Never solder work while on your lathe or mill. The vapors from the flux are highly acidic and will cause rust on any bare iron they happen to settle on. You can rust coat a whole lathe with only a drop or two of the stuff. Ask me... I know this one well....LOL
Best
Steve
#1... Never melt the solder under the flame. Heat the metal until the solder will melt when it touches it. This is when the solder will flow evenly into the joint. Melting it under the flame only makes nice ugly lumps you'll have to file away later.
#2... Flux... it's not just a cleaning agent. Flux being liquid, transfers heat to the solder and allows it to melt more quickly. It also acts to wick the solder into the joint.
#3... carbon... Solder dosen't like it and won't stick to it. After you've prepped your solder joint and fitted it, take an old cigarette lighter (think Zippo) or your handy dandy acetelyne tourch and smoke it up a bit, using the open flame with no oxygen added to the mix. Solder overflow and off target contacts don't stick and clean up is a breeze.
#4... Tinning is a great way to almost avoid that clumsy solder roll altogether. When two pieces need to be held togther where you don't want an obvious solder joint, apply a bit of solder to both surfaces before fitting them together. You want a nice thin even coating of solder here. You can always file a bit of it off if you get too much on a surface. Less is more in this trick.
Now put a bit of flux on one surface and fit them together. Use tip #3 as a precaution and heat the work until the solder melts in place. If more solder is required, the existing solder will wick it easlily into the joint.
#5... is an alternate to the last tip. hammer the solder out flat so that it becomes a very thin ribbon. Place small pieces of the thinned solder strips into the joint and proceed as in tip #4.
#6... When possible, fitting pieces as male and female makes for nice clean joints that look like one piece of metal. I needed to fit steam chest onto a set of cylinders and didn't want an obvious joint. I cut a notch in the outer cylinder wall that fit the steam chest quite closely. I then tinned the two pieces, and heated until the solder melted. The results looked like a single piece of metal. It was clean enough to cause a 30 year professional machinist to ask me how I managed to make such a complex cut on my chinese iron.
#7... Never solder work while on your lathe or mill. The vapors from the flux are highly acidic and will cause rust on any bare iron they happen to settle on. You can rust coat a whole lathe with only a drop or two of the stuff. Ask me... I know this one well....LOL
Best
Steve