


This post isn't for those people who do everything by the book and only use the best equipment.
What I am about to show you is a relatively cheap method to get good levels of angle accuracy.
Whether you know or not, the sine bar is a method of producing very accurate angle measurement, if you know how to use one.
It can also be a rather expensive way of doing it, due to the cost of a top quality precision sine bars and the related slips gauges that are normally used with them. But help is at hand.
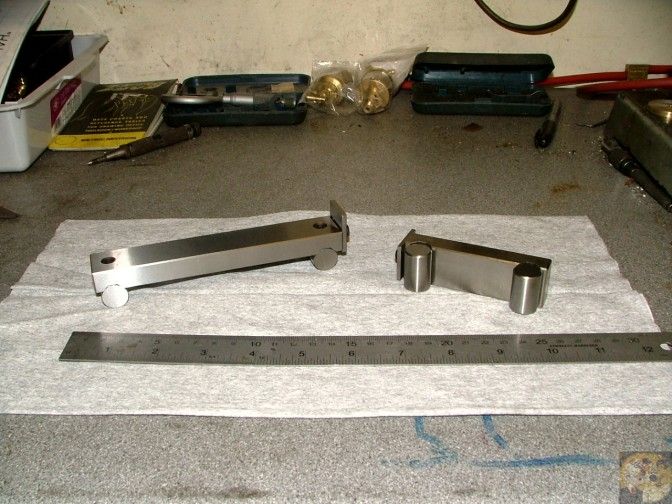
These are what is called 'value' sine bars, the 5" one cost me less than 20 pounds and the small one, which I purchased recently was less than 6 pounds. You can spend hundreds on buying one, but for general workshop use, one of these would do just fine.
This shows you what they look like.
http://littlemachineshop.com/products/product_view.php?ProductID=3760
Sorry that they are no longer available from that source, but it does give you an idea of how much they cost and what to look for.
Even though they are cheap, it doesn't mean you should throw them about, you treat them as you would any other precision instrument. If it doesn't come with a storage box, they should be stored by resting on one of the sides, as shown by the small one. The top top face and the bottom of the rolls are the critical bits.
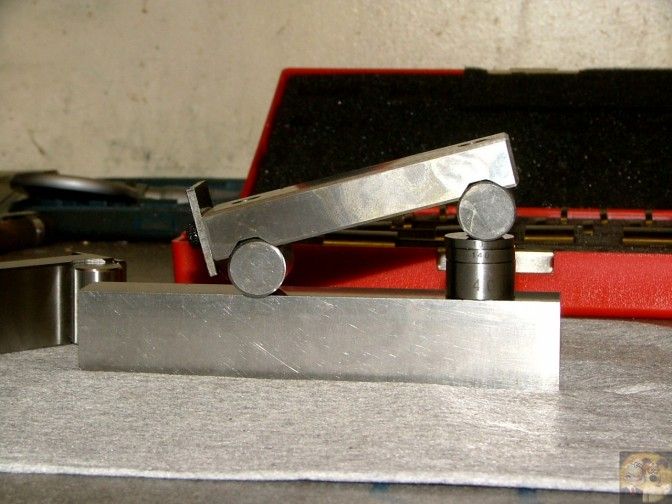
This is how they are normally used, either sitting on a parallel, or another true flat face. One end is supported on a stack of slips that have been built up to the required height to put the top face at the correct angle.
Getting that required height can be rather daunting for the newcomer, because of the calculations involved.
I am going to show you a way where the calculations are done for you, and you should get acceptable accuracy on your angle.
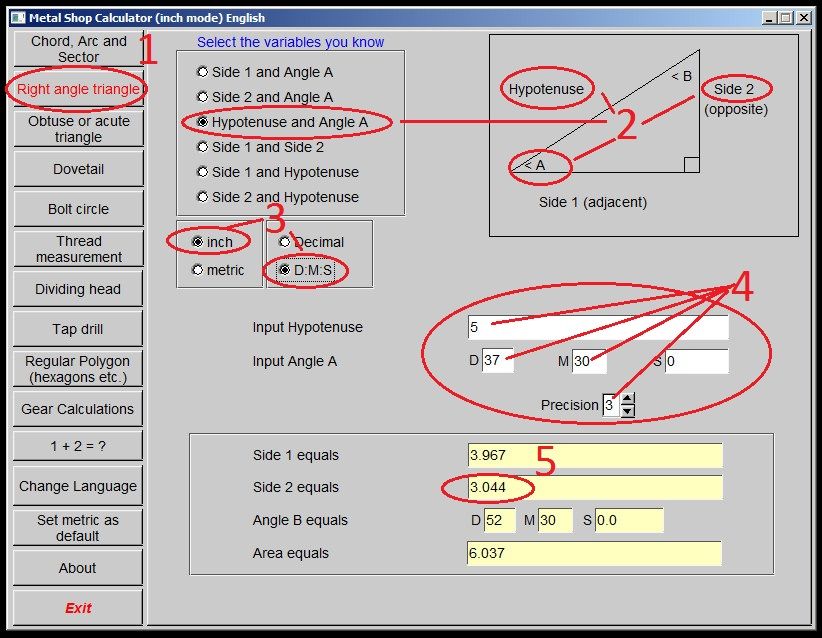
You first need a small engineering conversion program installed on your computer, this shows the one I use the most. It must have a right angle triangle calculator program within it's walls. I have gone through the getting the bit you need stage in numerical order, so it should be very easy to carry out.
You can obtain it from here, free of charge.
http://home.scarlet.be/mini-draaien-frezen/engels/program-01.html
How to use.
1) Select 'Right Angle Triangle', this main page appears.
2) These bits are to do with what you are trying to achieve. The Hypotenuse is the distance between centres of YOUR Sine bar, and the angle is the one you want your bar to sit at. You need to find the length of Side 2. So select 'Hypotenuse and Angle A'.
3) This is where you select your input and output figures. Mine is set to Imperial with Degrees, Minutes and Seconds (DMS). If you wanted Metric with Decimal Input and Output, then just select those buttons.
4) This is where you input your figures, the top figure is the distance between centres on YOUR particular Sine bar, then you input the angle you require, again, this shows what I entered in DMS, you could enter yours in decimal if you had selected that option. Underneath the input, you will see a button for selecting the accuracy of output. I have selected 3, which gives the output to 3 decimal places, in fact in thous (mils) if you are in Imperial. If you are using metric, then I would suggest #2. You could select 6 decimal places, to give you super accuracy, but I think you would have trouble getting your spacer pack to the right height.
5) That is the figure you require for your spacer pack height, that you sit under one of the Sine bar rollers to give you the angle that you require.
It does look rather complicated, but it isn't. Just look at the ovals in order, input your figures, and once you have done it once, you will never have trouble again.
Marv also has a little program the he has written that will also do the same function, I am sure if he reads this he will show you all about it.
There are many ways you can obtain that figure, even by the use of a normal scientific calculator.
The choice is all yours.
This is the controversial bit, what to use instead of those very expensive slip sets.
I have two of the expensive ones, donated to me many years ago, but I always use these little jobbies that a friend picked up for me when he visited the US with his work.
http://littlemachineshop.com/products/product_view.php?ProductID=1757&category=988300808
So you still don't want to fork out any more cash?
Then grab your trusty mic and go around your shop measuring the thickness of things, and by holding the bits together, and using a set of feeler gauges as fine tuning, you will soon find you can get to the height you want.
If that is too much like hard work, then dive in on your lathe and turn a piece of something down to the same diameter as the height you need, and depending how the sine bar is situated, you can either leave the turned down bit on the original bar, or just part it off. But remember, don't try to put the round edges against each other, they need to be at 90 degrees to stop things rolling about.
I hope that this has helped to explain how easy a sine bar can be used, and it is not in the domains of master machinists, as a lot of beginners suspect.
John
What I am about to show you is a relatively cheap method to get good levels of angle accuracy.
Whether you know or not, the sine bar is a method of producing very accurate angle measurement, if you know how to use one.
It can also be a rather expensive way of doing it, due to the cost of a top quality precision sine bars and the related slips gauges that are normally used with them. But help is at hand.
These are what is called 'value' sine bars, the 5" one cost me less than 20 pounds and the small one, which I purchased recently was less than 6 pounds. You can spend hundreds on buying one, but for general workshop use, one of these would do just fine.
This shows you what they look like.
http://littlemachineshop.com/products/product_view.php?ProductID=3760
Sorry that they are no longer available from that source, but it does give you an idea of how much they cost and what to look for.
Even though they are cheap, it doesn't mean you should throw them about, you treat them as you would any other precision instrument. If it doesn't come with a storage box, they should be stored by resting on one of the sides, as shown by the small one. The top top face and the bottom of the rolls are the critical bits.
This is how they are normally used, either sitting on a parallel, or another true flat face. One end is supported on a stack of slips that have been built up to the required height to put the top face at the correct angle.
Getting that required height can be rather daunting for the newcomer, because of the calculations involved.
I am going to show you a way where the calculations are done for you, and you should get acceptable accuracy on your angle.
You first need a small engineering conversion program installed on your computer, this shows the one I use the most. It must have a right angle triangle calculator program within it's walls. I have gone through the getting the bit you need stage in numerical order, so it should be very easy to carry out.
You can obtain it from here, free of charge.
http://home.scarlet.be/mini-draaien-frezen/engels/program-01.html
How to use.
1) Select 'Right Angle Triangle', this main page appears.
2) These bits are to do with what you are trying to achieve. The Hypotenuse is the distance between centres of YOUR Sine bar, and the angle is the one you want your bar to sit at. You need to find the length of Side 2. So select 'Hypotenuse and Angle A'.
3) This is where you select your input and output figures. Mine is set to Imperial with Degrees, Minutes and Seconds (DMS). If you wanted Metric with Decimal Input and Output, then just select those buttons.
4) This is where you input your figures, the top figure is the distance between centres on YOUR particular Sine bar, then you input the angle you require, again, this shows what I entered in DMS, you could enter yours in decimal if you had selected that option. Underneath the input, you will see a button for selecting the accuracy of output. I have selected 3, which gives the output to 3 decimal places, in fact in thous (mils) if you are in Imperial. If you are using metric, then I would suggest #2. You could select 6 decimal places, to give you super accuracy, but I think you would have trouble getting your spacer pack to the right height.
5) That is the figure you require for your spacer pack height, that you sit under one of the Sine bar rollers to give you the angle that you require.
It does look rather complicated, but it isn't. Just look at the ovals in order, input your figures, and once you have done it once, you will never have trouble again.
Marv also has a little program the he has written that will also do the same function, I am sure if he reads this he will show you all about it.
There are many ways you can obtain that figure, even by the use of a normal scientific calculator.
The choice is all yours.
This is the controversial bit, what to use instead of those very expensive slip sets.
I have two of the expensive ones, donated to me many years ago, but I always use these little jobbies that a friend picked up for me when he visited the US with his work.
http://littlemachineshop.com/products/product_view.php?ProductID=1757&category=988300808
So you still don't want to fork out any more cash?
Then grab your trusty mic and go around your shop measuring the thickness of things, and by holding the bits together, and using a set of feeler gauges as fine tuning, you will soon find you can get to the height you want.
If that is too much like hard work, then dive in on your lathe and turn a piece of something down to the same diameter as the height you need, and depending how the sine bar is situated, you can either leave the turned down bit on the original bar, or just part it off. But remember, don't try to put the round edges against each other, they need to be at 90 degrees to stop things rolling about.
I hope that this has helped to explain how easy a sine bar can be used, and it is not in the domains of master machinists, as a lot of beginners suspect.
John
")
