ML Midge Conrod

Home Model Engine Machinist Forum

Help Support Home Model Engine Machinist Forum:

This site may earn a commission from merchant affiliate links, including eBay, Amazon, and others.

jack620

Well-Known Member
Joined
Jan 6, 2013
Messages
322
Reaction score
113
Location
Melbourne, Australia
Sorry for all the questions. A lot of this is probably bleeding obvious to most of you guys, but it's a whole new world to me.

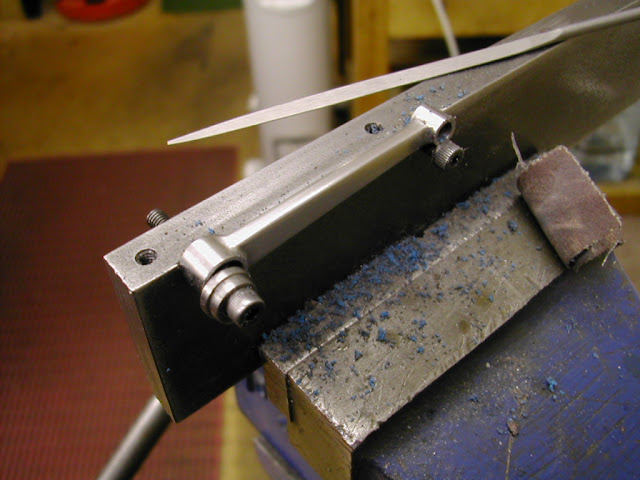
The conrod for the ML Midge is shown in the extract from the plans below. To make the manufacture of them easier and neater I propose to make them as shown in the Sketchup picture. The plan is to drill and ream the holes then attach 4mm and 5mm filing buttons. Then I can simply file between the buttons to get nice flat sides and a symmetrical shape.

My only concern is the extra weight. I imagine it is minuscule but as this is my first engine I really have no idea what the effect will be. What do you think?

Chris

Screen Shot 2013-01-15 at 9.33.59 AM.png


Screen Shot 2013-01-15 at 9.33.31 AM.png
 
I don't think, for the amount of material involved, the additional weight would be any problem
 
Shouldn't make too much difference Chris but look out for the possibility of the rod catching the side of the case. Why not file between the buttons to bring the rod thinner at the same taper. - It pays to bolt the rod to a piece of plate that can be held in the vise. The bolts needing to be at the very edge of the plate so the side being filed projects above it.

I've tried to insert a picture here of the Nova rod being done but for some reason it will not accept it. Strange after all the pics I've got on here.

Ramon
 
Ron, thanks for the feedback.

Thanks Ramon. I was wondering how to hold the rod while filing. I'll use the mounting plate as you suggest. I suppose I could file between the buttons, but it would require a lot more care to get a flat edge than just filing across the top of the buttons.
 
I know for a fact that you will have clearance problems using a fatter rod. The crankcase has to be relieved even when using the standard rod.
 
Hi rklopp,
I wasn't aware of that. There is nothing on my plans that indicates relief in the crankcase. How did you machine the relief?
Chris
 
Hi Chris, Thanks to some help on here I've sorted out how to get pics up -thought you would still like to see this
DSCN1783.JPG

Regards - Ramon
 
Wow, that's nice! Thanks for the pic.

Today I priced 2.5mm and 3mm hand reamers. About US$25 for a 2.5mm Dormer. A bit less for the 3mm. Obviously I could buy a cheaper brand, but I'm happy to pay for the quality as long I am going to use them again. How common is a 2.5mm wrist pin in model engineering? Or a 3mm crank pin?
 
Hi again Chris

That seems pricey for a reamer - is that a chucking reamer or one with a morse taper. I have found chucking reamers to be fine and reasonably priced here in the UK. I have a lot of MT reamers but they only get used when theres no chucking one available. The price does usually increase toward the smaller sizes though.

The sizes are just relevant to the engine size - you may find an engine of similar size using a 3mm wrist pin and a 3.5/4mm crankpin. Obviously you can change a design a small amount to suit the kit you have so providing you make further engines of this size even if drawn in imperial they will be of continuing use - of course if you're going up to 5 cc you better order a 4, 5 and 6mm at the same time ;) ;)

Ramon
 
Hi again Chris

That seems pricey for a reamer - is that a chucking reamer or one with a morse taper. I have found chucking reamers to be fine and reasonably priced here in the UK. I have a lot of MT reamers but they only get used when theres no chucking one available. The price does usually increase toward the smaller sizes though.

The sizes are just relevant to the engine size - you may find an engine of similar size using a 3mm wrist pin and a 3.5/4mm crankpin. Obviously you can change a design a small amount to suit the kit you have so providing you make further engines of this size even if drawn in imperial they will be of continuing use - of course if you're going up to 5 cc you better order a 4, 5 and 6mm at the same time ;) ;)

Hi Ramon,

I think that some of these Chinese reamers are not too bad, I have some hand reamers from the Arc euro trade and they seem to be OK for a very reasonable price, on the other hand some people are asking five times as much money for the UK made ones with the same degree of tolreance, H7.

Regards,

A.G
 
Thanks Gents. These prices are for H7 spiral flute hand reamers. The same supplier has Taylor and Jones reamers for 20% less than the Dormers, so I might buy those. According to Ron Chernich's site the crankshaft bore MUST be finished by floating a 6mm hand reamer into the drilled bore assisted with a tailstock centre for alignment. Apparently a chucking reamer held in the chuck will produce an out-of-round hole. Based on that advice I was just going to buy hand reamers in all sizes. I guess hand reamers can be secured in a chuck if required?
 
Hi Chris, We used to use Taylor and Jones at work without any problems - I would say that they are certainly suitable for what you need. And yes AG some of the imported ones are very useable too - after all we are not working to aerospace standards ;)


As for chucking versus hand reamers though I have used hand reamers for the odd application (when it's the only one available) I have had no problems at all using chucking reamers - a caveat of course is that you must have a good chuck.
Where I do like to use a hand reamer is for the wrist pin hole - the long lead in taper on the reamer allows one side of the piston to be marginally smaller than the other giving a push fit which helps hold the pin in place. That said of course your piston is much smaller in diameter. The long taper is something to bear in mind too if there is insufficient clearance behind the work or the need to ream a blind hole

Some chucking reamers have a centre in the end so if you grind a small flat for a spanner to get a grip on you can still float it in if that's what you would prefer to do. The smaller diameters usually have a male cone on them. A stub of brass held in the drill chuck can be centered from the head stock to enable the same.

To get as true a reamed hole as possible though it's always best to bore after drilling before reaming - at small sizes the boring is best carried out using a D-Bit made to reaming size. A reamer will always 'follow' a drilled hole.

I have a high degree of regard for Ron Chernich and MEN but I would question the word MUST in this context. Given a reasonable set up a basic drilled and reamed hole for this specific application would be more than adequate - better would be to lap the bore then make the crankshaft to fit. It doesn't need to be too good a fit - a certain amount of fuel needs to be able to find its way down the annular gap to lubricate the shaft.

Regards - Ramon
 
Hi Ramon,

I would only add that for a chucking reamer to work perfectly, in addition to having a first class chuck, the tail stock and chuck setup ( mounted ) must be in perfect alignment with the head stock or as close to perfect as possible. If the drilling operation has been carried out successfully then the reamer will work fine, if however, the hole to be reamed is blind ( a cylinder for example ) then an ordinary hand reamer is of no use as the length of the lead taper is far too long in relation to the length of the reamer and then only a machine- chucking reamer or a home made reamer would be needed.

Happy reaming.

Regards,

A.G
 
Thanks for the info gents. Now I not only have to decide which brand to buy, but I've also got to decide whether I should get hand or chucking reamers! :)
 
Back
Top