Machining sequence

Home Model Engine Machinist Forum

Help Support Home Model Engine Machinist Forum:

This site may earn a commission from merchant affiliate links, including eBay, Amazon, and others.
W

whatsit

Guest
The question is... In what order do you machine parts? Drill first, turn first, mill first???
I have looked for info on this but it seems to be limited. If you know of any books that would help that would be great. The books I have pretty much just cover how to do individual operations not how to sequence the steps for the most efficient machining. So far I use the hit and miss method and have ended up scrapping a few parts.

Here's my process on the mill:
1. square up my material
2. layout, drill and tap any holes
3. machine to size. straight cuts first then any angles.
So far it works pretty good. Usually mess up when I make a cut too soon and lose clamping surfaces.

The lathe:

1. Find material
2. Center drill
3. ?
4. ?
5. ?
6. finish

I use the 4jaw for most things so I can remove it for different operations but I would like to be able perform more operations with fewer moves. I've had my lathe for only a couple months. So still getting used to it.

Hope this makes sense and you can understand what I'm asking. If not Let me know.

Thank

Kevin
 
Kev,

A lot depends on the part you're making but my job plan generally goes:

Chuck
Face off
Centre drill
Support with tail stock
Reduce diameter

If I'm making a part that has two ends, I always start with the bigger end so if I balls it up, it can become the smaller end.

Have a think about your process and if you need to rechuck it to machine it after you have a finish, how are you going to hold it.

I regret I've mislaid my job plan book from my apprenticeship, where we had to write and draw all the processes for the pending job before we started.

More from others to come I'm sure

Al
 
Kevin,

Good advice from Al.

But really it is not a question that can be answered in full. Every job has its own little sequences, nothing is written in stone.

I find a notepad and pen works for me.

I go thru the whole machining operation on paper, even to writing down coordinates if needed. After a time you can see when you do one operation, problems start to occur elsewhere. I also sometimes do a little sketch, just to remind me after a certain op, what the component should look like, then you can work out how you are going to hold for the next op.

Many times I have had to swap from lathe to miller and back again, or vice versa, just so a certain feature can be machined while it is still 'holdable'.

Only very basic sets of rules can be applied to very basic machining operations, as for the rest, that has to be planned out beforehand.

If it is milling, I personally leave tapping until the last operation if possible, I also work a lot from datum faces that I set up on initial machining.

For turning, if possible I work just like Al, the big end first. Tapping and threading is done as soon as possible, as long as it doesn't get in the way of future ops.

I had the same sort of military training as Al I guess, because we were not allowed to switch on a machine until the whole job sequence was proven.

It might only take thirty minutes to do the job, the preplanning could take an hour. But at least mistakes were kept to very rare occurrences.

John

 
Kevin
You're probably suffering from something similar to what many of us do. You've become oriented to think "Mill" first and "Lathe" second. It's a little like the old adage "When you're only tool is a hammer, everything looks like a nail".

Tim and I were laughing about this the other night when we were discussing how to perform a certain job. Tim tends to think in "Mill", so his solution was based on how he'd accomplish it on one. I, on the other hand tend to think "Lathe" and my solution was a completely different approach. Neither was wrong, but mine did require a bit less work. Tim's comment was "I hadn't thought about it that way". It's also happened in reverse where his mill thinking trumped my lathe ideas.

Tim now has a lathe and he's begun to try to think in that mode, while I finally have a substantial mill and I am exploring it's advantages more and more.

You might try looking at the work flow from both perspectives so you don't get trapped into one process the way some of us have.

Steve
 
I would like to be able perform more operations with fewer moves


most things we do is simply dragging some rotating work past a fixed tool bit or pulling some sort of milling cutter across a surface - what could be easier, there's nothing to this machining stuff, right?

...but the fun comes from, at least for me, efficiently solving the puzzle. The primary objective is how do i actually make this part and have everything dimensionally accurate and square etc - sometimes on complex piece that is accomplishment enough. Next you're looking for solving it efficiently, minimizing set ups, minimizing custom tooling/fixtures etc. More ops at one set up, thinking in terms of define then creating first datum surfaces, understanding where accuracy is important and where its not, and designing things that can be machined readily all help.

I agree with you, productivity does matter. Not in the absolute sense as it does to a commercial shop, but as an objective. All things being equal, who wouldn't like to minimize contributions to the scrap bin, have parts come out square, on size, with no binding on assembly, or to accomplish twice rather than half with the limited shop time we have....this is what comes with experience...you can't teleport there but there are ways to accelerate things!

Any basic text will show you the basic sequence of ops to turn a cylinder, thread a cylinder or mill a flat. Beyond that, its your own ingenuity on how to tackle each part. I plan each part in my mind from start to finish, sometimes even doing progressive sketchs to keep a complex one straight. Your repertoire will increase overtime with experience and will your tooling and you can aways for ideas on a specific part.

Perhaps ,as well as starting a library of books, you should subscribe to some magazines like Model Engineer or Home Shop Machinist. These give blow by blow accounts on making parts; and that is invaluable to the beginner. I used to read every page and force myself to understand what and why the author was up to, even though i had no interest in the particular project - augmenting real experience with that virtual experience will accelerate your learning big time.
 
I'm also a novice who spends a lot of time puzzling about the sequence of operations. But in addition to the things the experts have already listed, I'll add one more. I try to do the operations that I'm most likely to mess up as early as possible. That way when I have to scrap the part, I don't have as much time invested in it.
 
dave e said:
I'm also a novice who spends a lot of time puzzling about the sequence of operations. But in addition to the things the experts have already listed, I'll add one more. I try to do the operations that I'm most likely to mess up as early as possible. That way when I have to scrap the part, I don't have as much time invested in it.

Amen to that!

For part of kickstand, this is the approach I use.

1. cut the part almost to length on the bandsaw
2. face off the and size it to what I need
3. bore the holes I need.
4. remove part and go to the mill
5. perform all milling operations
6. return to lathe and use a jig to perform the final operations
7. size to what I need
8. finish the part with sand paper

Eric
 
Whatsit:
This is a bit of an open ended question it depends on the part your work holding tools and your experience. the more you change set-ups the greater the room for error or more time taken to prevent error. plan out the part and think ahead. also experience will teach for instance i learned if I drill then thread with a die on a small part the die rips off the threaded piece so now i thread then drill. In general for small hard to hold pieces machine the part as much a possible before you cut it off from the stock it comes from.
Tin
 
Thanks everyone for your responses.From those I think I need to slow down a bit and take better notes.
I seem to get involved in making chips and get ahead of myself.

Thanks again
Kevin
 
whatsit said:
Thanks everyone for your responses.From those I think I need to slow down a bit and take better notes.
I seem to get involved in making chips and get ahead of myself.

Thanks again
Kevin

I was there not too long ago. Nothing terribly wrong with that approach either if you aren't doing this for a living-- you'll gain valuable experience when something goes awry that will help later on when you decide what order to do things in.. "well, that didn't work so well last time, let's try it this way..."'

Do try and think things through, particularly on parts that move between the mill and lathe or require multiple setups (particularly things like "how am I going to hang onto this?" and "how am I going to find and index off that feature later on?"), but I bet most of us have had an "aw, crud, now how am I going to..." moment not too long ago.

Also you can take advantage of somebody else's hard-won experience by building engines off well-described plans-- some of Elmers Engines and Senft's, for a couple examples, have instructions and explanations of how and why to do things in the order they are done as well as just what holes to put where.


Cedge said:
It's a little like the old adage "When you're only tool is a hammer, everything looks like a nail".

Sweet Steve.

Kevin, as a novice machinist the quandries of machining order for some parts are still fresh in my mind and I've frequently done what dickdastardly suggests when I've got the order wrong! I have to say it does get easier though. I just made a small component that has 4 different diameters and required partial threading - a few seconds thought before hitting the 'On' button and I'd got the sequence sorted (and it worked our right ;D)

I always find practice on scrap (i.e. previous mistakes) useful!
 
I have been bitten by the "Chuck's Horizontal Single" bug. I've downloaded all the photos and drawing I could find, they seem to be all over the place and I think I have enough to start the build. I just received my sweet little 3" cast bronze flywheels from Tiny Power today. Now I have to ask: is there any particular order of sequence for cleaning these wheels up? should I chuck them up and drill the axle shaft hole first and then proceed to the outer rim OR ? I just hate to mess up these cute little critters.
I would guess that the spokes will require a lot of hand work.
I have ordered the 2-56 taps and the few other items needed. Now I ready and excited to get started.
Thanks
Mel
 
I have a particular aversion to flywheels that "wobble" when they rotate - drives me nuts.

As a consequence, I always try to machine the flywheel rim and the center hole in one chucking if at all possible. This pretty much guarantees that wobble will be minimized.

When I've machined cast flywheels with spokes, here's the procedure I've used.

1. Remove as much casting flash as possible. Files, die filers and a Dremel are your friends.

2. Mount the flywheel for machining. There are two methods I've used.

2.1 Grip the inside of the rim with the 3jaw jaws. Use spacers so that it's possible to machine the entire outer rim without running the lathe tool into the chuck jaws.

2.2 Clamp the wheel to the faceplate with the clamps acting on the spokes - again so the entire rim is exposed for machining. Use a sacrifical plate between the wheel and the faceplate so this is possible. The wheel must be centered (this happens automatically if the 3jaw is used) as well as possible. Centering an unmachined casting is more of an averaging process than a precision operation. You'll have to decide for yourself what is "good enough".

3.0 Machine the flywheel rim, the rim edges and the hub. Drill, bore and ream the shaft hole. Now you've got a flywheel finished on one side with all the features concentric since they've been machined without remounting the wheel.

4.0 Remove the wheel and remount it in the 4jaw with the unmachined side outermost. Use your favorite method to get it running dead true. (I generally center on the shaft hole using a pump center and then check the rim with a DI.) Use a chuck spider to ensure that the machined rim is running true relative to the chuck face.

5.0 Complete the machining of the exposed rim edge and hub.

6.0 Polish and add rhinestones to suit.
 
One note on Marv's Step 2.2. If you use this approach, be careful how you crank down on the bolts, or you can crack the spokes. It may be advisable to put shims under the back of the spokes so the flywheel is bearing on those, rather than on the outer rim.

I share Marv's aversion to wobbly flywheels. My approach has been to machine the rim with the flywheel mounted on a stub mandrel in the center hole, but you'll find your favorite method.
 
I found that if you take a flat piece of glass or belt sander make the inside of the wheel flat so when you put it in the lathe the flat side to chuck I have found it helps a lot.
 
If possible I chuck on the rim ID between the spokes as Marv has already suggested.
Not only does that allow for machining of the hub, bore and rim OD in one set up, it
also places the casting in it's best possible condition of static balance.
Dynamic balancing may require a few shallow drill spots later on in the process.

Rick

 
Thanks gentlemen for the great and fast reply. I think each of you have given me some very good and necessary pointers. It's amazing how much one can learn from a forum with people like you guys willing to take the time to help. I'm sure I will be calling on you again. I try to post my progress.
Thanks again
Mel
 
This procedure takes some time & effort to begin with but it sure makes life easier for any follow on projects. Consider it if you plan to build many models.

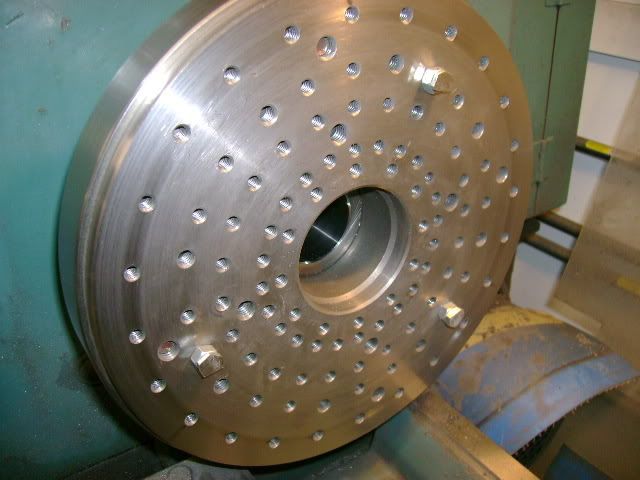
I made a plate with a series of tapped holes and fastened it to my faceplate. This plate comes in handy for many operations. I then inserted three 1/4-20 hex head bolts with a jam nut for a spacer. These were positioned so they would support the flywheel in three places. I then faced them off so they run true with the face plate.
Flywheellathework004.jpg


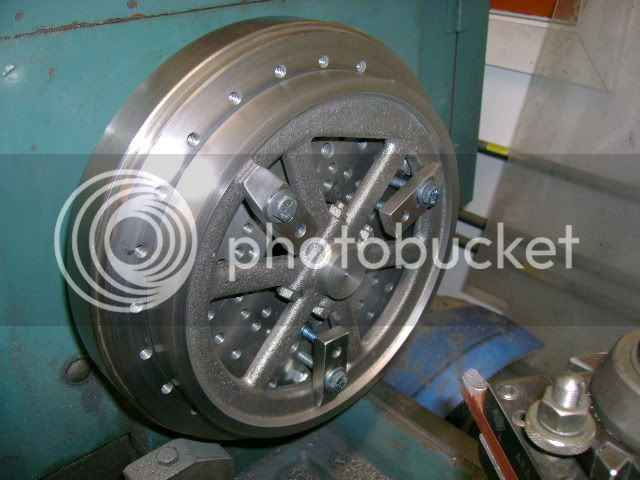
I clamped the flywheel in three places over the bolts. Indicate the O.D. of the flywheel and O.D. of the hub and compromise between the two. Now I am able to face off one side of the flywheel and hub, turn the O.D on both the flywheel & hub, chamfer the inside lip of the flywheel, and bore the I.D. all in one set up.
Flywheellathework001.jpg


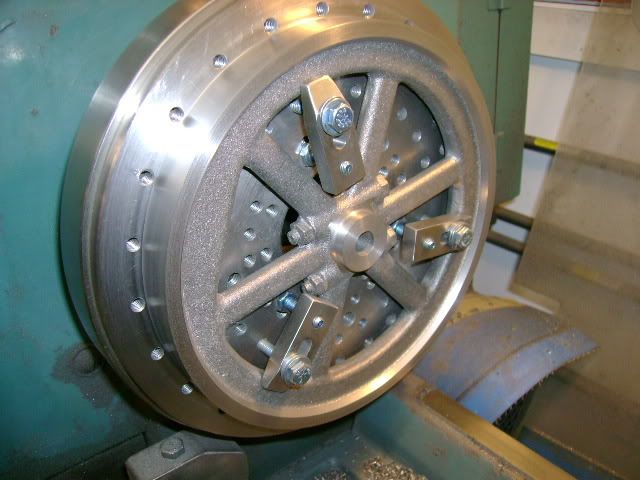
Next I remove the hex bolts and clamp the flywheel directly to the faceplate and indicate the O.D. Then machine the surfaces on that side of the flywheel.
Flywheellathework006.jpg


This plate has also been used for clamping the fixtures for the offset throws on my crankshafts. I haven't removed it from the faceplate since I built it.
 
Arv, that is great! but now I have another tool to build. Actually that is one of my favorite parts of this hobby, building the tools to support the hobby.
thanks for the great photos and idea.
One more thing Arv,
You really need to post your disk in the Tools and or Tips and Tricks every one should see it.
Mel
 
Lugnut,

Thank You for your question, I ordered flywheels from Tinypower just this morning and since I have never turned any casting before, all the answers are just what I need. By the way, the flywheel is also for "Chuck's Horizontal Single".

Again thanks for asking and to all that answered -THANK YOU-

Jim Geib
Mansfield, Oh
 
Back
Top