Head cold from Hell and maybe a Stirling engine

Home Model Engine Machinist Forum

Help Support Home Model Engine Machinist Forum:

This site may earn a commission from merchant affiliate links, including eBay, Amazon, and others.
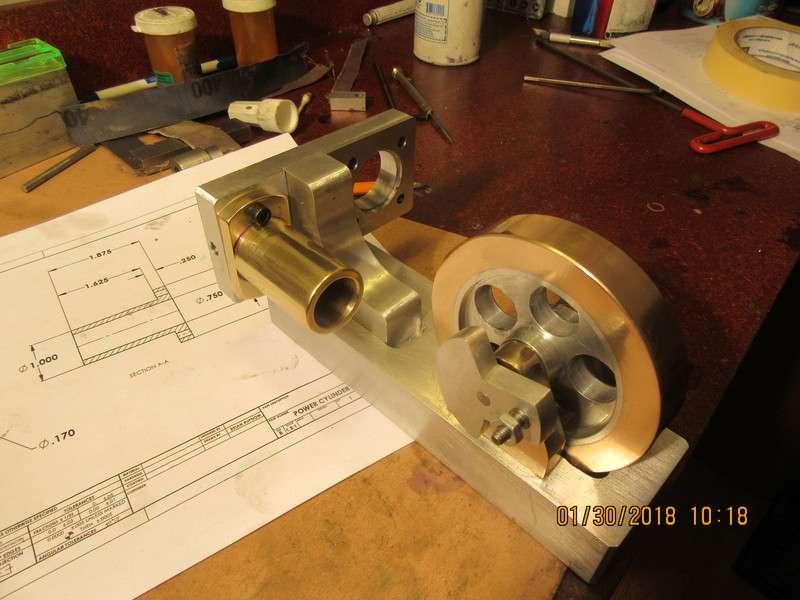
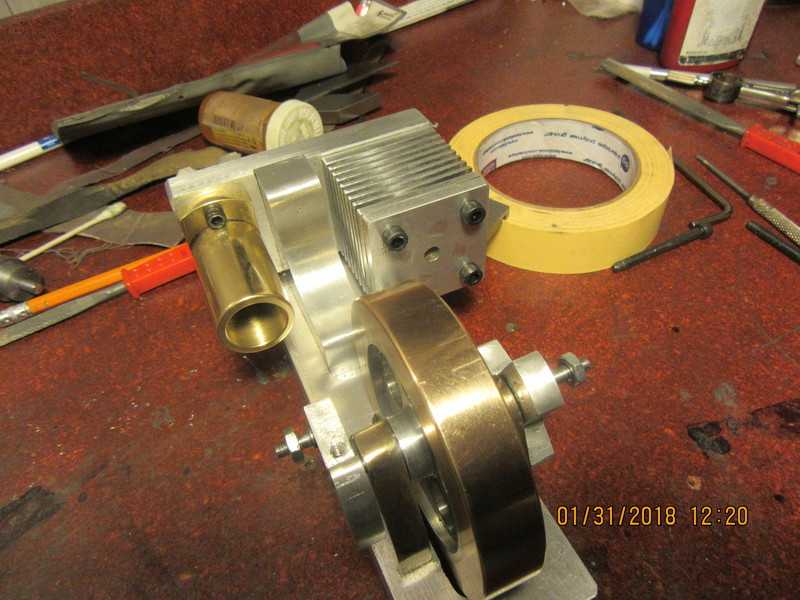
I was a bit unimpressed with how "unfreely" the flywheel spun on my engine with the bearings degreased. Then I loosened the bolts off on one of the bearing stands, and WOW!!!
[ame]https://www.youtube.com/watch?v=lUDu-TNftR0[/ame]
 
And that is the last of the shiny bits for this engine. The power cylinder is on spec., and honed internally to knock down any and all ridges. I used a 3 stone brake cylinder hone, light oil, and my variable speed electric drill to hone it with. I still have the buffs and waxes left over from my hot-rodding days, an old Eastwood polishing kit. It certainly brings brass and bronze to life with a minimum of effort. I didn't notice until after I had taken the picture that there is still some layout dye tight where the cylinder transitions into a flange.
Xdiw9O.jpg
 
I'm very pleased with the way the "cold end" cylinder turned out. The slots between the fins are .094" wide, which happens to be the width of my HSS parting off tool. I cut the slots with power cross-feed--One hand on the "disengage" lever and one hand holding a can of spray on WD40. It was a bit nerve racking, but everything went well. Tomorrow before I take the 4 jaw chuck off, I will make the square cover that attaches to one end of this part.
43xJLm.jpg
 
Thanks Shopshoe--You are the kind of person that I post for. I love it when folks step up and say hi. I know my counter shows lots of lookers, but I really like it when I hear from people watching.---Brian
 
This morning I managed to make the cover plate for the cold end cylinder closest to the flywheel. The cover and the cylinder are just held up there by faith and some pushed into place bolts, so I can take a picture. Now I have to go across town to my customer and help put on a dog and pony show for his customer.
szr5ib.jpg
 
Tomorrow should be---Ahhh---interesting. I plan on building the "hot end" displacer cylinder. Instructions say that it will work best if machined from a solid 1 1/2" square cold rolled steel bar. I bought the bar this afternoon and cut it to a length adequate to make the part, give 1/2" clearance to the chuck jaws, and 1 1/4" that is gripped in the chuck jaws. All work is to be accomplished in one "chucking" without removing and repositioning the part from the chuck. I'm not sure my machining skills are up to it. We are getting into some pretty darn thin walls and end in the finished piece. I'll let you know how it goes---
P7d3KB.jpg
 
The hot end cylinder is probably going to be the most difficult part to machine on this entire project. As a consequence, I will post a step by step set of pictures. Picture number one shows the piece of material cut to length in my bandsaw and stood on end in my milling vice to center-drill one end. Picture 2 shows it in the 4 jaw chuck of my lathe being "centered". The nose of that long rod in the tailstock chuck is seated in the center drilled hole, and my dedicated dial indicator bearing against the side of this indicator rod which allows me to dial in the 4 jaw until the center drilled mark is exactly centered in the lathe. Picture 3 shows the end of the part after three 0.010" clean-up passes were taken to square up the previously saw-cut end. there is a lot of "stick-out" from the jaws of the chuck, so only light cuts were taken.
1oI8Rv.jpg

caRL6K.jpg

7S8aWR.jpg
 
Now, with a tailstock dead center in place, I use my 0.120" wide carbide tipped cut off tool to plunge about .425" deep from the corner of the square stock, just behind what will become the 3/16" wide flange. I took a total of 3 passes side by side to allow me enough room to get a carbide tipped turning tool into the slot to begin turning operations on the rest of the length of material. The plan is to turn the o.d. of the cylinder down to a point where it is about .125" oversize from finished diameter.
AGem5S.jpg

jqvR4A.jpg
 
And here we have the full length of the cylinder plus about 3/8" more, turned down to 1 1/4" o.d.---about 1/8" oversize from the finished diameter.
RnB2RD.jpg
 
Up to this point, it has pretty straightforward machining. Nothing really exacting. Now I'm at the point where the bear shat in the buckwheat!! I have to drill and bore a hole 1 1/16" in diameter and not a hair longer than 2.00". The end thickness of this part is only 1/32" thick, and an over-length drilling is going to be really bad ju-ju. I will start with the 15/32" drill shown and work my way up in increments to 1" which is my largest Silver and Demming drill bit. Then I will bore the last 1/16" with one of my brazed carbide tools.
rhwKuS.jpg
 
We have a hole--Exactly 1.062" diameter and exactly 2.00" deep. It was a lot more difficult than I thought it was going to be. I drilled and drilled, and then I bored and bored, and then I drilled some more and--Oh, you know how it goes. I didn't want to go larger nor deeper. I ended up right on spec, but its a lot more work than just drilling a hole through. My next step will be a scary one. I have to turn the o.d. down to 1.112" diameter, leaving only a 0.025" thick wall. This will be the part that determines whether I have made a hot end cylinder today, or just saved the flange.
fcD3nR.jpg
 
We have a hot end cylinder. There is about 7 hours of work in that little sucker, but it turned out nice. After the hole was completely finished I turned down the o.d. in .005" depth of cut passes to the finished size of 1.112" diameter. When I parted it off there was a high pucker factor, and I didn't want to part it completely off in case it pulled out the end which is only 0.030" thick. I cut the last 1/4" off with my hacksaw, then dressed the remaining little stub with my belt sander.
dlMnTA.jpg

3gmCp7.jpg
 
It fits!!!--Right at the very last moment, after I had center drilled the hole locations, I remembered that I wanted to use shcs. instead of studs like it shows in the solid model. I called Brafasco, my local nut and bolt store to see if they had any #10-24 shcs. x 3" long, and they had 30 in stock.----So---I drilled the four holes undersize and tapped them. Now I have to figure out where I can buy some 3/16" Teflon for the insulator between the hot end and the frame. The Moriya plans call for asbestos sheet, but I won't be doing that. Hoping I can find a source locally.
dILIbX.jpg
 
Hi Tony--The cold is better now. One thing about being semi retired, it leaves a great deal of time to play in my shop.--and it's winter here. 30 cm of snow and -20 temperatures, so I'm not inclined to go and play outside.---Brian
 
I went out this morning and picked up a scrap of Phenolic bout 3" x 1/4" x 10 for $2 from a local supplier in Barrie to use as an insulator between the hot-end and the rest of the engine.
 
Here is an interesting shot. Due to the tight tolerances on the cold and hot ends of the displacer cylinders, it is absolutely critical that the ends of the cylinders be perfectly square to the long axis. When I made the cold end cylinder, the end facing away from the chuck was squared off in the same operation as the bore. The other end however was cut off with a parting off tool, and I never trust parting off tools to give a good square result . As suggested in the Moriya plans, I attached the cylinder to a piece of round stock that was turned for a tight fit in the bore, and squared the end of the cylinder off.
7mEEhw.jpg
 

Latest posts

Back
Top