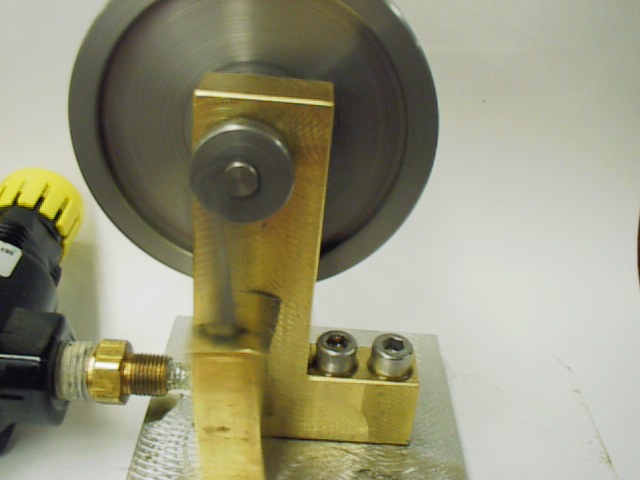
First build, a single acting oscillating steam engine, It steams!

Home Model Engine Machinist Forum

Help Support Home Model Engine Machinist Forum:

This site may earn a commission from merchant affiliate links, including eBay, Amazon, and others.

Kaleb

Senior Member
Joined
Jan 3, 2010
Messages
272
Reaction score
27
This is my first engine build, so nothing too complex or fancy, so here we go.

The cylinder starts out as a piece of copper tube, about 10mm ID.


First cut with the hacksaw.


Ending up with this


Facing in the lathe


A simple lapping tool made from a piece of dowel with some 600 grit Wet & Dry paper held on by Blu Tack.


Lapping in progress with the tool in the lathe


And finishing by hand


Filing a flat on the side of the cylinder to take the port face


Turning the piston from some aluminium rod


And center drilling to take an M3.5 tap.


The piston after cutting off and threading


The piston screwed on to it's conrod, with the cylinder on the left with an end cap sweated in, as well as a piece of brass for the port face.

More to come soon, I'll let you post your comments.
 
Hi Kaleb. That's going to be a very interesting Engine. Lots of hand crafting so far.

Wobbles are my favorite type of engine.

I can't wait to see it finished and running!

Keep up the good work! :)

-MB

 
Way to go! Adapt and do what you can with what you have. Thm:

I have made several parts from brass and copper and just soldered them.
 
Kaleb,
Looking good so far. Nicely done post with good use of photos.
Dennis
 
A first engine has got to be exciting. Since I haven't started mine yet, I'll live vicariously through yours. Thanks for having the courage. Any pictures of what the finished engine is supposed to look like or what this one is based on?

Ed
 
Very nice start. It took about 10 tries to get the piston right on my first engine. Just stay the course.
 
BigBore said:
A first engine has got to be exciting. Since I haven't started mine yet, I'll live vicariously through yours. Thanks for having the courage. Any pictures of what the finished engine is supposed to look like or what this one is based on?

Ed

Yes I do. It will bear a very slight resemblence to this one:

oscillpvrun.jpg


But it will have a brass crank disk and flywheel, and the mounting piece, also of brass will be behind the engine (flywheel side of the port face). I am going to run it on live steam from a boiler similar to the one this engine:

Steamco_STC-01.jpg
 
Good progress, Kaleb. Thanks for letting us join in on your first one!

Dean
 
Time for an update!


First trial assembly


Cutting a piece of brass for the flywheel


Facing and machining a recess


Result of machining work


Drilling hole for grub screw


and tapping


The crankshaft is made by sweating a couple of pieces of approx. 3mm brass rod (sourced as brazing rod) into a disk, also brass.


The pulley is a simple turning operation, and is threaded down the middle hole.


Another trial assembly shows how the engine will go together.


Unlike most engines of this type, I am adding an in line cylinder oiler, which starts with a piece of copper tube, the same stuff used to make the cylinder.


Machining one of the caps


Center drilling underway, the drill bit broke, so I made another cap with a bigger hole. This is the end which the oil enters the steam line through.


One of the caps sweated in.


The complete oiler.

Next I should be soldering the port face onto the cylinder, setting up the ports and making the trunnion.

 
Looking Good Kaleb,

If I can make a suggestion on the flywheel grub. If you drill on a angle where the hub meets the web you'll have less to tap and a better chance of hitting dead center in the shaft hole. The outside of the FW will be nice and clean and the screw hole will be hidden.

Tony
 
I've made quite a bit of progress since I last posted. The engine now runs on air! :big:
Here's a video:

<embed width="600" height="361" type="application/x-shockwave-flash" allowFullscreen="true" allowNetworking="all" wmode="transparent" src="http://static.photobucket.com/playe...eam/KalebsfirstscratchbuiltengineMarch2.flv">

Here are some extra pictures:


A piece of thick steel plate to make a base


Since I'm one of those people who believe compressed air is cheating, I'm making a simple pot or haycock type boiler which will operate at about 20 psi. It is made from a piece of copper pipe, capped at each end with welch plugs.


A firebox, fabricated from tin plate and spot welded


Sitting everything on the base should give an idea of what the finished steam plant should look like.

There's still a bit to do, I've still got to finish the safety valve bushing, I am using an off the shelf safety valve, to be on the safe side, and I also have to rig up the steam line with it's in line oiler.
 
Hey, has everyone lost interest in this? ::) For moderators, sorry if this is against the rules. I just don't like having no one interested in what I'm doing here.
 
Kaleb,
Congratulations on having a runner. Thm: Thm:

Something that is probably reducing the response to your thread is the large size of the photos.
They are loaded as 3072px × 2304px which generates a very large file that is slow to download and then have to be processed to something that can be displayed on the web site. I have a high speed connection and your thread takes almost 2 minutes to load. For members without high speed connections it would probably take a half hour.

If you will resize your photos to 800 x 600 maximum then they will load very fast. I use 640 x 480 except for special photos and often use 320 x 240 for routine photos in build posts.

Your computer probably has the photos cached on disk so you don't notice it with your own posts.

Gail in NM
 
Please Kaleb, what Gail said. My internet service times out every time I try to load this thread.

Thank you,

Dean
 
Hi Kaleb,

I would like to see what you are doing but I have never been able to download more than the top 25% of any of your pictures. Please heed the comments of the previous two posts.

Jack
 
Kelab,

Congratulations on building your first running engine... I was able to watch your video, good job!
Are you planning to hydro test the boiler? Also, double check your safety valve on air, before putting it into service. A couple more questions: Will you have a pressure gauge & water glass, and what is your plan for the burner?

Paul
 
A runner is always a good thing.

Like others have said it often becomes the speed that a page loads that effects response.

I'm just a tad above dial-up, topping out at around 20K for download speed. Can spend days making a part but if that page dont load in 10 seconds . . .

I enjoy watching the videos, but those that use photobucket I do not get to view them as intended. The you-tube method of presenting the video allows for a replay that doesnt require re-downloading the file.

I try to resize my photos to 640 X 480 and use you-tube for video.

Even as I write this reply and goof off for 10 minutes your existing photos havent yet loaded.

Not bashing your efforts, cut your photos down a bit in size and those of us with less than stellar connections can share in your hard won achievements.

Robert
 
Kaleb,

Congrats on a runner. :bow:

th_wwp but we gotta be able to download them. I am on wireless broadband and at some times of the day it's as slow as dial up. Both me and my computer surrender. Please reduce your picture file sizes then we can all fully enjoy your work.

Best Regards
Bob
 
Well, it looks like they are "scaled" now, but they still contain the full size image in them. Still 3070 x 2300. They have to be "RE sized", not "scaled". Sorry for the hard time you're having with this.
 
OK, I've reposted all my images. Feel free to have a look anytime! :D
 

Latest posts

Back
Top