


rodw
Well-Known Member
- Joined
- Dec 2, 2012
- Messages
- 1,146
- Reaction score
- 340
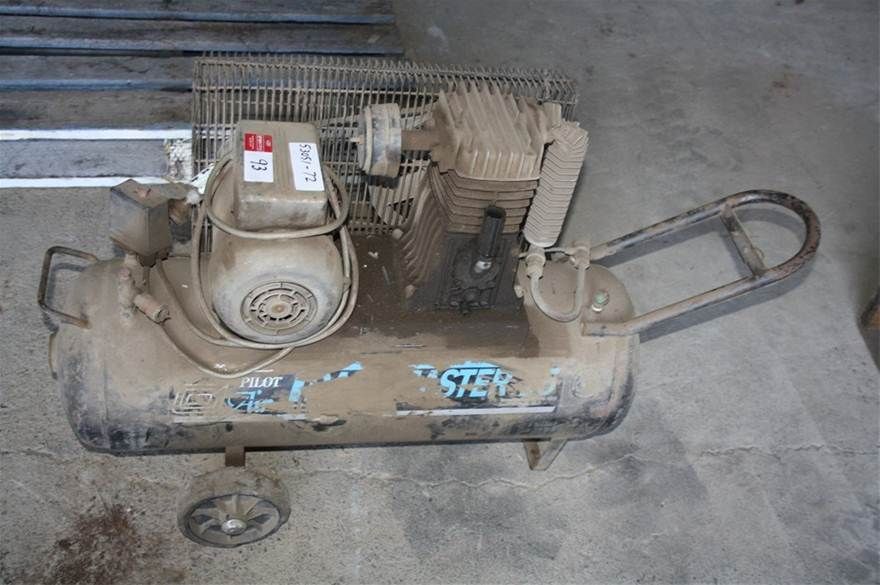
Well, I have been meaning to buy a belt driven compressor for a while and I spied this one on Grays Online Auctions recently and because it was not far from home to pick up, I thought I would take a punt on it sight unseen based on this photo that was in the listing
Pilot is a very good Aussie brand and this compressor retails for around AUD $1,000 and I knew you could still get parts for them locally otherwise I would not have bothered. This mode has only just been discontinued and you can still buy it.
I figured that either the motor or the pump was seized and hoped that it would not be both.
Anyway, I was quite surprised that I won it for well under my maximum bid so I allocated a day to collect it, clean it up and sort out what parts I needed.
When I got it home, I was a bit disappointed to see that the motor would only just turn the thing over so I pulled it off and to my surprise the motor ran like a train with no load. Anyway, I put it aside and tackled the first stage cleanup with my Stihl Pressure washer and copies quantities of degreaser, I got it to this stage and saw that it was built in 1995.
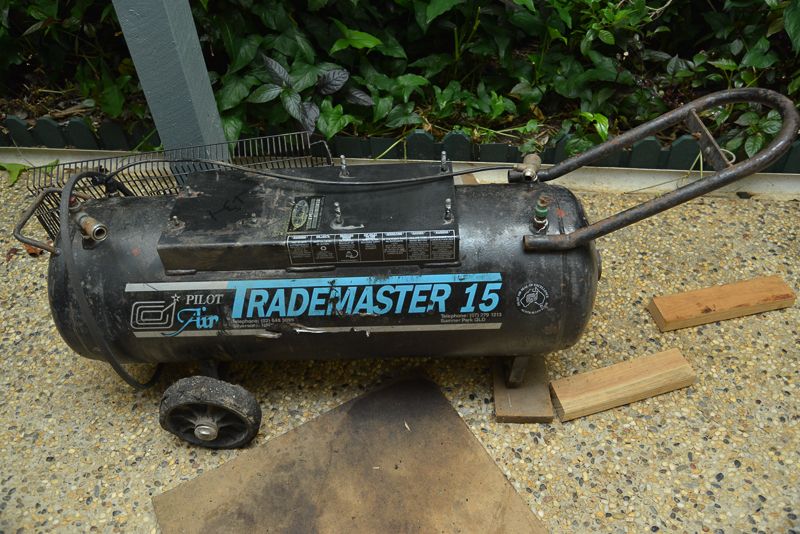
I was quite surprised that there was still air (and a lot of sludge) in the tank. I did not see any evidence of shale or rust though.
I rang an electric motor repair place to see if it was worth getting the motor repaired and they said they hated to see old motors like this Brook Crompton Betts thrown out as you simply could not buy motors of that quality anywhere today (even if you bought the same brand). Anyway, they talked me into bringing it in for an assessment and said they would test it and quote on repairs.
So in the afternoon, I headed off to Pilot and picked up an air filter, a new oil filler/breather to replace the broken one and a set of head gaskets so I could see what was going on inside. I also decided I would get an air pressure gauge so I could check that the pressure switch was cutting out at a safe pressure. All up I spent $100 or so on parts.
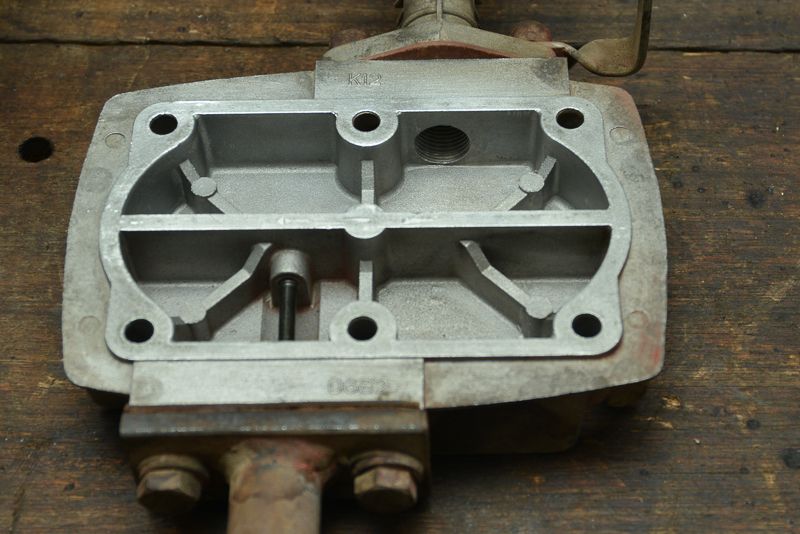
The pump is a two cylinder Italian made one and the valves are riveted to a plate that is sandwiched between the cylinder and the head. The guy at Pilot reckoned that the rings probably would not need replacing and said if it was pumping air, there was no need to worry about buying a new set of valves which he had in stock at a price of $115. Off I went to drop the motor off to be assessed for repair. I was not too concerned about the motor being shot as I know I can grab a new Chinese on for $200 that would do the job for home use but if the repair not too bad I will stick to the original. I asked the guy what oil to use and he said just use 15W/40 diesel engine oil. I had some of this on hand so I changed the oil once I got home.
We went away for the weekend but after we got home I pulled the head off to see what was going on. I am pleased I did as it was very dirty around the valves and it took a long time to clean it all up.
The head
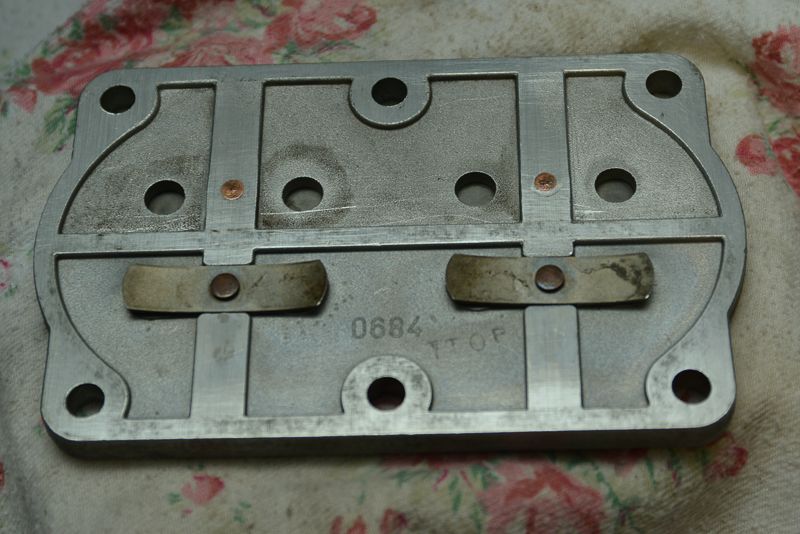
The valve plate which I stamped and scribed so I would not forget which way is up
And the pistons
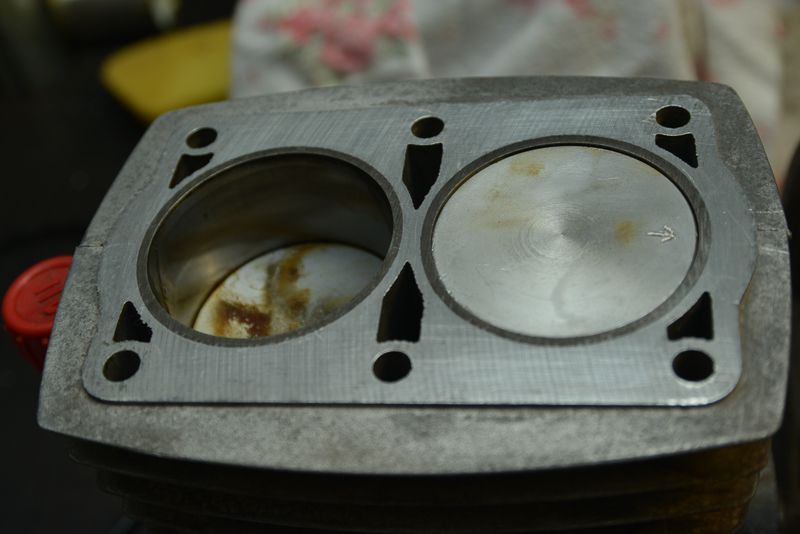
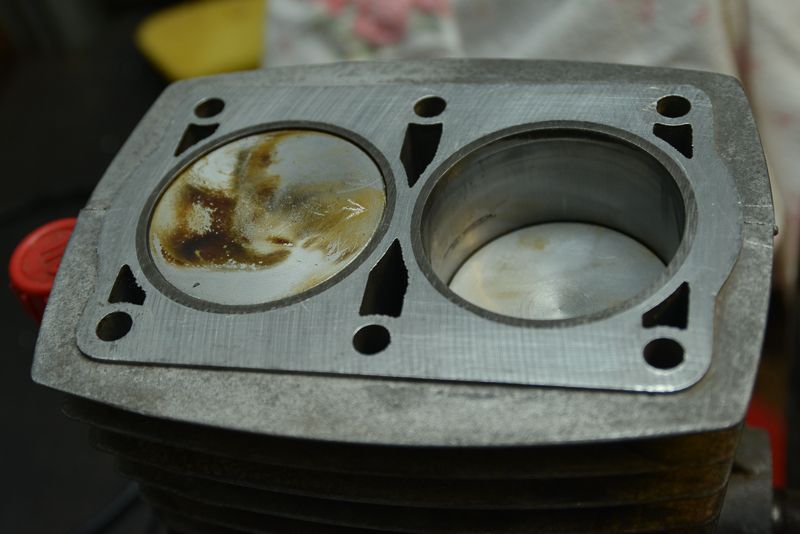
One piston has quite a scorched look and I found this hard to clean off and I don't think I will worry too much about it as I did not want to get too much dirt down onto the rings.
By the look of it, somebody had been in here before me as the arrows look to be engraved by the same hand that had engraved the belt code on the motor housing. I figured this is not a bad thing as it meant that the rings are not 20 years old! There is heaps of compression. I turned the thing over for a while and noticed there was a thin film of oil on one cylinder wall but none getting last the rings on the other one. Not ideal but I don't think it is worth stripping it down further at this stage to fix this. If it does need reboring, I think I will be able to swing the cylinder on my 13" lathe and do it myself but for now I don't want the expense of new pistons, rings and bearings unless I really have to.
The reed valves seem to be fine now they are cleaned up.
The next stage is to strip the fittings off the tank and clean out the sludge. and put the pump back together. The tank will probably get a coat of paint.
Anyway, there did not seem to be much about compressors on this site so I thought I would document this project so you can see what a compressor looks like on the inside as I had never seen one opened up either. Sorry, I did not take any photos before I cleaned it up.
For the record, this has a 15 cubic foot a minute displacement pump with free air delivery of 243 litres per minute (8.3 cubic foot) and a 58 litre air tank. The motor is a 2 kW single phase which draws 12.5 amps so it officially needs a 15 amp power point but of course the lead on it has a 10 amp plug on it.
I can't wait to get it up and running so I can retire the cr@ppy $150 noisy as anything direct drive compressor that only delivers half the air of this unit.
Pilot is a very good Aussie brand and this compressor retails for around AUD $1,000 and I knew you could still get parts for them locally otherwise I would not have bothered. This mode has only just been discontinued and you can still buy it.
I figured that either the motor or the pump was seized and hoped that it would not be both.
Anyway, I was quite surprised that I won it for well under my maximum bid so I allocated a day to collect it, clean it up and sort out what parts I needed.
When I got it home, I was a bit disappointed to see that the motor would only just turn the thing over so I pulled it off and to my surprise the motor ran like a train with no load. Anyway, I put it aside and tackled the first stage cleanup with my Stihl Pressure washer and copies quantities of degreaser, I got it to this stage and saw that it was built in 1995.

I was quite surprised that there was still air (and a lot of sludge) in the tank. I did not see any evidence of shale or rust though.
I rang an electric motor repair place to see if it was worth getting the motor repaired and they said they hated to see old motors like this Brook Crompton Betts thrown out as you simply could not buy motors of that quality anywhere today (even if you bought the same brand). Anyway, they talked me into bringing it in for an assessment and said they would test it and quote on repairs.
So in the afternoon, I headed off to Pilot and picked up an air filter, a new oil filler/breather to replace the broken one and a set of head gaskets so I could see what was going on inside. I also decided I would get an air pressure gauge so I could check that the pressure switch was cutting out at a safe pressure. All up I spent $100 or so on parts.
The pump is a two cylinder Italian made one and the valves are riveted to a plate that is sandwiched between the cylinder and the head. The guy at Pilot reckoned that the rings probably would not need replacing and said if it was pumping air, there was no need to worry about buying a new set of valves which he had in stock at a price of $115. Off I went to drop the motor off to be assessed for repair. I was not too concerned about the motor being shot as I know I can grab a new Chinese on for $200 that would do the job for home use but if the repair not too bad I will stick to the original. I asked the guy what oil to use and he said just use 15W/40 diesel engine oil. I had some of this on hand so I changed the oil once I got home.
We went away for the weekend but after we got home I pulled the head off to see what was going on. I am pleased I did as it was very dirty around the valves and it took a long time to clean it all up.
The head

The valve plate which I stamped and scribed so I would not forget which way is up

And the pistons


One piston has quite a scorched look and I found this hard to clean off and I don't think I will worry too much about it as I did not want to get too much dirt down onto the rings.
By the look of it, somebody had been in here before me as the arrows look to be engraved by the same hand that had engraved the belt code on the motor housing. I figured this is not a bad thing as it meant that the rings are not 20 years old! There is heaps of compression. I turned the thing over for a while and noticed there was a thin film of oil on one cylinder wall but none getting last the rings on the other one. Not ideal but I don't think it is worth stripping it down further at this stage to fix this. If it does need reboring, I think I will be able to swing the cylinder on my 13" lathe and do it myself but for now I don't want the expense of new pistons, rings and bearings unless I really have to.
The reed valves seem to be fine now they are cleaned up.
The next stage is to strip the fittings off the tank and clean out the sludge. and put the pump back together. The tank will probably get a coat of paint.
Anyway, there did not seem to be much about compressors on this site so I thought I would document this project so you can see what a compressor looks like on the inside as I had never seen one opened up either. Sorry, I did not take any photos before I cleaned it up.
For the record, this has a 15 cubic foot a minute displacement pump with free air delivery of 243 litres per minute (8.3 cubic foot) and a 58 litre air tank. The motor is a 2 kW single phase which draws 12.5 amps so it officially needs a 15 amp power point but of course the lead on it has a 10 amp plug on it.
I can't wait to get it up and running so I can retire the cr@ppy $150 noisy as anything direct drive compressor that only delivers half the air of this unit.


")