Coaxial Indicators are Great!

Home Model Engine Machinist Forum

Help Support Home Model Engine Machinist Forum:

This site may earn a commission from merchant affiliate links, including eBay, Amazon, and others.

BobWarfield

Well-Known Member
Joined
Dec 27, 2007
Messages
1,151
Reaction score
1
I got a knock-off of the Blake Coaxial Indicator from Shars and got a chance to try it out today. Man, what a cool gadget!

Here it is in action as I center the spindle over that hole so I can use my boring head to make a shoulder on the hole:

P1010262.JPG


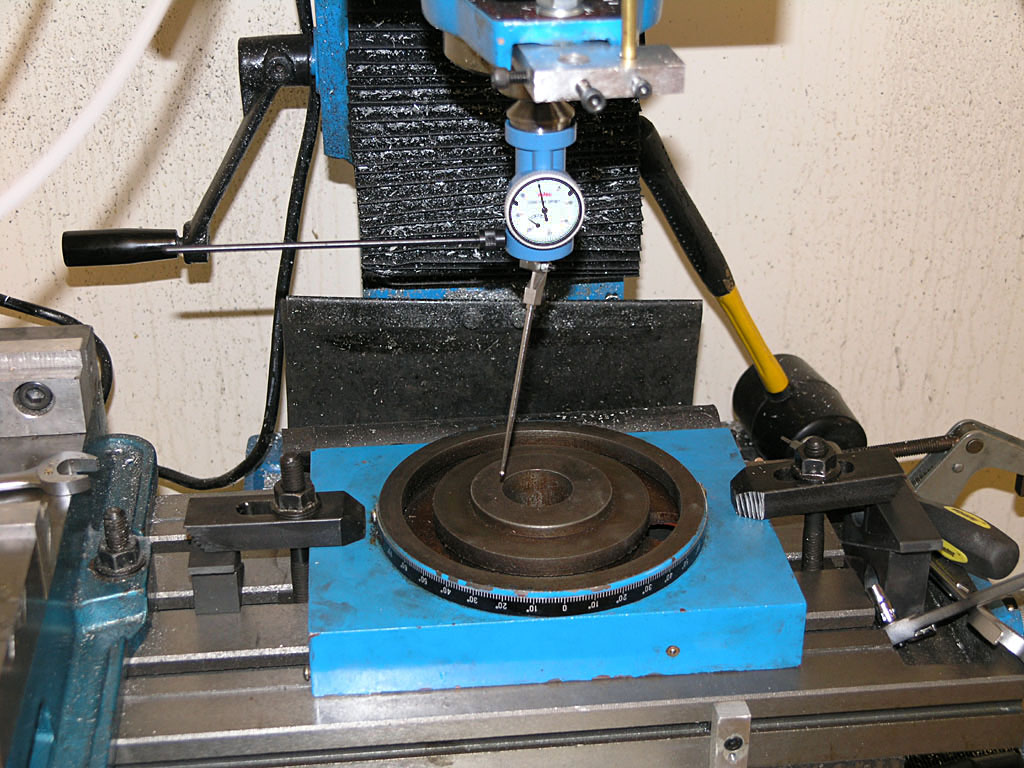
If you've never tried one, they work like this. Picture that long feeler as being sort of like a very exagerated finger from a dial test indicator. It goes against the inside of the hole, or there are curved feelers included for the outside of a round boss. You turn on the spindle at the lowest rpm, say 100rpm, and hold the horizontal rod. This keeps the indicator facing your way while the feeler sweeps around the circumference of the feature you want to center on. As the feeler sweeps around, the needle will "kick" because the spindle axis is not centered. Now adjust the X and Y axis handwheels until the needle kicks as little as possible. That's all there is to it, you are done very quickly. What a nice gadget!

Adjust the axes one at a time and don't even think much about what's needed. Simply turn the wheel and observe whether the needle kicks more or less. Turn it in the direction that kicks less. When you've minimized the kick on one axis, do the other. I circled back a second time around and got to almost no kick at all.

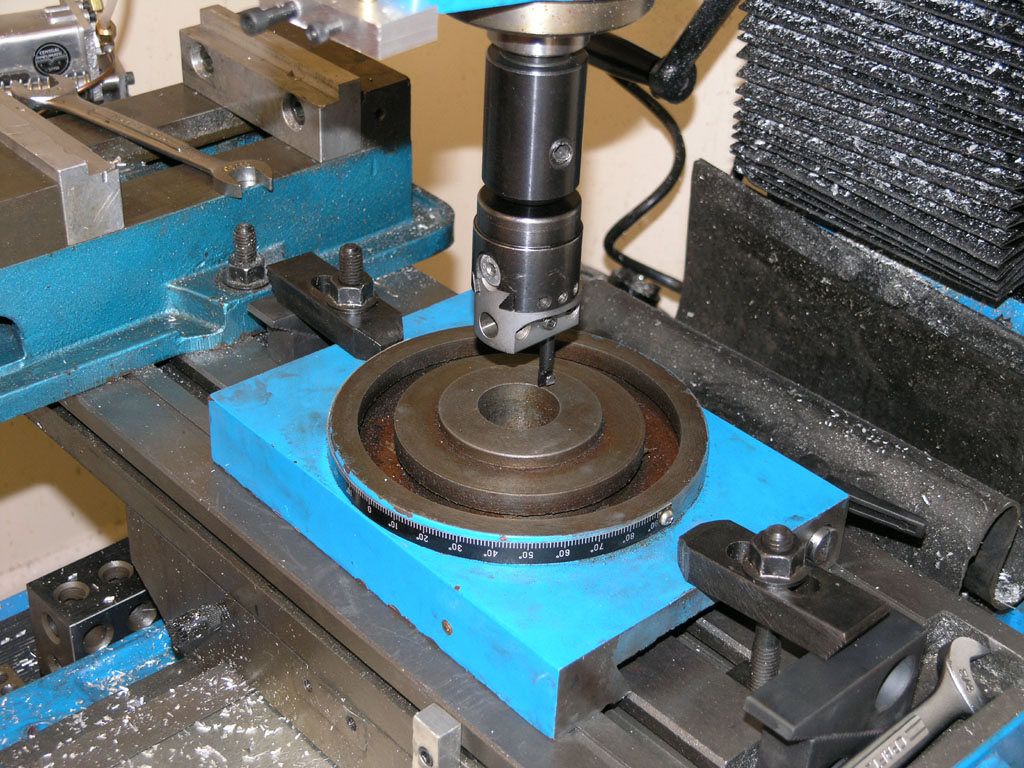
I did not set up the Indicol and DTI to check the result as I was in a hurry, but visually, after I used the boring head to make the shoulder, it looked spot on.

It tool longer to stick the Blake in the R8 collet than it did to adjust the X and Y axes, or so it seemed. Apparently they can also be used to dial in a 4-jaw chuck. I'm going to love having this little gadget around I think!

 
Bob your right they are very handy and have always been a time saver for me. I bought my first one from Enco about 5 years ago but dropped it last spring. I finally ordered a replacement from Shars in last summer.
 
I have one but seldom use it on the mill/drill because of the headroom it requires.

However, where it is useful (to me) is in the lathe. It's a great tool for realigning the tailstock.
 
mklotz said:
I have one but seldom use it on the mill/drill because of the headroom it requires.

However, where it is useful (to me) is in the lathe. It's a great tool for realigning the tailstock.

Fortunately, I've got headroom on the IH. In fact, the setup shown above required no change when I swapped in my boring head:

P1010263.JPG


It will be particularly nice when I get done with my CNC conversion because I can just command the Z-axis to move to a height that's perfect for the coax.

Marv, was thinking about using the coax to reset the tailstock to zero after tapering. Do you have a procedure to use a DRI in a QCTP holder and perhaps a DRO to set the tailstock properly to do the taper in the first place? Or do you prefer the sine bar method?

Best,

BW
 
I don't offset the TS to make tapers. I made a fitting so I can mount the boring head in the TS and put a ball center in that. Nevertheless, the coax is nice to check the TS after a crash - not that I've ever had a crash. :) - or when helping to set up a lathe.
 
OK, I have to tell my Blake co-ax story...
I had a genuine Blake Co-ax once...bought it on ebay, for a pretty good price, after looking & bidding a lot. I always thought it would be a good tool. It was advertised as "like new". Headed out to the mill the minute I got it unwrapped, chucked it up, & after about 1 minute, it was obvious the shaft was bent...the whole body gyrated like a hula girl... :-[ I emailed the seller, & was told, in succession, that it couldn't be damaged, he bought it from the co. he worked for, & it was new, then that I must have bent it, then that he didn't know how it got bent. Obviously, it had been crashed into a vise...I filed a claim w/ebay, & was handed off to Paypal, which I had used to pay for it. It took about 2 months, I had to send it to the Blake factory in California to be checked out, & they verified that the shaft was bent. According to the ser. #, they originally sold it to MSC. I don't know how they twisted his arm, but the dude finally took it back, Paypal credited my account for the full amount, & I've never seen him sell anything under that name since. However, I've been afraid to bid on another Blake, for fear I'll get the same one from him under another name... :p I thought just the other day about asking on here if a co-ax indicator was worth having, I'm glad to see this thread. I never got to use that one...Maybe I'll try one of the Enco clones, they have them for a pretty good price...
My one & only bad Ebay experience, it was Paypal that saved my bacon, if I'd sent him a check, I'd have been up the proverbial creek...
The people at the Blake factory, BTW, were very good to deal with, not judgmental, they just checked it out & told me the results.
Ron in CO...
 
Ron, I can't say for sure yet just how accurate my Shars Coax is, but I did take one measurement. I used it extensively in a project to modify my mill's Z-axis mounting. RF-45's have a sloppy carriage to leadscrew nut mount that is easily fixed up by making a slightly different bushing:

P1010272.JPG


That's the original bushing on the left. It just sits in the saddle with a loose fit. The new bushing on the right pinches the bracket against the saddle by bearing on the shoulder as you tighten the mounting bolt.

I used the coax for a couple of the aspects of this project, but one that was easy to measure is there is a counterbore in that bushing for the socket head's cap. That counterbore is withing 1.5 thousands of the bolt's bore. That's not fabulous precision, but considering I spent all of about half a minute on it and used a Silver and Deming bit to make the bore, I reckon it came out fine.

At some point I'll try to measure the ultimate performance of the indicator.
 
I think we discussed these a short time ago, and some guys felt that the accuracy wasn't there. I've had nothing but unqualified success, have used mine probably 1,000 times, and it has never failed me. Bob, if you run out of "Z", you can cut, bend or otherwise manipulate the feelers and it will still work well. For example, I needed a very short OD feeler, so I took one of the short, straight ID feelers, heated the shank, and gave it a pretty sharp bend to turn it into a stubby OD feeler.

This worked so well I ended up buying a wrecked co-ax off eBay just for the feelers, so now I have two sets.

If the object (bore or solid) is out of round, it will be indicated by the fact that the needle will never go completely still... but if you MINIMIZE the pulsation, you are as close to center as possible. With a ground solid, you can almost freeze the needle. I am convinced the accuracy is inherent in the design. My cheap Sargon DRO on my mill goes to 0.0005", no better, but I can manipulate the table such that the co-ax goes into and out of a dead-center indication without rolling the 0.0005" digits over; and it is repeatable. This implies to me that it is AT LEAST good to 0.0005" if not better.

Enjoy the tool, Bob. I also got my first Shars order yesterday; nice stuff at a good price. I got one of those sets of 1-2-3 blocks with NO HOLES... they are perfect. I was able to wring them like Jo-blocks. I look forward to using them and not having the threaded holes fill up with swarf. I also picked up one of those sets of ultra-thin parallels, the 1/16" jobs. My best Mitutoyo mike shows a variation of ZERO across a pair chosen at random.
 
I have two Blake's and the one bad thing about them is the body is made out of magnesium. If you don't use them for a long time, a long time depend on the moisture conditions in your shop , they can corode up and not move. Why they used magnesium instead of steel or aluminum is a unknown algorithm of the machine world.
 
The designers probably thought the lower mass of magnesium would increase the accuracy?

BTW, that reminds me. I did have to make one tweak on my Shars Coax. The nut and bolt that hold the feel hub onto the rocker arm were not tight and couldn't be made tight. That meant the friction fit of the feeler was too loose and it wasn't moving the indicator very far before it slapped. I stuck a new nut and bolt on, tightened them appropriately, and it has worked great.

Cheers,

BW
 
Time to get someone off my back...or at least remove some weight.

This thread is about making some adjustable clamps and rods. Primarily for holding indicators and the like. My first pressing need (aside from the aforementioned back problem) is to be able to do a better job of tramming my mini-mill. Secondly...to mount an indicator in various positions when mounting a vise or rotary table. Third...of course...to verify parts as they are being made.

As many of you know...I'm not just new to this hobby...I'm new to machining. Hopefully this thread will provide some help to others like me. I can only hope the more knowledgeable ones will provide help, advice, and assistance (and I bet they do.)

To make this thread a bit more worthwhile...I hope to include some examples of using these tools. In particular...the aforementioned tramming and mounting.

I've been confused by the terminology used for the indicators. So far it seems an 'indicator' is a measuring device with a plunger that has various tips. I have no idea why there are so many different types of tips or how/when to use them. And then a 'dial test indicator' seems to be a miniature version but instead of a plunger there is a little arm that moves just a little side to side. This tool seems to be more about checking squareness or finding centers. I say all that in hopes of some confirmation or correction.

In any case...this is what I'm envisioning...

Aluminum blocks, 1/2" square and maybe 1" long. Two 3/8" holes along the 1" axis but 90 degrees to each other. A set screw on each end. A set of 3 or 4 different length aluminum 3/8" rods that can be inserted into the 3/8" holes and held by the set screws. A couple of 1" rods that can act as connectors or wrists to two blocks.

Simple? An obvious issue to me are the set screws. Over time they'll ruin the rods. But I may not care (at least initially) because usage should be low.

Questions...

What else is as, or nearly as, simple/easy?
Why not aluminum rods? I'm thinking flex shouldn't be an issue.
Aluminum blocks and steel for the rods? The rods should only need the ends faced and chamfered...but then there's rust.
Aluminum is more readily available and easy for the novice (me again!).
Maybe the blocks can be a bit longer and instead of set screws...slot the ends and use a socket head cap screw to hand tighten? A flat head would not pose an interference issue but requires an allen wrench.

And gee...if I'm doing this...maybe some proper drawings would be good. What would anyone suggest as a freebie drawing software?

Okay...so let's see where this goes. And remember...this is all about my back :big:.

Drat. I just realized that if I'm going to make a set of blocks...a vise stop might be handy. Don't I need to tram the mill to make the stop to make the blocks to tram the mill? Oh my poor back. :big: (And don't get me started with squaring the vise.)
 
Back
Top