
You are using an out of date browser. It may not display this or other websites correctly.
You should upgrade or use an alternative browser.
You should upgrade or use an alternative browser.
Bazmak diary of a sieg SX 2 bench mill
- Thread starter bazmak
- Start date


Help Support Home Model Engine Machinist Forum:
This site may earn a commission from merchant affiliate
links, including eBay, Amazon, and others.
- Joined
- Dec 12, 2012
- Messages
- 2,220
- Reaction score
- 1,285
Yes i am hoping to fit DRO at some stage,there is not much available in this neck of the woods.I would hope to fit scales and remote digital
readout box,if i can find an economical kit somewhere out there.I would also like to fit power feed to axis.I local supplier has one for $240,but i think it fits
the 400mm long table.I have a 460mm lg table so the new leadscrew is
probably too short.Dont know whats involved in modding my existing
leadscrewe.Have asked the question but no reply yet.Anyone out there have any thoughts.???
Just throwing it out there if you haven't seen it yet, but worth looking at TouchDRO.
http://www.yuriystoys.com/p/android-dro.html
The app is free and the developer is a member here.
If you don't have an Android tablet, even a cheap older(tho OS 4.0 or newer) is capable of running the app as it isn't power hungry. I use it on a Nexus7.
An Arduino controller and some scales from Hare&Forbes and you're set.
Last edited:
I also use TouchDRO on both my mill and lathe, and just frequently added tachometers to both. The tachs also run through TouchDRO and allow it to do cool things like calculate chip load. I'm extremely happy with it and can't recommend it enough. Also, what other DRO do you know of which can play music, movies, and allow you to browse the internet?
I used a car power seat actuator, a speed control, and a couple switches to make my mill's power feed. All the parts were available on Amazon. It works quite well and I'm very happy with it, I wrote it up here: http://benchtopmachineshop.blogspot.com/2014/06/mill-power-feed.html
I used a car power seat actuator, a speed control, and a couple switches to make my mill's power feed. All the parts were available on Amazon. It works quite well and I'm very happy with it, I wrote it up here: http://benchtopmachineshop.blogspot.com/2014/06/mill-power-feed.html
- Joined
- Dec 12, 2012
- Messages
- 2,220
- Reaction score
- 1,285
I asked the question about increasing the Z axis in questions and answers,but i was confident that there would be no problems so went ahead
I skimmed a a piece of HRS 3"x1"x6" lg and drilled to suit the column base
Fitted new HS cap hd screws.Trammed the head to 1/2 thou on a 6" dia faceply
and about 2 thou over the table length.Took some cuts with no discernable
flex or chatter.I also removed the silly rubber doorstop at the top of the column
I have now gained approx 40mm of travel for little time and cost and no permanent changes to the mill.Time will tell. I also made a 2min video that would be of interest but cannot upload it to photobucket.I have put it on youtube.How do i provide a link so you guys can watch it ??? Reg ards barry


I skimmed a a piece of HRS 3"x1"x6" lg and drilled to suit the column base
Fitted new HS cap hd screws.Trammed the head to 1/2 thou on a 6" dia faceply
and about 2 thou over the table length.Took some cuts with no discernable
flex or chatter.I also removed the silly rubber doorstop at the top of the column
I have now gained approx 40mm of travel for little time and cost and no permanent changes to the mill.Time will tell. I also made a 2min video that would be of interest but cannot upload it to photobucket.I have put it on youtube.How do i provide a link so you guys can watch it ??? Reg
 ards barry


- Joined
- Dec 12, 2012
- Messages
- 2,220
- Reaction score
- 1,285
I asked the question about increasing the Z axis in questions and answers,but i was confident that there would be no problems so went ahead
I skimmed a a piece of HRS 3"x1"x6" lg and drilled to suit the column base
Fitted new HS cap hd screws.Trammed the head to 1/2 thou on a 6" dia faceply
and about 2 thou over the table length.Took some cuts with no discernable
flex or chatter.I also removed the silly rubber doorstop at the top of the column
I have now gained approx 40mm of travel for little time and cost and no permanent changes to the mill.Time will tell. I also made a 2min video that would be of interest but cannot upload it to photobucket.I have put it on youtube.How do i provide a link so you guys can watch it ??? Reg
ards barry
Cogsy
Well-Known Member
All you need to do for Youtube is copy and paste the address of the video (http....etc) into a post and it will auto embed.
- Joined
- Dec 12, 2012
- Messages
- 2,220
- Reaction score
- 1,285
Thanks cogsey here goeshttp://youtu.be/WVtG-TQucQ4
- Joined
- Dec 12, 2012
- Messages
- 2,220
- Reaction score
- 1,285
- Joined
- Dec 12, 2012
- Messages
- 2,220
- Reaction score
- 1,285
The above video gives an idea of the capabilities of this mill on mild steel
I know the majority of you are more into aluminium which is far easier
and i have no experience of the swivel column and gears of the sx2 so
how does this compare ?. your comments would be most gratefully received
As regards the 1" thick packer,although i have no need or intension to. How high could we go for a specific purpose ??. Knowing what i now know i would suggest. 2 plates 1" thick x 4"x7" lg. Open up the 4 fixing holes to M10 and bolt 1 plt to the base with HS cap screws and 1 plt to the column.The two plts then could be bolted with 8 no M8 screws around the outer edges.This would give
a bigger footprint and stiffer bolted connection with a height increase of a nom 2 1/2" Just a thought only time will tell
Swifty
Well-Known Member
I can't get into the video, it tells me it's private. You may have to do something else to enable others to view.
Paul.
Paul.
- Joined
- Dec 12, 2012
- Messages
- 2,220
- Reaction score
- 1,285
- Joined
- Dec 12, 2012
- Messages
- 2,220
- Reaction score
- 1,285
Thanks swifty,is this any better.Dont know if i have got the hang of it yethttp://youtu.be/WVtG-TQucQ4
- Joined
- Dec 12, 2012
- Messages
- 2,220
- Reaction score
- 1,285
[ame]https://www.youtube.com/watch?v=WVtG-TQucQ4&feature=youtu.be[/ame]
Is that any better. Once you have the vid displaying or playing on youtube, just copy the URL displayed at the top in your browser and post into this page, it will automatically convert things for you. Don't try to use the url given in youtube itself.
Anyway, back to your mods.
I just hope my new machine will work as well as yours after I convert it to CNC, but of course, I will be using much smaller cutters.
I do have a larger mill in my shop, and can do much larger jobs on it, but even though I have 14" of throat available, once you get say the RT with a chuck on, things can get very tight for swinging around a largish cutter.
I worked a few things out and found that by swapping to spindle collets and getting rid of the long ER collet holder, I had gained over 2" in workable height, and the cutters were a lot more rigid. If I was starting out now, I wouldn't have bought the ER setup at all and would have gone for the spindle collets straight away as there is very little difference in cost, even having to buy both imperial and metric R8 collets.
If I could make a suggestion, either make or buy a cheap set of flycutters. If you grind the tips of the cutters into a quarter rad you will find you would be able to take off that 10 thou cut and end up with a mirror finish. I take up to 100 thou (2.5mm) off on brass or ali and you can see your face in the surface finish, half that for ferrous. But of course, much smaller cuts on your machine, but I think you will appreciate the difference.
Anyway, keep up the great work, and hopefully I might pick up a few tips for when I start mine.
From experience, the first thing for you to go for is a DRO setup. It really does make machining a lot more enjoyable, you can forget about backlash in your leadscrews as they measure actual table movement, but please, if you can, save your pennies and go for a better system than the scale type. I started with them many years ago and after struggling with them for a fair while, and buying replacement scales, I could have bought a glass DRO set a couple of times over.
Your next mod should be power feed, especially on the X axis, I don't know if I am lucky or unlucky because I had to fit power feeds all round, otherwise I would have had to give up machining because of injury etc, but having them really does make taking a cut more enjoyable, you can concentrate more on keeping the cutting area clean and getting a bit of lube on there without having to worry about an interupted cut, and again, your surface finishes really improve.
John
Last edited:
- Joined
- Dec 12, 2012
- Messages
- 2,220
- Reaction score
- 1,285
Many thanks for your help and advice John.I have a flycutter,do you mean to use HSS cutters? or RCT or even brased carbide lathe tools.Yes i am thinking of power feed,a local supplier has one for $240 but it includes a new leadscrew and i have the longer table,not sure if it will fit.I also would like to fit DROs but dont knpow much about them and local supply of anything in Adelaide is primitive.Thanks for explaining about the video and youtube.It took 1 1/2 hrs
to upload a 2min video so i dont think i will be doing it on a regular basis
to upload a 2min video so i dont think i will be doing it on a regular basis
- Joined
- Dec 12, 2012
- Messages
- 2,220
- Reaction score
- 1,285
[ame]https://www.youtube.com/watch?v=WVtG-TQucQ4&feature=youtu.be[/ame]
That is a problem I think you have with uploading. I have a very fast fibre line and almost anything uploads at 20mb so it only takes a couple of minutes, but anyway, you now know how to do it.
I was on about the HSS square toolbits, sorry this is very scrappy, but I have just done a quickie C-o-C for you. The shaded area at the bottom is the end on shape you should end up with, and to resharpen, just rub a slip along the front face.
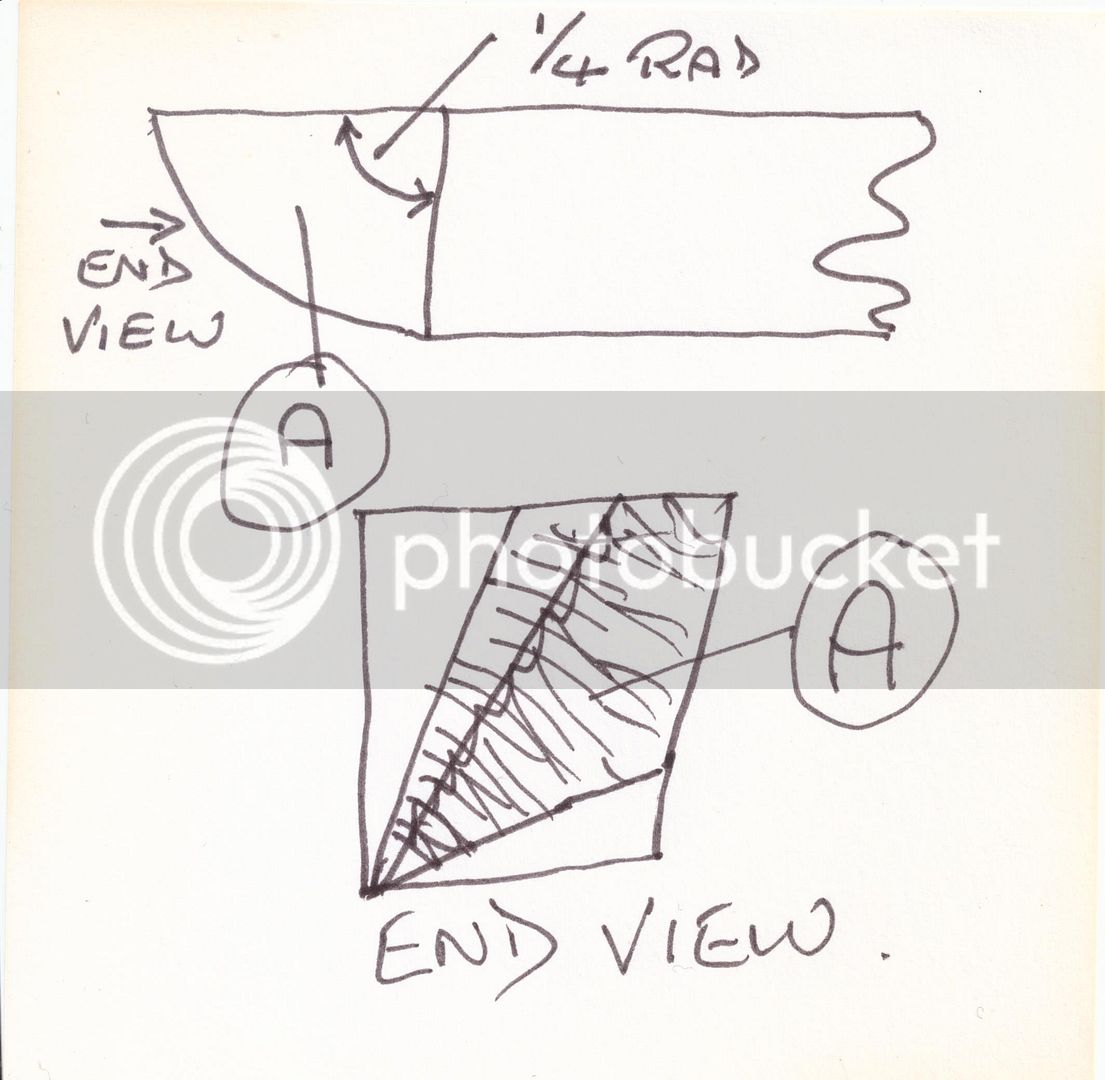
I hope you can understand it.
John
I was on about the HSS square toolbits, sorry this is very scrappy, but I have just done a quickie C-o-C for you. The shaded area at the bottom is the end on shape you should end up with, and to resharpen, just rub a slip along the front face.
I hope you can understand it.
John
Just to show you that the shape does work, here is a slowed down vid of me cutting a fair depth with the flycutter. It slows down even more half way through.
I think it is about 2mm deep cut in ali, and if you look closely, you will see it is leaving behind a mirror finish.
[ame]https://www.youtube.com/watch?v=FipAdIUr5OE[/ame]
John
I think it is about 2mm deep cut in ali, and if you look closely, you will see it is leaving behind a mirror finish.
[ame]https://www.youtube.com/watch?v=FipAdIUr5OE[/ame]
John
Last edited: