Pump Center

Home Model Engine Machinist Forum

Help Support Home Model Engine Machinist Forum:

This site may earn a commission from merchant affiliate links, including eBay, Amazon, and others.

Tin Falcon

Well-Known Member
Joined
Jul 9, 2007
Messages
7,207
Reaction score
788
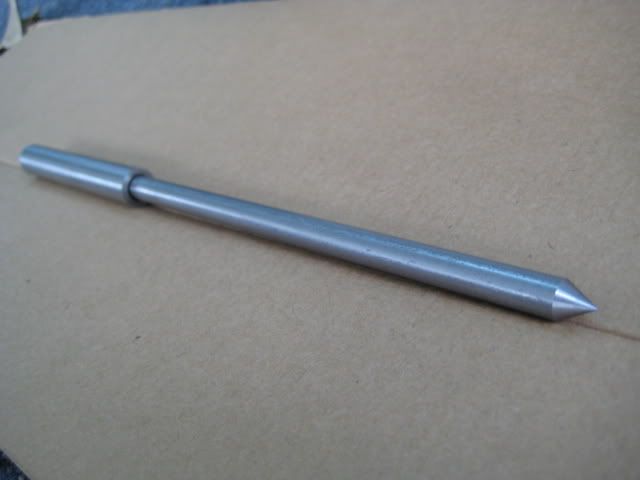
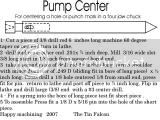
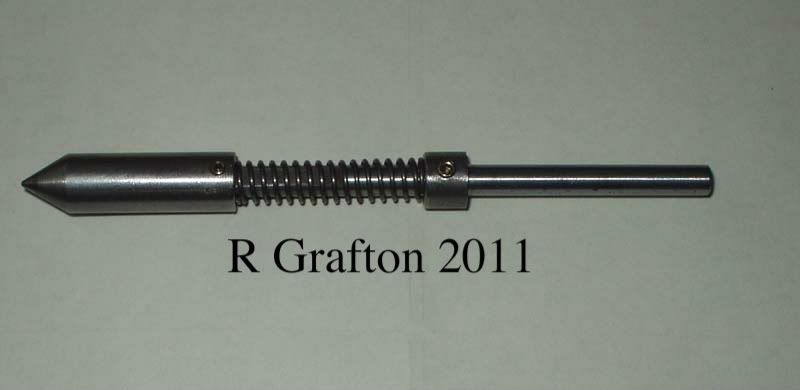
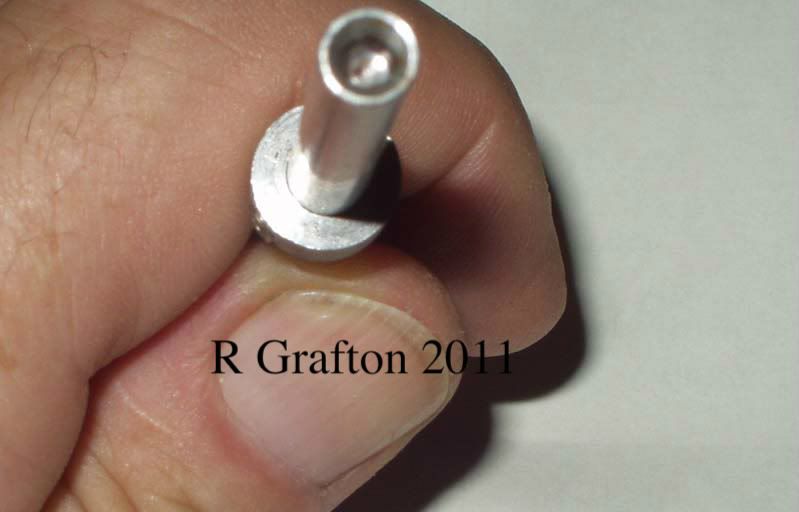
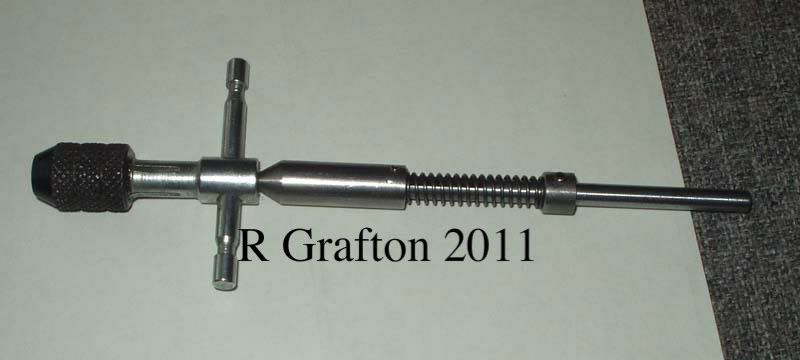
Guys this is what I use to center a punch mark or small hole in the 4 jaw chuck. the one I use came with a box of tools I bought. I decided I would sketch it up for anyone that wants to make there own. great simple starter lathe project . I am sure there are many variations to this. If your are sure of your measuring skills and fits you can start with a 7" piece of drill rod and make the little part first. the way I wrote it up gives the builder an opportunity to test fit the small piece before taking it out of the lathe and you can always bore the hole in the long piece or use a "D" bit if a reamer is not available. Most of the dimensions are not critical the important thing is the two pieces slide easily together before assembly
Tin

Pumpcenter.jpg
 
Tin Falcon: Is there a larger version of this image somewhere on the site?
 
Thanks for that TroyO. I've registered and you are right - there are lots of interesting bits there.
 
While a spring-loaded pump center is the preferred way to go, the spring-loading is not absolutely essential.

A simple rod with a 60 deg point on one end and a 60 deg center hole in the other end supported by a center in the tailstock will work if the workpiece isn't too far off center when you start.

Even simpler is a thinner, more flexible rod held in the TS chuck. As long as it can bend to follow the (slight) eccentric movement of the workpiece, it will get the job done.

In some cases, one can use the pointy end of an edge finder. Grasp in TS chuck with point in hole-to-be-centered and adjust chuck until there's no runout. This approach doesn't even require a DI. You can detect the misalignment with your fingernail or, if you require more precision, simply use a mike to measure across the interface between the point and the body of the edge finder. When that measurement is equal to the body diameter, you're done.
 
Hi
this is my pump centre,
pumpcentre.jpg


it's a dual purpose one, the blunt end is centered
centeredend.jpg


so with a centre in the tailstock it's a wobbler and with a chuck in the tailstock it's a spring tensioner for a tapholder
pumpcentrewithtapholder.jpg


very useful little gadget.

Roy.
 
I like the simplicity of Wheeltappers design - I'll take a shot at one tonight if I can find the bits in my inventory. Thanks everyone for taking the time to reply.
 
cheers for that :bow:
you'll notice a grubscrew in the blunt end of the pointy bit ( very descriptive here :big:).
there is a flat filed on the spindle , it stops about 2mm from the end. the grub is to stop the pointy bit going into orbit.

Roy
 
sorry I never went back and fixed that. Can not seem to find that file to updated in a better format . but it looks like folks have taken care of you.
Tin
 
I'm absolutely confused.

Why is it named a 'pump center'?
And I still don't know how to use one, when to use one, why to use one.
(Not that it helps if I did...I ain't got one.)

Thanks for the pics wheeltapper. I think I understand the last pic...center in the tailstock against the 'pump center' blunt end...pointy end of the 'pump center' against the tap handle. Spring provides pressure without having to adjust the tailstock. Is that right?

I'd be interested in knowing more.
 
Zee, I knew you had it in ya. :big:
 
Carl,

Imagine you have a workpiece in the 4J with a hole you want to center. Insert the male end of the pump center in the hole and support the (spring-loaded) female end with a center in the TS. The spring-loading keeps the male end pressed into the hole. As you rotate the chuck (and workpiece) the male end will oscillate due to the hole misalignment. Place a DI with an elephant foot against the male end to read oscillation and adjust jaws to center work.

It's discussed in my writeup of 4J centering.
 
Carl
to illustrate Marvs description here's a photo of setting up the eccentric strap on my latest effort

P6140483.jpg


Clock the pointy end for zero run out and Bobs your uncle! As a newbie to these techniques I have found it to be the simplest way to go for 4J centreing. I must say I haven't used it for tapping yet but can see the advantages especially with small taps

Regards

TerryT
 
Thinking out loud here - I guess if you're not after a huge degree of accuracy with the 4J you could just run the TS centre into your punch mark or centre hole, with a bit of dychem or chalk in the hole, and hand turn the chuck. The dychem etc would rub away letting you know how close to centre you are. Repeat as necessary. Interesting to confirm with a pump centre or edge finder to see how close you could get.
 
Very clear. Thanks very much everyone.

That also explains the 'center' portion of the name.
'pump'? Because of the spring?
 
Yep Zee, i believe the "pump" is in reference to the fact that it is able to move back and fourth along the Z axis. It's other name is a "Spring Center", which is slightly more clear.

Here's the one I made. As mentioned earlier, plans are available on ProjectsInMetal.com

100_0052.jpg


I use it more for tapping with small taps than for centering, and I don't just use it on the lathe. Here's an example of me using it on the mill. It really helps keep the tap aligned. I've never broken a tap while using it.

img_0935.jpg


This was actually the first project I ever made on the lathe and it's become one of my most regularly used tools. I can't believe how often I use it. You won't regret making one!

Tyler
ProjectsInMetal.com
 
One of my first projects too:

Parts:
IMG_1320.jpg


Assembled:
IMG_1318.jpg


That ProjectsInMetal design looks really nice--especially for tap holding. And I like the tailstock flag as well. More stuff for the projects to-do list.
 
Definitely a handy tool to have.

In my short hobby career I've already had several opportunities where that would be helpful.

Lathe certainly, but my mill doesn't have the room.

Is there any reason that would dictate the overall length of the pump/spring center other than, I guess, the spring?


Is there any reason that would dictate the overall length of the pump/spring center other than, I guess, the spring?

Z: it depends on the intended use. In my experience a pump center is relatively long and thin and used to cent a part in a 4 jaw chuck and there is only about 1/4 inch or so of movement. My spring center loaded tap guide needs more travel as to guide a tap and is larger diameter. I would think with a little creativity one could make one to function for both uses.
Tin
 
Zee, for tapping I use a short piece of broken end mill that was ground to a point. You could also make one out of drill rod or even mild steel.

It's the piece just above the V-blocks.

tn_tools.jpg


I use a longer piece of drill rod, about 8 inches, for a pump center. No springs at all in either one. For the tapping center I do have advance the quill each turn. Both have served me well for several years, though I've had an itch to make a spring-loaded tapping center.
 
Back
Top