Nose cone - ball turner (1st attempt)

Home Model Engine Machinist Forum

Help Support Home Model Engine Machinist Forum:

This site may earn a commission from merchant affiliate links, including eBay, Amazon, and others.
The more tricks and tips presented, the more flexible we all become as we encounter a tricky bit of challenging metal work. It definitely encourages mentally stepping outside of the box and increases one's comfort zone.

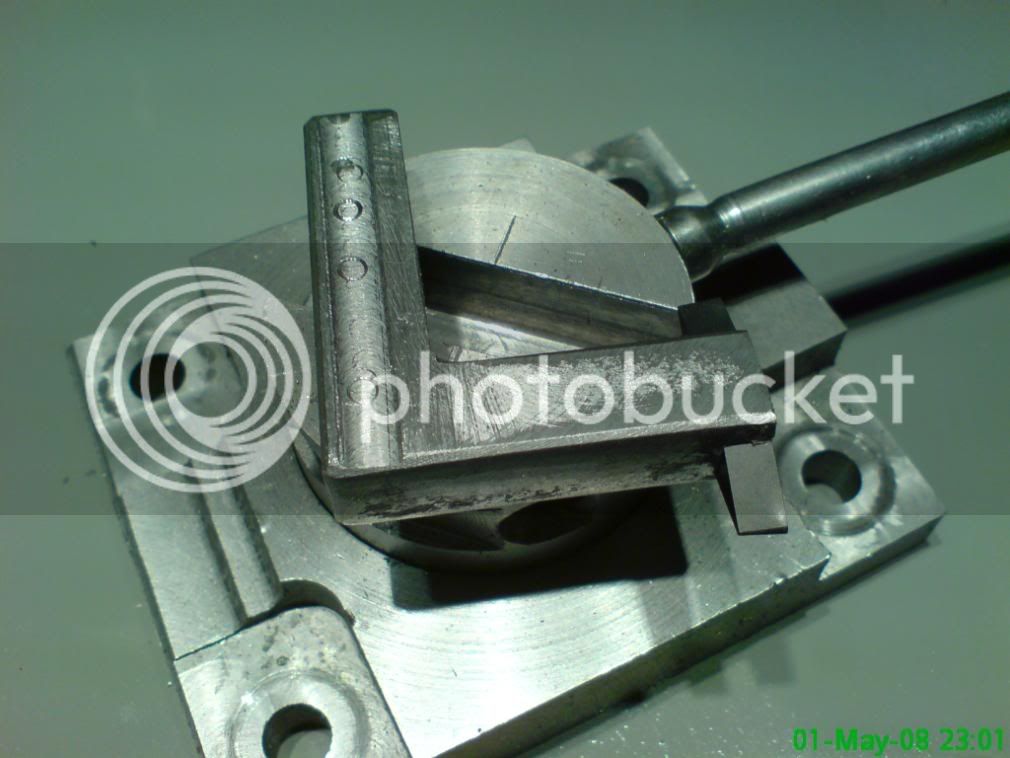
I not only have a ball turner... I built 3 different styles, basically because I was curious enough to want to see how each one performed. They are convenient for what they are and lots of fun to build and to use.

Having said that, I also use incremental cutting, freehand gravier, hand files, loads of sandpaper and now I'm beginning to adopt form tools. The point is that I use whatever works when the circumstances dictate it. I never wonder if it's what the pro's do and I don't worry if it's the "right" way. As long as everything stays well within the safety envelope, there are no barriers.

Heck.... I'll use just about anything that will get me to where I want to go. The family cat still hasn't forgiven me the day that I needed a small sable grade paint brush... even though the bare spots on his tail are long gone.

Keep sharing the techniques that work for you and I'll keep filing them away in my head until they are needed. That loud sucking sound, heard on the HMEM board, is made by us newbies absorbing all the great information this place makes available.

Thanks from all us newbies...
Steve
 
Tel,

A man after my own heart.

Swizzle, the perfect word for it.

If there isn't a word available, make one up that describes the action.

John
 
I think the (very minor) problem is that, if someone posts an alternate method without an introductory disclaimer (e.g., this is how I do it), it's easy for the OP to get the idea that we're criticizing his approach rather than embellishing the presentation with alternate ideas.

I know I'm guilty of this and I'm trying to sensitize myself about it but it still slips through. When I respond I'm thinking of all the folks who might read this in the future and trying to make each thread a smorgasbord of suggestions for those folks.

So, be advised to turn down the sensitivity on your annoyance filters. If you read my posting history, I think you'll see that knocking other people's way of working is the last thing on my mind. Furthermore, I suspect that's true of most of the other people who post here.

 
Aww Marv...
We all know you aren't one for getting anyone's goat. It's just the nature of communicating with typed words instead of normal speech. What is written meaning to be humorous often gets misconstrued. We all enjoy having you chime in. Things only gets out of hand if a couple of alpha males both want to pee on the same bush.

My shop wouldn't be half as much fun without your ingenious gadgets and being somewhat math challenged, I'd be completely lost without your calculator programs. I, for one, look forward to seeing a Marv post as much as a Bogster, Mcgyver... et al post. I'm always sure to learn something.

Steve
 
Well all is now calm on this post!! I don't know you leave a simple video post a few weeks back and then all hell breaks loose!! :big:
No one upset here John :D Just wanted to clear up any missconceptions ::)

I love it, so many new things to try, so many things to try to remember!! How will I ever make all the things in my head?! Not to mention all the things from your heads! Where will I find the time? (that's in general, not just balls... and ogives! :) )


It's all good ;D


Ralph.

 
Hi all,
I finally got some time to take some pictures of my ogive's that I needed to cut. Thanks to all of you for your help and especially Ralph for really taking time out to give me a hand.

Thanks
Walt
Ogive.jpg

RadiusCutter1.jpg

RadiusCutter.jpg
 
Nice curves Walt! ;D


Now you know the next curiosity question... What are they? ???
If it's top secret no worries. I'm happy That your happy :D


Ralph.

P.S. Unless you are talking to us through time?! I think your camera is a little out on it's date :big:
 
Actually, the CNC method does NOT resemble the incremental method at all. The tool path will follow the profile on CNC, more like what a ball turner does, or as a better example, what a hydraulic tracer does. There will be no "cut this little 1/8" to this depth and the next one to this depth and so on" with CNC. This is one reason why CNC guys are so uptight about backlash. Imagine the profile goes in and then back out, all the while continuously cutting. What happens to the backlash? :eek: Oops, now your part is wrong.

Not that there is anything wrong with incremental, just wanted folks to be clear on how it works in CNC. FWIW, I have done the incremental before. This is an easy thing to lay out in Excel to get your schedule of cuts.

It works great, but I did find it to be kind of monotonous. Consequently I prefer to use tapers with limited radiusing with a file for a lot of my machine knobs:

P1010375.JPG


That sort of thing goes really fast! I am pleasantly amused at how nicely a little lathe filing can turn out, particularly if you're turning 12L14 or something very free machining.

Cheers,

BW
 
The incremental cylcle is similar to the G71 Roughing cyle. It roughs out the shape with steps then it then makes a pass that is the final shape.
Tim
 
Thanks Ralph!

Can't really tell you what they are, but they will be used as a training aide where I work when finished. Now I just need to take some time and make a nice ball turner. I just threw this one together out of some junk I had laying around, just to experiment with my project.

Turns out the finished ones where a big success at work so I will probably be making a whole bunch of them(maybe hundreds $$$) :)

Thanks again!!

Walt
 
No worries Walt... Nudge, nudge, wink, wink, say no mowarh!! ;) ( tis hard to type in a monty python style!!)

I'll post a pic of a little mod I finally did on my turner that I've been meaning to do for months. Not right now, got to walk up a mountain (well a big hill!) but will post it later, simple but very nessersary I think! ;D


Ralph.
 
This was so simple and obvious from about a week after I made the tool but it took me ages to get around to it!! ::)

It is just a recess 0.3mm depth into both sides of the cutter carrier. The cut is 6mm wide and was set to remove the grubscrew marks that were in the tool, ensuring that the grubscrews would bite within the recess.

DSC01493.jpg


DSC01494.jpg


It simply stops the cutter carrier getting tight in the turret... doesn't sound like much but a few little burrs from the grubscrews and it's very difficult to remove or adjust the carrier.

-----------------------------------------------------------------------------------------------------------------------------------------

Just one more thing to try to help Dave (and anyone else) with alignment issues. I know it's a different tool but this is how I set this tool up, I think the principal would be very similar? (might explain my question about his cutting tool adjustment too?)


Hi all
I built a ball turner over a year ago and have use it several times now. But only I seem to only be able to make is an ogive cant quite get a ball maybe next week I will take it off the shelf and give it a nother try. Marv I would like to know what you have frogotten over the years. Ralph I'm with you on that one after 30+ years under the hood you forget the math because it makes your head hurt just like your back.
Excellent post in joyed every bit of it !!!!
Dave

This is to cut a ball not an ogive! :)


DSC01495.jpg


1) scribe a line through the centre of the main turret. (scribed lines to be permanent)

2) using a square, mark exactly the point from the tip of the tool onto the top of the tool carrier (see picture) and then using the square scribe a line across the carrier. You only have to do this once.. It must be accurate!

3) using your vernier calipers set the distance between the two lines of the turret and carrier to half the dia' of the workpiece.( I know that's called radius but I'm trying to say it as I do it!)

4) set the tip of the tool to just touch the end of the workpiece, lock the saddle, wind the crossslide back clear of the workpiece and you are ready to start cutting. Slowly moving the cross slide back in toward the workpiece as you rotate the cutter around the radius until your ball is created ;D .

DSC00932.jpg

I do a lot of pieces from the same dia' steel so I put a little extra line on for quick alignment ;)
DSC00933.jpg


DSC00934.jpg


DSC00935.jpg

C'est voila!! 1" stainless steel screw on Knob ;D


Hope this helps... I don't think there is anything more I can add to this post in the way of help with your balls ?! :eek:


Ralph.

 
Hi Guys
Finely got back to reading the post on this wow I have learned a ton (again ). Marv I like the way you align the tool I will try to incorporate that in my turner vary simple solution as my dad allways said KSS (keep it simple stupid!) Ralph if you look at the first pic I adjust the cutter with the set screw up and down the shaft, there is a flat milled top to bottom I believe that's what you were looking for? I can see now some of the reason's this tool is not performing as I had hoped . And one is because it is fixed at the pivot points. At the time I made this I had no ideal that would determine the size of the ball, it hit me like an Iron skillet in my wife's hand after reading that. I am re thinking this completely. As soon as time allowes I will finish up the one I have started that is similar to yours Ralph. Thanks to all who posted. there is much needed Info here for a newbie. I will keep you posted ???
Dave
 
d-m said:
Ralph if you look at the first pic I adjust the cutter with the set screw up and down the shaft, there is a flat milled top to bottom I believe that's what you were looking for?

Dave,


Unless I'm missing something here (entirely possible!! ??? ) Wouldn't the Z axis adjustment you describe would only aid in setting tool centre height?
I was trying to see where the X axis adjustment came from? The cutting tool looks too short to be extendable?
If it cannot be lengthened or shortened then how can you adjust the arc for the tool to cut along? I could only imagine it cutting a very limited size range?

On Steve Bedair's tool the arc is adjustable by altering the gap between the swivel axis and the cutting tip (hence the lines scribed onto mine)

I don't want to be seen as a screaming loony on this subject (too late they say!) I'm just trying to understand your tooling to try to aid in it's use :)


Ralph.
 
Hi Ralph
And that is the biggest set back is that there is no X axis adjustment except for moving the tool in and out of the holder longer tool smaller ball.
I cant find the web page I copied the tool from but I did find this one below,as you can see the too has to holes in the bit holder for what I would think is 2 size ball's? Like I said I learn some thing all the time here !!!!!! I was thinking last night that if it was mounted to the cross slide set at 90 it would make a larger ball but this morning I realized that buy doing that you still haven't incrested the distance from the axes. So this tool of mine is a good tool but vary limited to size of ball you can turn ??????????
Dave
Ps
your not looney ;D

http://www.nucleus.com/~harlan/ball.html
 
Dave,

If you look at the tool on Harlan's site you can see what I was thinking of... the tool is passed through the centre of the Z axis, so it can not only be moved between the two sets of grubscrews but the tool length itself can be altered using it's grub screw.
Just a little rethink and I am sure you could have yours adjusting in this way? ;)

The scale on Bob's tool is very neat, I saw it a while ago but decided that it was unnecessary (for me) since I am so use to using my calc' and digital vernier to split the dia' as exactly as I can (not to mention I haven't got a rule narrow enough!). I know it is not always necessary to try to be so accurate but I always challenge myself to obtain the target sphere ;D

Just looking back at Steve's site I remembered how much I altered his design myself, I have a much thicker baseplate, a double recessed shoulder for the turret for greater rigidity and My own cutter idea... It's good to rethink now and again ;)


Ralph.
 
Ralph'
Got to say I've really enjoyed this thread, your "spherical" turner is great ;D ......... once I have the means it's one of the first projects on my list ;)

Dave
 
Thank you Dave (CC).

It has been fun trying to figure out how to express the set up processes etc. I bet some people have read it twice and still wondered what the hell I'm blathering on about... I know I have! :big:

The tool is not mine Dave... It is the very selfless Steve Bedair's... I just borrowed it!! ;D His instructions are very easily followed, I made most of it before I got my mill' and then finished it of very excitedly when that arrived :D

When you make yours You'll be a happy man ;D


Ralph.
 
Back
Top