A crank for a cranky old man's lathe

Home Model Engine Machinist Forum

Help Support Home Model Engine Machinist Forum:

This site may earn a commission from merchant affiliate links, including eBay, Amazon, and others.

mklotz

Well-Known Member
Joined
Aug 29, 2007
Messages
3,047
Reaction score
27
Location
LA, CA, USA
My lathe has a threaded spindle with no lock and I'm in the nasty habit (listen up here newbies!) of engaging the backgear to lock the spindle so I can get leverage to unscrew the chucks. Everytime I do this I keep telling myself, "One of these days you're going to do this and hear a ping as a tooth comes off the bull gear."

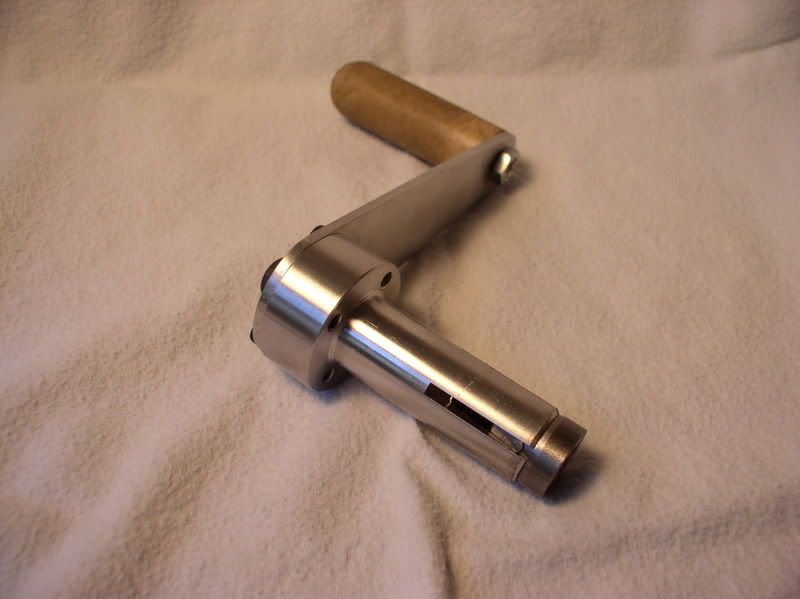
I finally collected a couple of round tuits and made myself a crank for the spindle. The first photo shows the component parts. On one end of the crank is a free-wheeling handle. On the other end is an aluminum 'gripper' that will expand to grip the inside of the spindle. In front is the conical expander nut and the draw-in bolt that activates it. I chose aluminum for the gripper so that it wouldn't mar the bore of the spindle (not that I think that's terribly important).

CRANK1.jpg


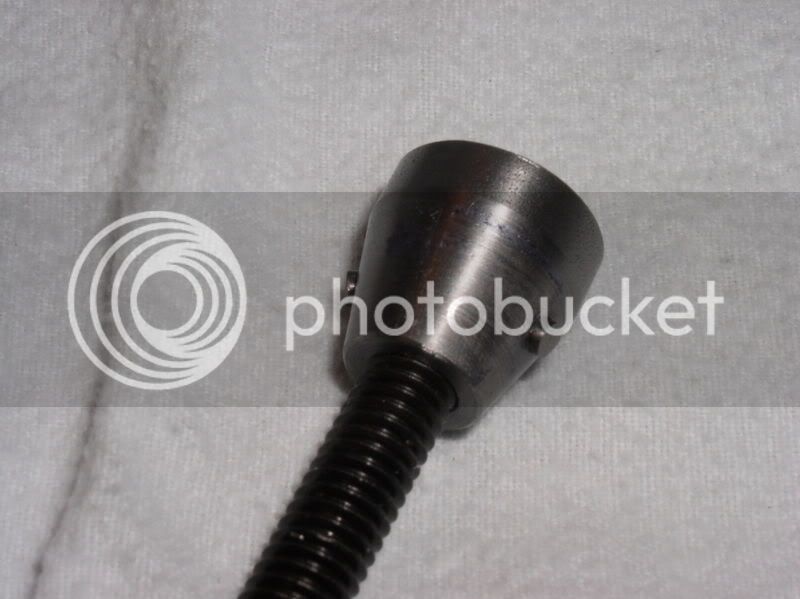
Here you see the bolt and expander nut installed in the gripper.

CRANK2.jpg


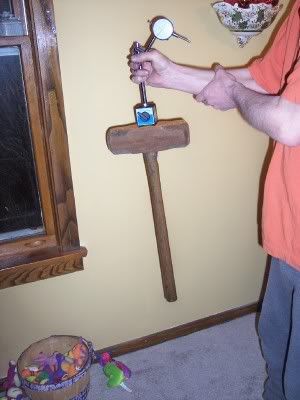
And here is how the whole assembly mounts to the lathe.

CRANK3.jpg


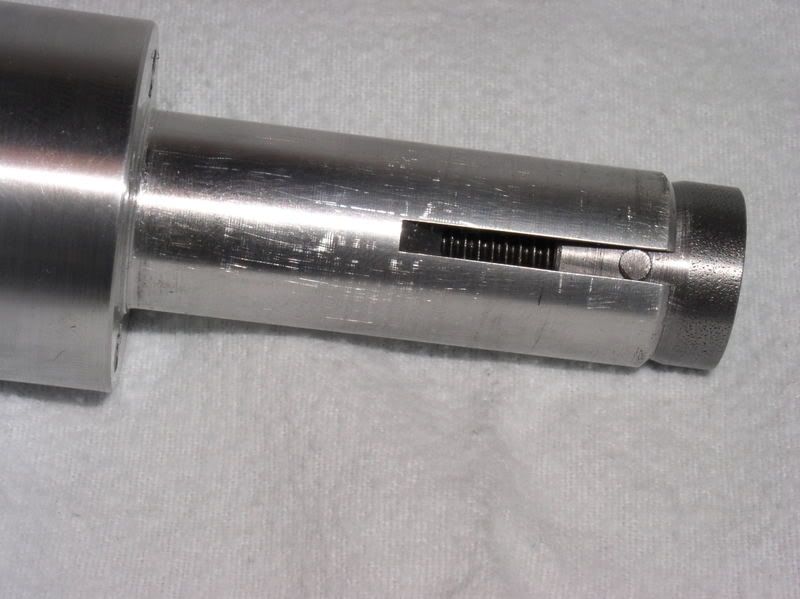
The expander gets a real death-grip on the spindle with only about a half turn on the draw-in bolt. Removing stuck chucks is really easy now. [Even if you oil the threads before mounting the chuck, which I do, the turning forces will tighten up that thread very nicely. A crash, not that I've ever had any :), will really lock things up.]

Of course, the other important use for the crank is to turn the chuck by hand when threading up to a shoulder. Imagine putting three or four fine threads up to a shoulder on a delicate camera filter mounting ring or telescope eyepiece adaptor. Doing it under power is way beyond my skill set whereas with the hand crank it's an easy job.

This was a fun job. I normally make tiny model parts so the chance to make big stuff where every measurement and machining step is easily seen and accomplished is a welcome break.
 
Good job Marv.

Now whats the testube for in the first picture? ;D

Eric
 
Hey Marv,

You might want to mention to the newbies that one should remove the handle before starting the lathe. Anybody standing within stricking distance would get one nasty surprise, especialy if the lathe is set to a high RPM. Hate to see somebody get the snot flailed out of them, unless they needed it ofcourse. ::)

Bernd
 
Bernd said:
You might want to mention to the newbies that one should remove the handle before starting the lathe. Anybody standing within stricking distance would get one nasty surprise, especialy if the lathe is set to a high RPM. Hate to see somebody get the snot flailed out of them, unless they needed it ofcourse. ::)

Bernd,

It's hard to believe that such a warning is needed but you're absolutely correct.

NEWBIES (AND EVERYBODY ELSE TOO) LISTEN UP

If you use the backgear to lock the lathe spindle (a bad idea as I mentioned above), first make some sort of lockout for your lathe power. I cut out a small plywood lockout tab that hangs down over the power switch. A slot in the tab fits over the switch and, when in place, makes it impossible to turn the switch.

I forced myself to develop the muscle memory to put this in place before engaging the backgear. I can't tell you how often, in the heat of making something, I reached down to turn on the lathe and found that damn tab in the way - saved me from many potentially messy and dangerous (to the lathe) mistakes.

I should point out that I still use the lockout tab when using the crank. In fact, I use it whenever I'm doing something on the lathe which would lead to disaster if the lathe were unexpectedly energized.

Although I have a somewhat different arrangement on my mill (two power switches in series - one in an awkward, out-of-the-way location), I recommend that all of you make effective lockouts for all your dangerous machine tools so you won't create any nasty surprises for yourself.
 
Four 10-32 SHCS pass through holes in the bar and are threaded into the gripper.
 
Hi guys. I've been lurking for awhile, but just had to put my $.02 in about this one.

It looks great. I need to make one myself.

The only suggestion I would make is to figure out something to prevent the conical piece from spinning. If you got it locked into your bore and then found that the conical piece was just spinning instead of loosening, you might have to resort to a big hammer to get it out. That might make for a pretty bad day.
 
When I first built it, I considered putting a pin into the conical nut, said pin to ride in one of the grooves and prevent the nut turning relative to the gripper.

I soon discovered though that the nut locks up very quickly and doesn't spin plus, when the bolt is loosened, the steep taper on the nut ensures that it pushes out of the gripper to free the unit.

However, all this may be a happy consequence of the particular geometry and materials I chose. If you build your own, consider the pin in the conical nut.
 
One more question before I go to the shop to build one. What is the taper on the expander nut, and the does the gripper have a taper in it also?
Ok sorry that was two questions.
John T
 
I made a lever of sorts to be used to lock the spindle while unscrewing a stuck chuck...Yeah I did that right first thing after I busted 3 teeth off the backgear wrassleing with a tight one...So I can attest to the value of making one of those lathe acessories.
 
G'day Cranky

Some have used an internal clamp arrangement much like bicycle handle bars. What is general oppinion regarding this method over Cranky's expanding bolt?

Regards,
Ian
 
J. Tranter said:
One more question before I go to the shop to build one. What is the taper on the expander nut, and the does the gripper have a taper in it also?
Ok sorry that was two questions.
John T

I think the taper is about 17 degrees although I doubt that it is critical. I chose what I used so that about one third of the tapered nut would be inside the gripper before it started to expand.

An internal taper would be more elegant but I didn't use one. This was one of those tools that I needed but didn't really want to spend the time building so I went for the simplest approach that I thought would work.
 
Hi Marv,

I finally got around to making mine. I added a couple pins to prevent the expanding plug from turning. It works like a charm and was a lot simpler to make than the contraption I was dreaming up. Now I can't wait for my next threading job... sort of.

P1010002.jpg


Here's the pins I added to the expanding plug...

P1010003.jpg


They just ride in two of the slots in the gripper thingy.

P1010007.jpg


BTW, I used 15 degrees for the tapers. Works great.
 
Marv, I’ve been reading your post on the handle to turn the spindle of your lathe forever what your need. I built mine to thread on my Grizzly lathe that will only go as slow as 150 RPM. I found the idea from Mr. Ishiamura’s web sit http://homepage3.nifty.com/amigos/handle/mandrel_handle-e.htm
I’ve used the crank handle for a couple of years now and it’s worked fine. BUT the other day while making a piece for the engine I’m building I forgot the handle was in the spindle and made the mistake of hitting the start button and guess what! That loud wirrrrrring sound (new to my ears) scared the hell out of me! Yep the handle was still in the spindle. Not any one of us is beyond pulling of a stupid mistake like this and I was lucky I didn’t get a broken wrist or worst.
To night when I saw the handle that dave e made, I thought why in hell didn’t I thing of this before.
The handle should be made using a 3/8 or ½ “ ratchet wrench handle so if you did a stupid thing like I did, it would only (or at least it should) set there and spin and not fling the handle around like a missile?
I’m going to dedicate one of my cheep Chinese made ratchets to a new threading handle tomorrow.
Thanks for the Idea
Mel
 
Mel,

Please go back and read what I wrote (earlier in this thread) about using a lockout tab on the lathe power switch when doing anything that could be dangerous if the lathe was energized without thinking.

Your concern is a genuine one and something definitely needs to be done to protect oneself when doing stuff where an inadvertent start of the machine could endanger the operator or the machine.

The solutions I described work for me but there is nothing sacred about them. It's important that you design a lockout technique that works for you and takes into account your own mentality. Depending on how methodical you are (or are not), you may have to employ something more complicated than what I use. If one is truly scatterbrained (and I'm certainly not suggesting that *you* are), this may mean something as complicated as a microswitch in series with the lathe power hidden in a fixture that requires laying the crank in the fixture before power can flow to the lathe (a technique used by more than a few for the chuck key on a drill press).

Also note that it's just as important to have a lockout arrangement for the mill. Imagine inadvertently starting the mill while the tramming gizmo is held in the collet. There are probably other power tools in your shop that deserve a lockout mechanism.

Puzzle out what works for you and put it in place.
 
It occurs to a newbie that something along the line of the old crank handle
for starting cars may be in order, when the engine fired it automatically
disengaged. Mind you I was taught never to wrap my thumb around the
handle just for the one time it did,nt disengage.
 
For myself, I have simply vowed that I will ALWAYS remove the drive belt when I plug in the handle. It only takes about 5 seconds to remove it. That makes it safe and has the added bonus of making the lathe turn easier. I've already affixed a big warning label to the handle to remind me to do it.
 
I just received my "Special of the Week" from LMS.
It is for an import magnetic indicator base.
Here it is: LMS Special of the Week

A few months back I bought that same base from Harbor Freight.
I posted this photo here of it picking up my 20 pound hammer.

HFMagBaseHammer.jpg


Rick
 

Latest posts

Back
Top