


I expect a lot of static from the perfectionists on this but I am a hobbyist and I get as much enjoyment out of the trip as the destination. I spend more time making tools than making models. I only use carbide tools when the metal is too hard for HSS and these threading bits show what is possible. I probably have 20 bits ground to 60° made for specific purpose and they were all made to solve an immediate problem.
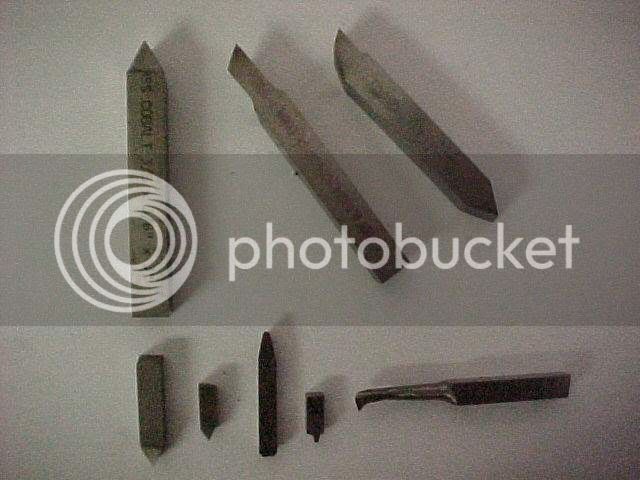
The first bit in the picture is a conventional looking threading tool but it has one drawback. You cannot thread close to the chuck or close to a a shoulder with it. The next two bits solve those problems. By grinding the bit at an angle, you move the compound away from the chuck jaws. By grinding all the material off one side, you can get close to a shoulder
The first two bits on the bottom row are conventional bits for a boring bar. The 1/4" bit for big holes and the 3/16" for a smaller bar. The next bit is for acme thread (about 8 TPI) and the next one is for a small boring bar about 10 TPI.
The last one was just chopped out of a 1/4" lathe bit to thread a replacement collet nut on a Starrett Last Word indicator.
The point I am trying to make is not to fear threading. You are not making parts to NASA specs. Take a piece of HSS steel and your fishtail and try to get close to the 60° gauge. Leave the top of the bit flat but you need relief under the point. Look at the end of your bit and visualize how it is going to sit in the thread when you reach the total depth. Don't forget that the thread is sitting at an angle to your tool and relief must be ground to accommodate that. On an inside thread, on small holes you need a lot of back relief. On left hand threads the relief is on the opposite side.
Unlike carbide, where a mistake costs dollars, you can spend the rest of your life changing the shape of a $2.00 HSS lathe bit. If you mess it up, try again. Eventually, it become routine and when you need a special application, you just grind it and carry on.
Personally, I am long past my best work. With bad eyes and shaky hands I do what I can and still have fun, which is why I started it in the first place.
")